Master Shading: The Ultimate Guide to Shading Techniques for Drawing for Beginners
Have you ever looked at a professional drawing and wondered how a simple pencil can create such a realistic, three-dimensional effect? The secret lies in one fundamental skill: shading. Shading is the process of applying varying levels of darkness to a drawing to create the illusion of form, depth, and light.
For many beginners, the transition from drawing flat outlines to creating realistic shapes can feel overwhelming. However, mastering shading techniques for drawing is not about innate talent; it is about understanding how light interacts with objects and practicing specific pencil movements.
In this comprehensive guide, you will learn the essential principles of light, the tools you need, and a step-by-step breakdown of the most effective shading techniques to elevate your artwork from amateur to professional.
1. Understanding the Science of Light and Shadow
Before you touch your pencil to paper, you must understand how light works. Without a clear light source, your shading will appear muddy and inconsistent.
The Light Source
The light source is the origin of light hitting your object (e.g., the sun, a lamp, or a window). Once you determine the direction of the light, you can predict where the highlights and shadows will fall.
The Five Elements of Shading
To create a realistic 3D effect, you must incorporate these five elements into every object you draw:
- Highlight: The brightest area where the light hits the object directly.
- Midtone (Halftone): The actual color or value of the object, located between the highlight and the shadow.
- Core Shadow: The darkest area on the object itself, where the light cannot reach.
- Reflected Light: A small strip of light at the edge of the object, caused by light bouncing off the surface the object sits on.
- Cast Shadow: The shadow thrown by the object onto the surrounding surface. This is usually darkest near the base of the object.
2. Essential Tools for Shading Success
While you can start with a standard school pencil, using professional tools will significantly improve your results.
The Graphite Grading Scale
Pencils are graded by their hardness (H) and blackness (B).
- H Pencils (Hard): These produce light, fine lines. They are excellent for initial sketches and very light highlights.
- B Pencils (Black/Soft): These contain more graphite and less binder, producing darker, richer tones. A 2B, 4B, and 6B are essential for deep shadows.
- HB Pencil: The middle ground, similar to a standard #2 pencil.
Blending Tools
- Blending Stumps (Tortillons): Rolled paper sticks used to smudge and smooth graphite transitions.
- Tissue or Cotton Swabs: Ideal for softening large areas.
- Your Fingers (Not Recommended): Avoid using your fingers, as the natural oils on your skin can stain the paper and make shading look blotchy.
Erasers
- Kneaded Eraser: A “putty” eraser that can be molded into points to lift graphite for highlights without damaging the paper.
- Plastic/Vinyl Eraser: Used for clean, sharp edges.
3. The Value Scale: Your Roadmap to Depth
One of the biggest mistakes beginners make is not using enough contrast. To avoid “flat” drawings, you must master the Value Scale.
A Value Scale is a chart showing a range of tones from the lightest white to the darkest black.
- Low Contrast: Using only a few values close to each other (makes art look grey and dull).
- High Contrast: Using a full range of values from 1 to 10 (makes art look dynamic and 3D).
Pro Tip: Practice drawing a 9-step value scale box. Try to make the transition from one box to the next as distinct as possible.
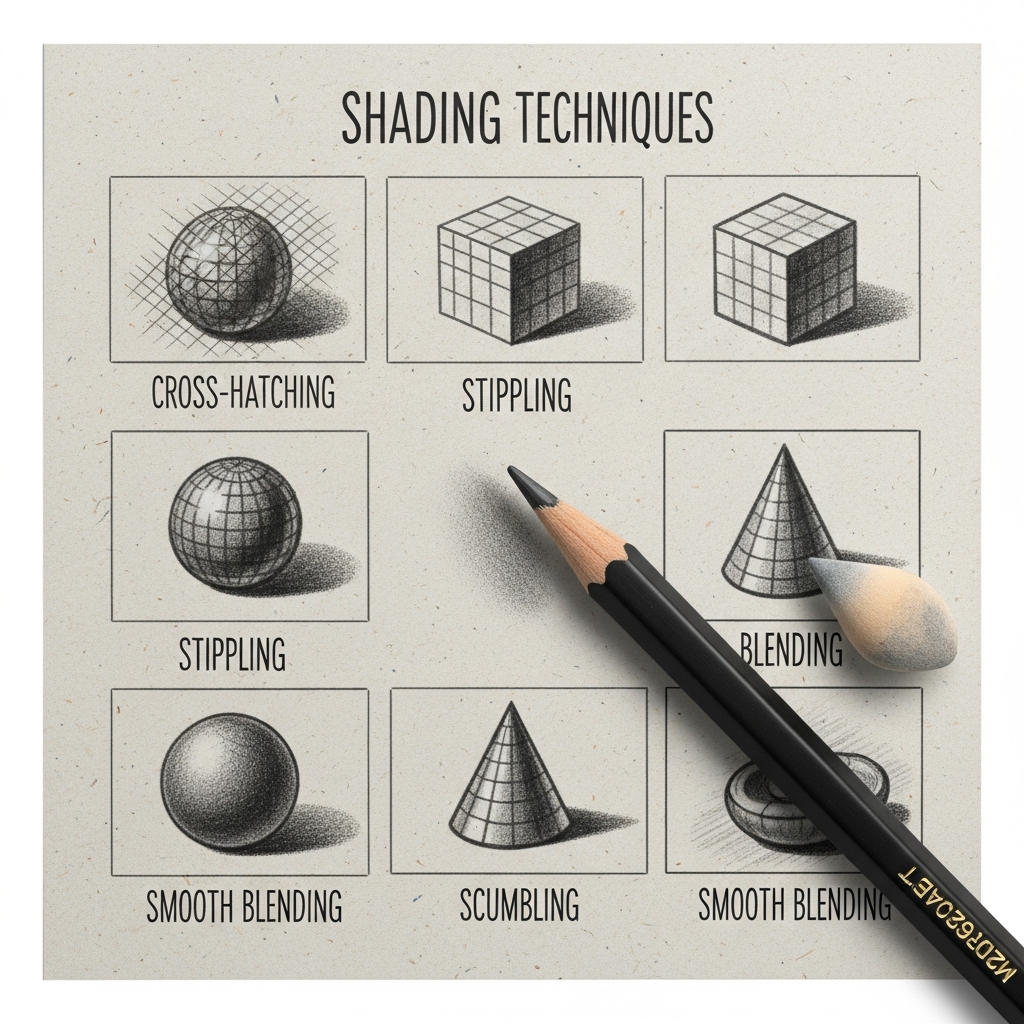
4. Core Shading Techniques for Drawing
There are several ways to apply graphite to create value. Each technique offers a different texture and “feel” to the drawing.
A. Hatching
Hatching involves drawing a series of parallel lines. The closer the lines are together, the darker the area appears.
- Best for: Quick sketches, architectural drawings, and subtle shadows.
- How to do it: Keep your hand relaxed and flick the pencil in one direction.
B. Cross-Hatching
This is an extension of hatching. You draw one set of parallel lines and then layer another set of lines in the opposite direction (forming an “X” or grid pattern).
- Best for: Creating deep shadows and adding rich texture.
- How to do it: Layer multiple angles of lines to build up darkness gradually.
C. Stippling
Stippling is the process of creating value using thousands of tiny dots.
- Best for: High-detail work and unique textures.
- How to do it: This requires patience. Use a sharp pencil and vary the density of the dots. More dots = darker shadow.
D. Blending (Smooth Shading)
This is the most popular technique for realistic portraits. You apply graphite and then use a blending tool to create a seamless transition.
- Best for: Skin tones, smooth surfaces, and realistic rendering.
- How to do it: Apply light layers of graphite in a circular motion, then gently use a tortillon to smooth the edges.
E. Circulism (The “Scribble” Technique)
Circulism involves drawing tiny, overlapping circles.
- Best for: Drawing skin textures, fabric, or curly hair.
- How to do it: Keep the circles small and tight. Avoid leaving gaps if you want a smooth look.
5. Step-by-Step Guide: Shading a Sphere
The sphere is the ultimate practice shape because it incorporates every element of light and shadow.
Step 1: Draw a Circle
Use an H or HB pencil to draw a light circle. Do not press hard, as you may need to adjust the shape later.
Step 2: Identify the Light Source
Draw a small arrow in the top corner to indicate where the light is coming from.
Step 3: Map the Shadows
Lightly outline the area for the highlight and the core shadow. This acts as a “map” for your pencil.
Step 4: Apply the Midtones
Using a 2B pencil, fill in the area around the highlight with a light, even layer of graphite. Use the blending or circulism technique.
Step 5: Add the Core Shadow
Switch to a 4B or 6B pencil. Darken the side of the sphere furthest from the light. Remember to leave a small sliver of reflected light at the very edge.
Step 6: Create the Cast Shadow
Draw an oval shape on the ground opposite the light source. Make it darkest right where the sphere touches the surface and fade it out as it moves away.
Step 7: Refine and Blend
Use your kneaded eraser to “pop” the highlight. Use a blending stump to smooth the transitions between the midtones and the core shadow.
6. How to Shade Different Textures
Once you master basic shapes, you can apply shading techniques to specific textures.
1. Metallic Surfaces
Metal has high contrast. This means you will have very bright highlights right next to very dark shadows. Do not blend too much; keep the transitions sharp.
2. Fabric and Folds
Folds in cloth create “valleys” and “peaks.” The peaks catch the light (highlights), while the valleys are tucked away in deep shadow. Use soft blending for a natural look.
3. Human Skin
Skin is never perfectly smooth. Use circulism to mimic the natural pores of the skin and avoid over-blending, which can make the person look like they are made of plastic.
7. Common Shading Mistakes to Avoid
Even experienced artists fall into these traps. Being aware of them will accelerate your progress.
- The “Outline” Trap: Beginners often leave a dark outline around their objects. In reality, objects are defined by the contrast between their value and the background, not a black line.
- Fear of Dark Values: Many students are afraid to use 6B or 8B pencils. If your drawing looks “flat,” it’s likely because your shadows aren’t dark enough.
- Over-Smudging: If you blend everything, your drawing will lose its definition and look “muddy.” Keep some areas sharp to maintain clarity.
- Ignoring the Background: A shaded object looks much more realistic if the background also has some value.
8. Expert Tips for Improving Your Shading
- Sharpen Regularly: A dull pencil makes it hard to control the value. Keep your pencils sharp for precision.
- Work from Light to Dark: It is much easier to add graphite than it is to remove it. Start with your H pencils and gradually build up to your B pencils.
- Use a Protective Sheet: Place a clean piece of paper under your hand while you draw. This prevents your hand from smearing the work you’ve already finished.
- Squint Your Eyes: When looking at your reference photo, squint. This blurs the details and allows you to see the broad areas of light and dark more clearly.
9. Frequently Asked Questions (FAQ)
Which pencil is best for shading?
For beginners, a 2B pencil is the most versatile. However, for a full range of values, you should have at least an HB (light), 2B (medium), and 4B or 6B (dark).
How do I stop my shading from looking messy?
Messy shading usually happens when you use your fingers to blend or when you don’t use a consistent technique. Use a blending stump and keep your pencil strokes in the same direction to maintain a clean look.
Can I shade with a mechanical pencil?
Yes, but it is more difficult for large areas. Mechanical pencils have very thin leads that can leave “grooves” in the paper. They are best used for fine details and sharp edges.
How long does it take to learn shading?
The theory can be learned in a day, but the muscle memory and “artist’s eye” take practice. If you practice the sphere exercise for 15 minutes a day, you will see significant improvement within two weeks.
Conclusion
Mastering shading techniques for drawing is the single most important step in moving from a beginner to an intermediate artist. By understanding light sources, practicing the value scale, and experimenting with techniques like hatching and blending, you gain the power to bring any subject to life.
Remember, every professional artist started where you are now. Do not be discouraged by initial “muddy” drawings. Grab your 2B pencil, find a simple object, and start observing the light. Your journey to creating breathtaking, realistic art begins with a single shadow.