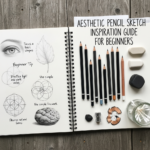
Learning to shade can transform your flat sketches into vibrant, three-dimensional forms, breathing life and depth into your artwork. For beginners, the journey of understanding and applying shading techniques for drawing is both exciting and incredibly rewarding, as it unveils the magic of light and shadow on paper. With the right approach and consistent practice, anyone can master the art of shading, elevating their drawings from simple outlines to realistic masterpieces. The core idea is to understand how light interacts with objects, creating highlights, mid-tones, and shadows, which are then meticulously translated onto your drawing surface.

When I first started drawing, many years ago, my sketches often felt…well, flat. I could capture the outline of an apple or a simple vase, but they lacked any real sense of weight or presence. It was like looking at a cardboard cutout. Then, a kind art instructor introduced me to the fundamental principles of shading, and it was a revelation. I remember spending hours just shading a simple sphere, trying to understand how the light wrapped around its form, creating subtle gradations. That experience, though challenging at first, was the turning point that truly ignited my passion for realistic drawing. It showed me that art wasn’t just about lines, but about observing and interpreting the world’s endless dance of light and darkness. This guide aims to provide you with the same foundational understanding and practical steps for mastering shading techniques for drawing guide for beginners.
The Fundamentals of Light and Shadow
Before diving into specific drawing techniques, it’s essential to grasp the basic principles of light and shadow. These elements are the building blocks of realistic shading. Without a solid understanding, even the most advanced shading techniques will fall flat. Shading is essentially the process of applying value or tone to a drawing to represent light, shadow, and form. By carefully manipulating these tonal changes, artists can simulate how light interacts with surfaces, making objects appear three-dimensional and realistic.
Understanding the Light Source
The light source is the origin of light in your drawing and is the most crucial factor determining how shadows and highlights fall on an object. Knowing its direction, distance, and intensity allows you to accurately predict how light and shadow will behave on any form. For instance, a strong, direct light source, like the sun, creates sharp, well-defined shadows, while a diffused light source, such as an overcast sky, produces softer, less distinct shadows.
Consider the simple act of placing an object under a single lamp. If the lamp is directly above, shadows will be short and concentrated beneath the object. If the lamp is to the side, shadows will stretch, revealing more about the object’s form and the surface it rests upon. This predictability means that with a consistent light source, you can reliably map out your light and shadow patterns. This understanding is foundational for any aspiring artist beginning their journey with shading techniques for drawing guide for beginners.
Key Elements of Light and Shadow
To effectively apply shading techniques for drawing guide for beginners, you must familiarize yourself with specific terms that describe how light interacts with an object:
- Highlight: This is the brightest area on an object, where the light source directly reflects off the surface. It’s typically the lightest part of your drawing and should often remain the color of your paper, or very close to it. The position of the highlight shifts based on the light source and the viewer’s position.
- Mid-tones (Halftones): These are the transitional values between the highlight and the core shadow. They gradually shift from light to dark, giving the object its sense of form and volume. Mastering these subtle gradations is key to achieving smooth, realistic shading.
- Core Shadow: This is the darkest area on the object itself, where light does not reach directly. It defines the volume and shape of an object and is crucial for creating depth. The core shadow is not uniform; its darkest point is often referred to as the “form shadow core.”
- Reflected Light: A subtle area of lighter tone found within the form shadow, caused by light bouncing off nearby surfaces onto the shadowed part of the object. Ignoring reflected light can make your drawing look flat, as it adds realism and depth to the shadows.
- Cast Shadow: This is the shadow that the object projects onto the surrounding surfaces, not on the object itself. The shape and direction of the cast shadow are determined by the light source and the object’s form. Cast shadows often have sharper edges closer to the object and become softer as they extend away.
When learning to shade, remember to separate the light and shadow areas first, rather than focusing on color changes. This fundamental separation helps prevent your drawings from appearing flat and lifeless. By meticulously observing these elements, you’ll gain an intuitive understanding of how to apply shading techniques for drawing guide for beginners.
Essential Tools for Shading Beginners
Having the right tools is paramount when you embark on mastering shading techniques for drawing guide for beginners. While expensive supplies aren’t necessary, a few quality items can significantly enhance your learning experience and the outcome of your artwork.
Pencils: Your Primary Shading Instruments
Graphite pencils are the most popular choice for drawing and shading, offering versatility and control. They come in a wide range of grades, from hard (H) to soft (B), with HB being in the middle.
- H Pencils (Harder): These pencils have harder graphite, producing lighter and more precise lines. They are excellent for initial sketches, fine details, and creating light tones without pressing hard. Examples include 2H, 4H.
- HB Pencil (Medium): This is a versatile, medium-hard pencil, ideal for general drawing and initial sketches. It’s a good all-rounder for starting your value range.
- B Pencils (Softer/Blacker): These pencils have softer graphite, creating darker, bolder marks, and richer tones. The higher the number (e.g., 2B, 4B, 6B, 8B), the softer and darker the pencil will be, perfect for deep shadows. Softer pencils allow you to achieve a wide range of values without excessive pressure, crucial for mastering shading techniques for drawing guide for beginners.
For beginners, a recommended set includes HB, 2B, 4B, and 6B pencils. Some sources also suggest including an 8B for truly dark areas. Brands like Faber-Castell 9000 Series and Staedtler Mars Lumograph are highly recommended for their quality and range of values.
Blending Tools
Blending is crucial for achieving smooth transitions between tones and softening harsh edges, a key aspect of realistic shading techniques for drawing guide for beginners.
- Blending Stumps (Tortillons): Made of tightly rolled paper with pointed ends, these tools are excellent for softening pencil marks and creating smooth gradients. They can be used to smudge small or larger areas and can be cleaned with sandpaper.
- Fingers: While convenient, using your fingers can transfer oils from your skin to the paper, potentially leaving smudges or marks that are difficult to remove. It’s generally advised to use dedicated blending tools.
- Cotton Swabs/Q-Tips: These can also be used for blending, especially in smaller areas, offering a softer touch than stumps.
- Tissues: A piece of tissue can be very effective for blending larger areas, creating a soft, even tone.
Erasers
Erasers are not just for mistakes; they are also valuable shading tools.
- Kneaded Eraser: This pliable eraser can be molded into various shapes to lift graphite gently, allowing for highlights and subtle lightening of shaded areas without damaging the paper.
- Rubber/Plastic Eraser: A standard eraser effectively removes marks cleanly.
- Battery-Operated Eraser: An optional tool for precise erasing and creating sharp highlights.
Paper
The type of paper you use can impact your shading.
- Smooth Paper: Often labeled “fine tooth” or “light grain,” smooth paper works well for smooth blending and detailed shading techniques.
- Textured Paper: Paper with more tooth provides a good grip for looser styles and expressive lines, but may not allow for extremely smooth shading.
For practice, cheap sketchbooks are often recommended to remove the pressure of “wasting” good paper and encourage experimentation. However, once you gain confidence, upgrading to sturdier paper can be very rewarding.
Fundamental Shading Techniques For Drawing Guide For Beginners
Now that you understand the principles of light and shadow and have your tools ready, let’s explore the core shading techniques that will bring your drawings to life. Mastering these methods is key to developing your skills as an artist and applying effective shading techniques for drawing guide for beginners.
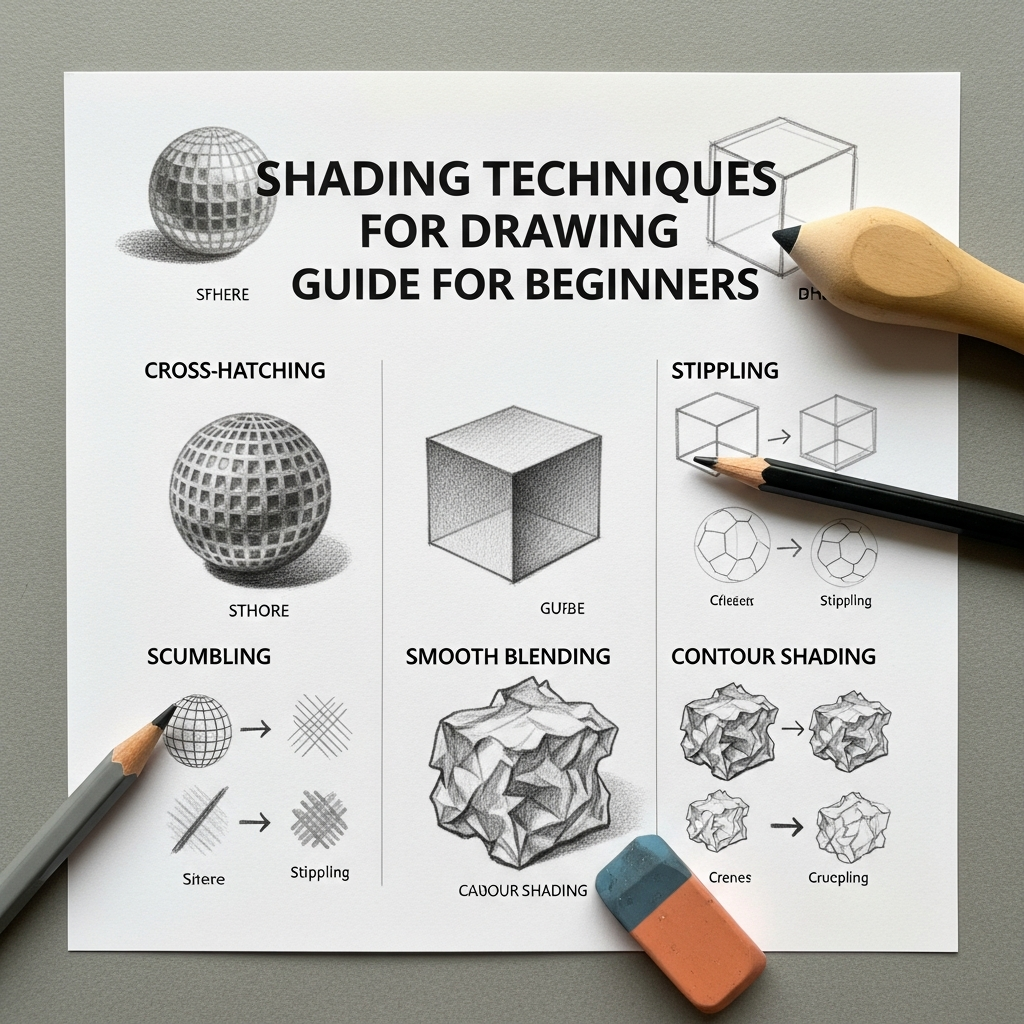
1. Hatching
Hatching is one of the most basic and effective shading techniques. It involves drawing a series of closely spaced parallel lines to create the illusion of shadow.
- Application: To create darker tones, draw lines closer together. For lighter tones, space them further apart. The lines can be drawn at any angle, but maintaining a uniform direction within a shaded area helps create a consistent look. Different angles can also create different textures.
- Effect: Hatching is excellent for building up tone gradually and is particularly effective in pen and ink drawings where smooth gradients are harder to achieve. It can also create the illusion of texture, such as animal fur.
- Example: Imagine shading a flat surface. You might use horizontal lines, drawing them closer together in the darker areas and spreading them out as the surface catches more light. For a curved surface, you could use diagonal lines to add depth and dimension.
2. Cross-Hatching
Cross-hatching is an advanced variation of hatching, creating deeper, richer shadows by layering sets of parallel lines at different angles.
- Application: Start by creating a layer of hatched lines in one direction. Then, draw a second set of lines perpendicular or at an angle over the first. The more layers of criss-crossing lines you add, the denser and darker the shadow becomes.
- Effect: This technique allows for more complex shading and is ideal for creating deeper, more dramatic tones. It produces a mesh-like texture, which can be varied by adjusting the spacing and angle of the lines.
- Example: To shade a sphere using cross-hatching, you would start with a layer of lines following the curve, then add another layer crossing the first, gradually increasing density in the core shadow area. This layering approach is essential for achieving varied values with shading techniques for drawing guide for beginners.
3. Stippling
Stippling is a time-consuming but highly effective shading technique that uses small dots to create tone and texture.
- Application: To create darker areas, place dots closer together. For lighter areas, space them further apart. The key is consistency in dot size and distribution for smooth transitions.
- Effect: Stippling allows for very fine control over values and is excellent for creating texture and smooth gradients, especially in pen and ink drawings where lines can be challenging to blend smoothly.
- Example: When drawing a textured object like a rough stone or a speckled fruit, stippling can accurately convey its surface quality. It’s also frequently used in detailed works where a soft, nuanced shade is desired without visible lines. This technique can add a unique character to your shading techniques for drawing guide for beginners.
4. Blending / Tonal Shading
Blending, also known as tonal shading, involves creating smooth transitions between different tones without relying on distinct lines or dots. It’s arguably one of the most important shading techniques to master.
- Application: This technique is achieved by applying pencil strokes (often circular or back-and-forth) and then softly rubbing or smudging the graphite with a blending stump, tortillon, or even a soft cloth. Building up tone gradually with light pressure is crucial to avoid a muddy or blurry effect.
- Effect: Blending is essential for creating realistic shading, soft gradients, and smooth, natural transitions between light and shadow. It helps conceal individual pencil marks, resulting in a seamless appearance.
- Example: When drawing a rounded object like a sphere or an apple, blending allows you to create the illusion of its curved surface by smoothly transitioning from highlight to mid-tone to core shadow. This is a foundational element in developing realistic shading techniques for drawing guide for beginners.
5. Scumbling / Scribbling
Scumbling, often referred to as scribbling, uses random, unplanned, or swirling strokes to build up tone and texture.
- Application: You move your hand lightly around the drawing, making swirls, dips, and turns. Darker areas receive more densely packed scribbles, while lighter areas have sparser marks.
- Effect: This technique provides a quick way to add shading and creates a unique, often organic texture. It’s useful for depicting things like foliage, hair, or distressed surfaces.
- Example: To shade a bushy tree, scumbling can effectively mimic the irregular, textured surface of leaves and branches, giving the drawing a natural, less rigid feel. It’s a great way to add a dynamic touch to your shading techniques for drawing guide for beginners.
6. Contour Hatching
Contour hatching is a clever technique that uses lines to create shadows while simultaneously following the form of the object.
- Application: Instead of straight parallel lines, the lines curve around the shape of the object. Lines drawn closer together create darker areas, while wider spacing results in lighter tones.
- Effect: This method significantly enhances the three-dimensional quality of an object, making it appear to have volume and depth by emphasizing its contours.
- Example: When drawing a cylindrical object, contour hatching would involve drawing curved lines that wrap around the cylinder, making them tighter on the shadowed side and looser on the lit side. This emphasizes its roundness and helps you master complex shading techniques for drawing guide for beginners.
Practicing Shading: Exercises for Beginners
Consistent practice is key to mastering shading techniques for drawing guide for beginners. Don’t be afraid to experiment and make mistakes; they are part of the learning process.

Here are some effective exercises:
- Gradient Bar: Shade from light to dark in one smooth motion within a rectangular strip. This exercise helps develop control over pencil pressure and smooth transitions.
- Value Scales/Squares: Create 5-7 boxes, each slightly darker than the last, aiming for an even, uniform tone in each. This teaches you to distinguish and create a wide range of values.
- Pressure Control Lines: Draw lines using increasing pressure from light to dark. This hones your ability to control the pencil’s pressure, which directly translates to tonal variation.
- Shading Basic Forms (Sphere, Cube, Cylinder, Cone): These are foundational exercises. Practice turning flat circles into spheres, drawing the three distinct planes of a cube, and understanding rounded forms with cylinders and cones, all under a single light source. This is crucial for understanding how light behaves on different forms.
- Shadow-Only Study: Focus on drawing only the shadows of an object, simplifying the scene. This helps you see light and shadow as distinct shapes and relationships.
- Reference-Based Shading: Find a black-and-white reference photo (or convert a color one to grayscale) and try to replicate its shading, paying close attention to highlights, mid-tones, and shadows. Squinting your eyes at the reference can help simplify tonal values.
Remember to start light and gradually build up the tone by adding layers of shading. This approach gives you more control and makes it easier to correct mistakes. Always consider the direction, distance, and intensity of your light source.
Common Shading Mistakes and How to Fix Them
Even with the best intentions, beginners often encounter similar challenges when learning shading techniques for drawing guide for beginners. Recognizing and addressing these common mistakes will accelerate your progress.
- Messy or Uneven Shading: This often results from rushing or a lack of pencil control, leaving visible pencil lines or uneven patches.
- Fix: Take your time. Practice making smooth, even lines with consistent pressure. Smooth, realistic shading takes patience. Use a steady, light hand and build up layers.
- Abrupt Transitions: Distinct lines separating different values rather than smooth gradations make objects look flat.
- Fix: Practice building values in gradual layers, easing the pressure as you move from dark to light. Blending tools are invaluable for smoothing these transitions.
- Timid or “Grey” Shading (Not Dark Enough): Many beginners are afraid to go dark enough, resulting in washed-out, flat drawings lacking depth.
- Fix: Don’t be afraid to use your darker pencils (like 4B, 6B, 8B) to create deep, rich shadows. Remember that shadows are essentially the absence of light and should be dark. Every drawing needs a full range of values from white highlights to deep blacks.
- Ignoring the Light Source: Inconsistent lighting makes shading look unnatural and confusing.
- Fix: Always identify and commit to a single, consistent light source for your drawing. This dictates where highlights and shadows fall.
- Outlines that Don’t Blend: Heavy outlines can make a realistically shaded drawing appear cartoonish, nullifying the depth created by shading.
- Fix: Make initial outlines very light and erasable. As you shade, let the edges of your shadows define the form, allowing outlines to blend into or be absorbed by the shading.
- Overblending: While blending is good, overdoing it can make a drawing too soft, blurry, or muddy, losing crispness and contrast.
- Fix: Preserve some sharp edges for contrast, especially where light meets shadow. Blend only where necessary to create smooth gradients, and know when to stop.
- Lack of Reflected Light: Forgetting subtle bounce light in shadows can make drawings look less realistic.
- Fix: Observe carefully for reflected light, which often appears as a slightly lighter area within the form shadow, caused by light bouncing off surrounding surfaces. This subtle detail adds significant realism.
By actively trying to avoid these pitfalls, and consistently reviewing your work, you will significantly improve your shading techniques for drawing guide for beginners.
Developing Your Shading Skills Further
Once you’ve grasped the fundamental shading techniques for drawing guide for beginners, you can begin to explore more nuanced aspects of shading and integrate them into your artistic practice.
The Importance of Value Control
Value refers to the lightness or darkness of a color or tone. Mastering value control is paramount for realistic shading. It’s not just about making things dark, but about understanding the precise relationship between all the tones in your drawing.
- Expand Your Value Range: Portraits with a limited value range often look flat, while those with a wider range pop out and appear more realistic. Don’t be afraid to push your darks and preserve your lights.
- Organize Your Values: The “lightest dark is darker than the darkest light” is a crucial rule. This means that even the lightest tone in a shadow area should be darker than the darkest tone in a lit area. This organizational principle prevents drawings from looking muddy or confusing.
- Squinting: When observing a subject or your drawing, squint your eyes. This simplifies the tonal values, making it easier to see the overall pattern of light and shadow and identify key highlights, mid-tones, and shadows. It helps you focus on the big picture of light and dark relationships.
Incorporating Texture
Shading isn’t just about smooth transitions; it’s also about depicting the surface qualities of objects. Different shading techniques naturally lend themselves to creating various textures:
- Hatching and Cross-Hatching: Can create coarse, fibrous, or even metallic textures depending on the line quality, density, and direction.
- Stippling: Ideal for gritty, sandy, or speckled textures.
- Scribbling/Scumbling: Excellent for organic, rough textures like hair, fur, or foliage.
- Blending: Best for smooth, soft textures like skin, polished surfaces, or fabrics.
Experiment with how you apply pressure, the type of pencil you use, and the specific technique to convincingly portray different textures in your work. This adds another layer of realism to your shading techniques for drawing guide for beginners.
Observing the World Around You
The best way to improve your shading is to become a keen observer of light and shadow in your daily life.
- Study Everyday Objects: Place simple objects like a fruit, a cup, or a crumpled piece of paper under a single light source. Observe how the light hits, where the highlights are, the shape of the core shadow, and how the cast shadow falls. Try turning the object around to see how light behaves from different angles.
- Analyze Photographs: Look at black and white photographs or convert color photos to grayscale. Pay attention to how professional photographers use light and shadow to create drama and form.
- Understand Form: Shading effectively requires understanding the three-dimensional form of the object you’re drawing. Break down complex objects into simpler geometric shapes (spheres, cubes, cylinders) to understand how light would interact with them first. If you don’t understand the underlying structure, your shadows will appear random and flat.
Patience and Practice
Shading is a skill that improves significantly with patience and consistent practice. Don’t get discouraged if your initial attempts aren’t perfect. Even experienced artists continually refine their understanding of light and shadow. Set aside dedicated time for shading exercises. The fine motor skills and observational abilities you develop through these practices will be invaluable across all your artistic endeavors, whether with graphite, charcoal, or even digital tools. By dedicating yourself to these shading techniques for drawing guide for beginners, you will see remarkable improvement over time.
Conclusion: Your Journey to Expressive Shading
Embarking on the journey to master shading techniques for drawing guide for beginners is one of the most transformative steps an artist can take. It’s about more than just adding darkness; it’s about learning to see the world through the lens of light and shadow, understanding how these elements conspire to create form, depth, and emotion. From the initial pencil strokes that define a highlight to the rich, deep layers that form a core shadow, every mark contributes to the illusion of reality on your paper.
Remember, the path to mastering shading techniques for drawing guide for beginners is a continuous one, filled with observation, experimentation, and diligent practice. Equip yourself with a range of pencils, embrace your blending tools, and never shy away from pushing your values from the brightest whites to the darkest blacks. By internalizing the principles of light sources, understanding the key elements of shadow, and diligently applying techniques like hatching, cross-hatching, stippling, and blending, you will unlock the power to transform flat drawings into captivating, three-dimensional artworks that truly resonate with viewers. Keep observing, keep drawing, and most importantly, keep enjoying the magical process of bringing your creative visions to life through the subtle, yet profound, power of shading.
—
FAQ
What are the most important shading techniques for drawing guide for beginners?
For beginners, the most important shading techniques to learn are hatching, cross-hatching, stippling, and smooth blending (tonal shading). These methods provide a solid foundation for understanding how to create different values, textures, and smooth transitions between light and shadow.
What pencils should I use for shading as a beginner?
As a beginner, it is recommended to start with a set of graphite pencils that includes a range from medium-hard to soft. Essential grades often include HB (for general use and light sketches), 2B (for mid-tones), 4B (for darker tones), and 6B or 8B (for the darkest shadows). Brands like Faber-Castell 9000 Series and Staedtler Mars Lumograph are popular for their quality.
How do I make my shading look smooth?
To make your shading look smooth, focus on using very light, consistent pressure with your pencil and building up tone in gradual layers. Keep your pencil strokes close together to eliminate gaps, and consider using the side of your pencil lead rather than the tip for broader, softer marks. Blending tools like a blending stump (tortillon) or a soft tissue can also help soften pencil marks and create seamless transitions.
Why do my drawings look flat even after shading?
Drawings often look flat due to a few common mistakes:
- Not going dark enough with your shadows (timid shading): A limited value range prevents the illusion of depth.
- Lack of clear light source: Without a consistent light source, shadows will appear arbitrary and unnatural.
- Ignoring reflected light: Subtle light bouncing into shadow areas adds realism and prevents shadows from looking like flat, dark patches.
- Over-reliance on outlines: Heavy outlines counteract the three-dimensional effect of shading.
To fix this, ensure you use a full range of values, establish a clear light source, observe reflected light, and let your shading define forms rather than outlines.
—