Learning to shade can transform your flat sketches into vivid, three-dimensional artworks, making them appear lifelike and full of depth. For any beginner, understanding the fundamental principles of light, shadow, and value is crucial to mastering the various shading techniques. This comprehensive Shading Techniques For Drawing Guide For Beginners will walk you through essential tools, methods, and practices, helping you develop your artistic eye and hand control. You’ll discover how simple marks can create complex illusions of form and texture, making your drawings truly stand out.

Shading, at its core, refers to building layers of pencil or other drawing materials to create different tones and contrasts, ultimately giving an object volume and solidity. This process helps replicate how light interacts with objects in the real world, producing highlights, mid-tones, and shadows. Mastering these distinctions is a cornerstone of realistic drawing, and this Shading Techniques For Drawing Guide For Beginners will provide a clear path to achieving convincing results.
Understanding Light and Shadow: The Foundation of Shading
Before diving into specific shading techniques for drawing guide for beginners, it’s vital to grasp how light behaves. The interplay of light and shadow is what gives objects their perceived form and depth. Without a solid understanding of these elements, even the most diligent shading can fall flat, failing to convey realism.
The Role of a Light Source
Every object in a drawing is affected by a light source. This source determines where the brightest highlights appear and where the darkest shadows fall. Imagine a single lamp illuminating a still life; the light hits some surfaces directly, reflects off others, and is entirely blocked from still more.
- Highlight: This is the brightest area on an object, directly facing the light source. It often appears as a small, intense spot of light.
- Mid-tones (Halftones): These are the transitional values between the highlight and the core shadow. They represent surfaces that are partially illuminated.
- Core Shadow: This is the darkest area on the object itself, where direct light cannot reach. It defines the object’s form.
- Cast Shadow: This is the shadow an object projects onto surrounding surfaces. Its shape and intensity are determined by the object’s form and the light source’s position.
- Reflected Light: A subtle area of lighter tone found within the shadow, caused by light bouncing off nearby surfaces and illuminating the shadowed area indirectly. This is a crucial detail for adding realism.
Observing how light interacts with objects in real life is an excellent practice. Pay attention to how shadows form, where highlights appear, and how different surfaces reflect or absorb light. This keen observation forms the fundamental basis of your shading techniques for drawing guide for beginners.
Defining Value and Tone
Value in art refers to the lightness or darkness of a color or shade. It’s the spectrum from pure white to pure black, with countless shades of gray in between. Tone is often used interchangeably with value, describing the specific lightness or darkness of an area. A wide range of values in your drawing creates contrast, which in turn enhances the illusion of three-dimensionality.
To create convincing depth, you need to use a full range of values. Beginners often shy away from truly dark values, which can lead to drawings looking flat or washed out. Conversely, making halftones too dark can also compromise the overall value structure. The key is to organize your values correctly, ensuring that shadows are appropriately dark and highlights are bright, with smooth transitions between them.
Essential Tools for Shading
Having the right tools is instrumental for any shading techniques for drawing guide for beginners. While you can start with just a pencil and paper, a few additional supplies can significantly enhance your ability to create diverse and nuanced shading effects.
Graphite Pencils: Your Primary Shading Companion
Graphite pencils are graded by hardness, indicated by letters and numbers.
- H (Hard) Pencils: These pencils produce lighter, sharper lines and are excellent for initial sketches and fine details. Examples include 2H, 4H, 6H. They are harder to blend.
- B (Black) Pencils: These pencils are softer and produce darker, duller lines. They are perfect for rich darks, blending, and filling large areas. Common grades are 2B, 4B, 6B, and even 8B or 9B for the darkest tones. Softer pencils deposit more graphite with less effort.
- HB Pencil: This is a standard, medium-hardness pencil, often used for general drawing and writing.
A good drawing set often includes a range of graphite pencils, providing a comprehensive system to explore shading in all its depth. Many artists recommend having a selection like 2H, HB, 2B, 4B, 6B, and 8B for a versatile range. When practicing shading techniques for drawing guide for beginners, avoid pressing too hard initially; instead, build up dark areas by layering more graphite.
Charcoal: For Deep, Rich Darks
Charcoal is another excellent medium for shading, known for its ability to create deep, rich black tones that are often harder to achieve with graphite alone.
- Vine Charcoal: Soft and easily blendable, vine charcoal is excellent for quick sketches and broad tonal effects. It’s easy to erase.
- Compressed Charcoal: Available in stick or pencil form, compressed charcoal creates darker, sharper lines and denser tones. Charcoal pencils offer precision with less mess.
Charcoal can add significant richness and texture to your artwork. Some artists even create their own charcoal powder by sanding charcoal pencils for smooth, even application. This allows for soft, subtle tones without harsh marks, which is crucial for gentle, gradual shading.
Blending Tools: Achieving Smooth Transitions
Blending is a fundamental aspect of many shading techniques for drawing guide for beginners, used to smooth away lines and create soft gradients.
- Blending Stumps and Tortillons: These are tightly rolled paper tools designed to create smooth transitions without leaving oils or smudges, unlike using your finger. Stumps are denser and more durable, while tortillons are lighter, better for delicate details. They are invaluable for softening shadows, smoothing gradients, and adding volume.
- Tissues or Cotton Swabs: These can also be used for blending, offering a softer effect than stumps for broader areas.
- Brushes: A soft watercolor brush or even a makeup brush can be used to apply and smooth charcoal powder, creating incredibly soft and even transitions.
Erasers: For Corrections and Highlights
Erasers are not just for fixing mistakes; they are also crucial shading tools.
- Kneaded Eraser: This soft, pliable eraser can be molded into various shapes. It’s excellent for lifting graphite or charcoal to create highlights or lighten areas without damaging the paper. It’s a “must-have” for shading.
- Rubber Eraser: Standard rubber erasers are good for more precise corrections. Some artists use detail erasers, which are rubber and can also lift colored pencil.
Investing in quality drawing materials, including a range of pencils, blending tools, and erasers, can significantly transform how you approach shading and depth in your artwork.
Core Shading Techniques for Beginners
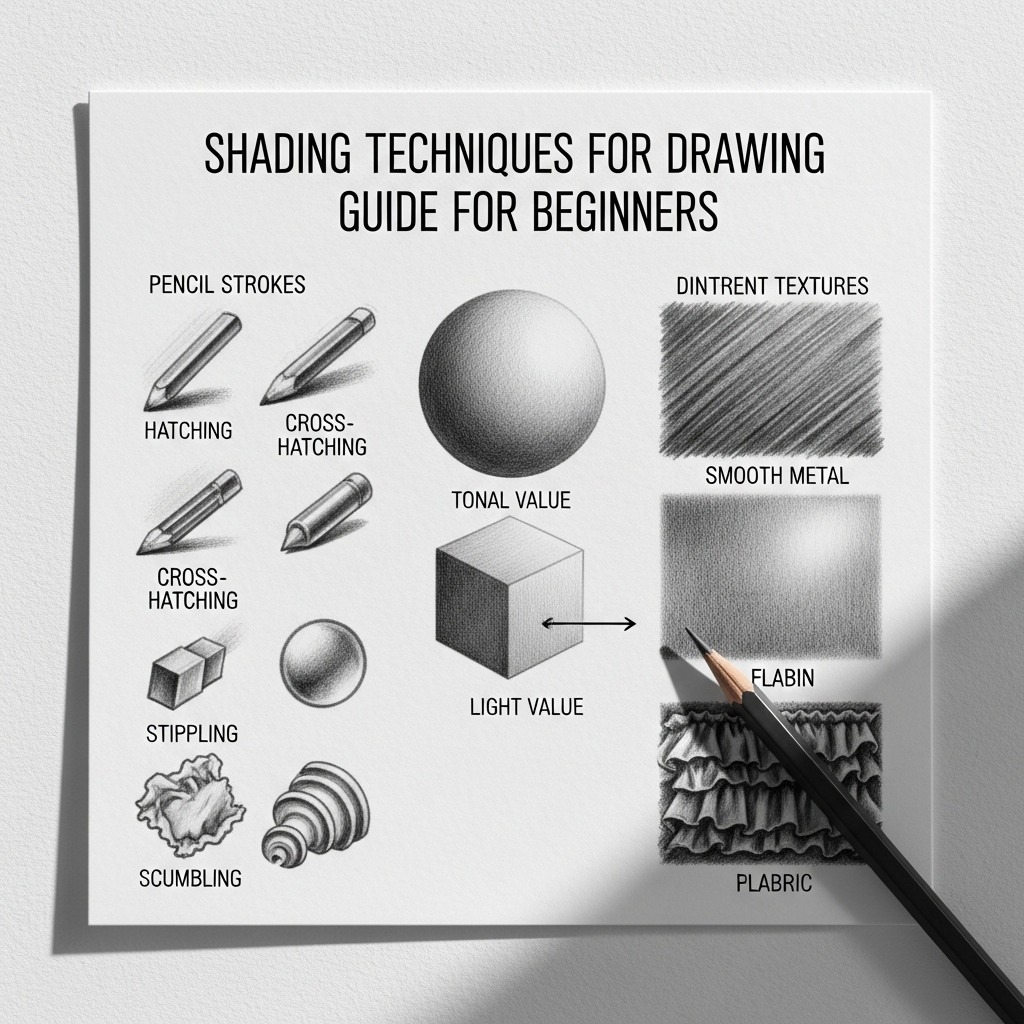
Once you have your tools, it’s time to explore the fundamental shading techniques for drawing guide for beginners. Each method offers a unique way to build tone and texture, and experimenting with them will broaden your artistic vocabulary.
Hatching
Hatching involves drawing a series of parallel lines close together to create darker tones. The closer the lines are, the darker the area appears. Spacing them further apart yields a lighter tone. This technique is simple yet effective for adding dimension. When practicing hatching, try to keep your pencil marks even and close together for a smoother effect. Varying the length of your pencil strokes can also add to the visual interest.
A good way to start with hatching for beginners is to create a gradient bar, shading from light to dark using parallel lines. This helps in understanding pressure control and line density.
Cross-Hatching
Building upon hatching, cross-hatching involves layering perpendicular sets of hatched lines. By drawing one set of parallel lines and then another set over the first in a perpendicular or angled direction, you create a mesh-like effect that quickly darkens an area. Adding additional layers at varied angles can further deepen the value. Cross-hatching is versatile and is frequently seen in both pencil and ink drawings. The more layers you add, the denser and darker the shading becomes.
Stippling
Stippling is a meticulous shading technique for drawing guide for beginners that uses tiny dots to create variations in light and shadow. The density of the dots determines the tone:
- Closer dots: Create darker values and denser shading.
- Further apart dots: Result in lighter values and more open areas.
While time-consuming, stippling can produce unique, textured effects and is particularly effective for highly detailed areas or specific textures. It demands patience but can yield impressive results. You can start by placing dots closer together in shadowed areas and gradually spreading them out for highlights.
Scumbling (Circularism)
Scumbling, often referred to as circulism, involves using small, continuous circular or swirling pencil marks to build up tone and texture. Unlike hatching or stippling where individual marks might remain visible, scumbling blends naturally, creating a soft, often cloud-like texture. This technique is excellent for shading organic forms, such as tree leaves, bushes, or achieving soft skin tones.
When performing scumbling as one of the key shading techniques for drawing guide for beginners, hold your pencil at a low angle and gently press it close to the paper, using small circular motions. Gradually layer more strokes to build depth and smooth transitions, varying pressure as needed.
Blending (Smooth Gradient)
Blending is one of the most widely used shading techniques for drawing guide for beginners to achieve smooth gradations from one tone to another, eliminating harsh lines and creating a professional finish. This technique is all about creating seamless transitions.
- Pencil Application: Use circular or back-and-forth pencil strokes, building up layers gradually with light pressure. Working slowly and building tone is essential; avoid pressing hard too early.
- Tool-Assisted Blending: After applying pencil marks, a blending stump, tortillon, or even a soft tissue can be used to smooth the graphite or charcoal, merging the tones seamlessly. A clean blending tool is particularly important for lighter areas to prevent smudges.
Blending is crucial for making objects appear three-dimensional and solid. The goal is a smooth transition rather than a sharp one.

Contour Shading
Contour shading, also known as contour hatching, uses lines that curve around the form of the object, following its contours, much like contour lines on a map. This technique directly reinforces the object’s three-dimensionality. For a round object like a sphere or an apple, you would use curved lines that wrap around its shape. The lines are drawn closer together for darker areas and spaced out for lighter areas. This is a powerful shading technique for drawing guide for beginners because it visually communicates the object’s form directly through the direction of your strokes.
Mastering Value Scales and Gradients
A crucial step in any shading techniques for drawing guide for beginners is developing control over value and creating smooth gradients. Value scales are a fundamental exercise that can dramatically improve your shading abilities.
Practicing the Value Scale
A value scale is a series of boxes or steps filled with tones, ranging from the lightest (white) to the darkest (black), with gradual steps of gray in between. This exercise trains your eye to see subtle value changes and helps you gain control over your drawing materials.
Here’s how to practice:
- Draw Boxes: Create 5-9 equally sized boxes in a row.
- Establish Extremes: Leave the first box pure white (your paper) and fill the last box with your darkest possible value, pressing firmly but evenly. For a set of 9 values, you’d fill the first box with value 1 (white) and the ninth with value 9 (black).
- Find the Mid-tone: Estimate the middle value (e.g., value 5 in a 9-step scale). It should be halfway between white and black.
- Fill the Gaps: Gradually fill in the remaining boxes, ensuring a smooth, incremental transition between each value. Squinting your eyes can help you judge if neighboring values are merging smoothly.
Practicing value scales with different pencil grades (e.g., HB, 2B, 4B, 6B) will show you the range of tones you can achieve with each. This exercise is about building muscle memory for pressure control and consistent application, which are vital shading techniques for drawing guide for beginners.
Creating Smooth Transitions
Smooth transitions, also known as gradations, are essential for making round forms appear volumetric. Instead of distinct steps, you aim for a continuous flow from light to dark.
- Layering: Build up tone gradually using light layers rather than pressing hard immediately. Each layer adds depth without creating harsh lines.
- Consistent Strokes: For smooth shading, keep your pencil strokes consistent and close together. Many artists suggest using the side of the pencil lead rather than the tip for broader, softer marks.
- Pressure Control: Varying the pressure you apply to the pencil is fundamental. Less pressure for lighter areas, more pressure for darker areas. This control is a hallmark of effective shading techniques for drawing guide for beginners.
- Blending: As discussed, blending tools are crucial for softening pencil marks and achieving seamless gradients.
An effective exercise is to draw a simple rectangle and shade it from one end to the other, transitioning from pure white to solid black smoothly, without visible lines or harsh breaks. This direct practice improves hand execution and material mastery.
Putting Techniques into Practice: Exercises for Beginners
Theory is good, but consistent practice is where you truly develop your skills in shading techniques for drawing guide for beginners. Applying these methods to actual forms is the best way to see them come to life.
Shading Basic Forms (Sphere, Cube, Cylinder)
Shading basic geometric forms is a classic and highly effective exercise for beginners. These shapes allow you to focus purely on light and shadow without the distraction of intricate details.
- The Sphere: A sphere is excellent for practicing smooth, continuous gradations from highlight to core shadow and understanding reflected light. Its curved surface demands subtle transitions to convey roundness. Start by lightly shading the entire ball, then gradually build up darker values for the core shadow and define the highlight. Remember the subtle reflected light at the bottom.
- The Cube: Cubes are ideal for understanding how light hits flat planes and creates distinct, often harder-edged shadows. Each visible plane of the cube will have a different value depending on its angle to the light source.
- The Cylinder: Cylinders combine elements of both spheres and cubes, featuring both curved and flat surfaces. They help you practice smooth transitions on the curved side and sharper definitions where the top and bottom meet the curved body.
For each form, experiment with placing the light source in different positions (top-left, side, below) and observe how it changes the highlights and shadows. This observation and application are critical for developing a natural understanding of shading techniques for drawing guide for beginners.
Observational Shading
Training your eye to observe shadows and highlights in everyday objects is invaluable. Take time to sketch and shade simple items around you, like a piece of fruit, a household object, or your own hand. Pay close attention to subtle changes in light and how they affect the form and texture of the object. This practical approach reinforces theoretical knowledge and makes your understanding of shading techniques for drawing guide for beginners intuitive.
A helpful tip is to squint your eyes when looking at your reference image. This softens details and reveals the underlying value shapes, helping you see where light stops hitting the form, where mid-tones live, and where the darkest accents naturally fall.
Common Mistakes and How to Avoid Them
Even with the best intentions, beginners often fall into common traps when learning shading techniques for drawing guide for beginners. Being aware of these pitfalls can help you avoid frustration and improve faster.
Ignoring the Light Source
A frequent mistake is applying shadows randomly without considering a consistent light source. This results in drawings that look flat or lack coherent depth.
- Fix: Always identify your light source first. Where is the light coming from? How intense is it? This single insight informs where your shadows fall and how light and dark values are distributed. Imagine the light as a straight ray, helping you determine shadow placement.
Lack of Contrast / “Afraid of the Dark”
Many beginners are hesitant to go dark enough with their shadows, leading to a narrow value range and flat-looking artwork. This often happens because artists confuse the “local color” of an object (e.g., fair skin) with its shaded value.
Fix: Embrace dark values. Shadows are areas where light is blocked, so they should* be dark. The only areas that should be pure white are the highlights. Make your darkest shadows as deep as you can and then adjust the rest of your values accordingly. Ensure a clear separation between the light family and the shadow family. A good rule to remember is: “the lightest dark is darker than the darkest light”.
Over-Blending
While blending is important for smoothness, over-blending can flatten out your drawing, making it look muddy or blurry. It can also destroy the texture and vibrancy you’ve carefully built.
- Fix: Use blending judiciously. Blend to smooth transitions, but don’t overdo it. Focus on building tone through layering first, ensuring your strokes are tight and even before blending. Remember, blending isn’t a miracle solution for sloppy application. Some experts even advise against blending too heavily, advocating for exploiting the qualities of your chosen medium instead.
Incomplete Shadows / Sloppy Values
Leaving “holes” of light in shadow areas or having inconsistent value control throughout the drawing can make shadows look spotty or sloppy, ruining the effect of light on form.
- Fix: Be consistent with your value organization. When shading a shadow area, ensure it’s a unified darker value. Layer carefully to fill in any gaps, creating a solid, believable shadow. Practice value scales to improve your control over tone and evenness.
Mixing Too Many Shading Types
Especially for beginners, trying to combine too many different shading techniques (like hatching, cross-hatching, and circulism) in a single drawing without a clear intention can lead to a messy or disjointed appearance.
- Fix: Choose one or two primary shading methods for a drawing and stick to them to maintain a cohesive look. As you gain experience, you can experiment with combining techniques more intentionally. This focused approach is a valuable aspect of mastering shading techniques for drawing guide for beginners.
Tips for Developing Your Shading Skills
Continuous improvement in shading techniques for drawing guide for beginners comes with consistent effort and a curious mindset.
Practice Consistently
Like any skill, shading improves with regular practice. Dedicate specific time to shading exercises, even short ones. A simple gradient bar or shading basic forms daily can make a significant difference. The more you practice, the more your hand control and observational skills will develop.
Experiment with Different Materials
Don’t limit yourself to just one type of pencil. Experiment with different grades of graphite, charcoal, and various blending tools.
- Paper Choice: The texture (tooth) of your paper can significantly affect your shading. Rougher paper holds more graphite/charcoal, allowing for more layers, while smoother paper is better for fine details and blended effects. Many artists suggest starting with cheap sketchbooks for practice to remove the pressure of “wasting” good paper.
- Pencil Grip: Experiment with how you hold your pencil. An overhand grip, using the side of the lead, is often recommended for broad, even shading, while a closer grip allows for more precise lines.
Study Master Artists and Realism
Look at drawings and paintings by master artists who excelled at rendering light and shadow. Analyze how they achieved depth, conveyed textures, and used value to create mood. Studying realism in art can inspire and guide your own practice. Additionally, observe how light behaves in the real world around you constantly. This “practice observation” trains your eye to notice the subtleties of light and form.
Shading is a journey, not a destination. With patience, consistent practice, and a willingness to learn from your observations and mistakes, you will see remarkable improvement in your ability to bring depth, form, and realism to your drawings. This Shading Techniques For Drawing Guide For Beginners aims to equip you with the foundational knowledge and actionable steps to begin that exciting artistic journey.
FAQ
What are the main shading techniques for beginners?
For beginners, the main shading techniques include hatching, which uses parallel lines; cross-hatching, which layers perpendicular lines; stippling, which creates tone with dots; scumbling (circularism), using small circular motions; and blending, which smooths tones to create gradients. Mastering these methods is fundamental for a solid Shading Techniques For Drawing Guide For Beginners.
What materials are best for shading as a beginner?
For beginners, essential shading materials include a range of graphite pencils (H, HB, B grades like 2B, 4B, 6B), charcoal (vine and compressed), blending stumps or tortillons, and kneaded erasers. These tools are recommended in any good Shading Techniques For Drawing Guide For Beginners as they allow for varied tones and smooth transitions.
How do I make my shading look smooth?
To achieve smooth shading, apply light layers of graphite or charcoal using consistent, close-together strokes, often with the side of your pencil. Gradually build up darker tones, and then use blending stumps, tortillons, or soft tissues to smooth out pencil marks and create seamless gradients. This is a key focus within a comprehensive Shading Techniques For Drawing Guide For Beginners.
Why do my drawings look flat even after shading?
Drawings often look flat after shading if there’s a lack of contrast, meaning you’re not going dark enough with your shadows or your values are too similar. Another common reason is ignoring a consistent light source, which leads to illogical shadow placement. This issue is frequently addressed in any effective Shading Techniques For Drawing Guide For Beginners.
How important is understanding light and shadow for shading?
Understanding light and shadow is critically important for shading, as it forms the entire foundation of creating depth and realism in your drawings. Knowing where your light source is, and identifying highlights, mid-tones, core shadows, cast shadows, and reflected light, directly informs how and where you apply shading. It is the absolute first step in any practical Shading Techniques For Drawing Guide For Beginners