Shading is a fundamental aspect of drawing that transforms flat, two-dimensional outlines into captivating, three-dimensional forms. For beginners, mastering shading techniques unlocks a new level of realism and depth in their artwork. By understanding how light interacts with objects and learning various mark-making methods, budding artists can create illusions of volume, texture, and atmosphere. This comprehensive guide will walk you through the essential shading techniques for drawing, offering practical tips and insights to help you embark on your artistic journey with confidence and skill.

Shading Techniques For Drawing Guide For Beginners
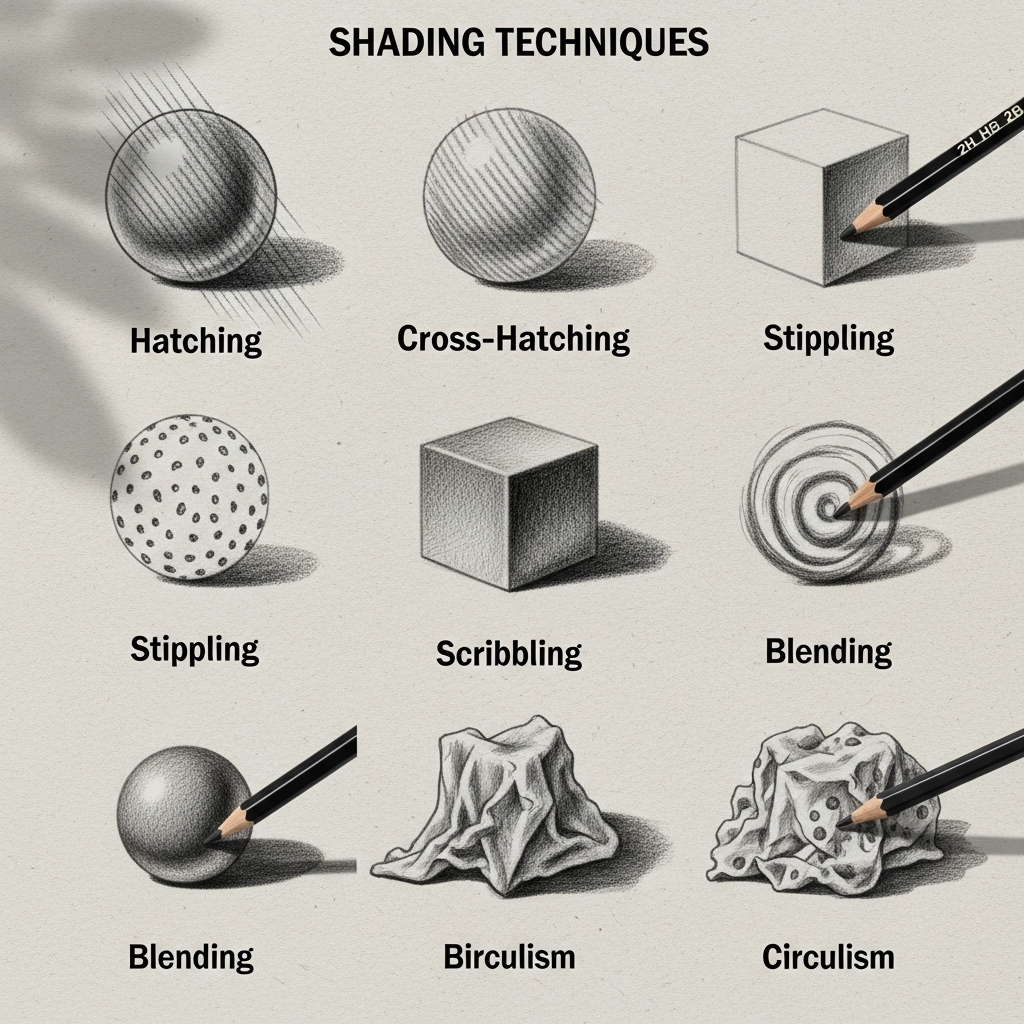
Shading is the art of manipulating light and shadow within a drawing to create the illusion of form, depth, and texture on a flat surface. This process involves using various pencil pressures and strokes to produce a range of tonal values, from the brightest highlights to the darkest shadows. For beginners, the journey into shading begins with understanding fundamental concepts like light sources, value scales, and the impact of pressure control. Mastering these elements allows you to transform simple outlines into realistic, visually engaging artwork. Key shading techniques include hatching, cross-hatching, stippling, scribbling (or scumbling), and blending, each offering unique textural qualities and control over tone.
Understanding the Fundamentals of Shading
Before diving into specific techniques, it’s crucial to grasp the foundational principles that govern effective shading. These principles act as your roadmap, guiding your hand and eye to create believable light and shadow. A solid understanding of these basics is the bedrock for any aspiring artist looking for a “Shading Techniques For Drawing Guide For Beginners.”
Light Source and Form
The most critical element in shading is the light source. Every object in the real world is illuminated by one or more light sources, and how that light hits an object dictates its highlights, mid-tones, and shadows. When drawing, you must first identify where your light is coming from and its intensity. This will inform where the brightest areas (highlights) and the darkest areas (core shadows) fall on your subject.
Imagine an apple sitting on a table with a single lamp shining on it. The side of the apple facing the lamp will be the brightest. As the apple curves away from the light, it gradually darkens, entering the mid-tones, and then the core shadow—the darkest part of the apple itself. Furthermore, an occlusion shadow (the darkest shadow where the object meets the surface) and a cast shadow (the shadow the object throws onto the surface) will appear. Understanding this interplay between light and form is paramount for any beginner learning “Shading Techniques For Drawing Guide For Beginners.” Without a clear light source, your shaded objects will appear flat and unconvincing.
Value Scale
A value scale is an artist’s best friend. It’s a gradient of tones ranging from pure white to absolute black, with multiple shades of gray in between. Think of it as your visual alphabet for shading. Creating a value scale involves drawing a rectangle and dividing it into several squares (typically 5 to 9), then gradually filling each square from the lightest gray to the darkest black.
Practicing with a value scale helps you develop pressure control—the ability to apply varying amounts of pressure with your pencil to create different tonal values. For example, a 2B pencil can produce a wide range of values, from very light to quite dark, depending on how lightly or firmly you press. A full range of values in your drawing, from the brightest highlights to the deepest shadows, is essential for making objects appear three-dimensional and “pop” off the page. This foundational exercise in any “Shading Techniques For Drawing Guide For Beginners” helps build muscle memory and a keen eye for subtle tonal shifts.
Essential Shading Tools For Artists
Having the right tools can make a significant difference as you explore various “Shading Techniques For Drawing Guide For Beginners”. While you don’t need an elaborate setup, a few key items will greatly assist your journey.
- Pencils: Graphite pencils come in a range of hardness, indicated by letters and numbers. ‘H’ pencils (e.g., 2H, 4H) are harder and produce lighter, finer lines, ideal for initial sketches and light tones. ‘B’ pencils (e.g., 2B, 4B, 6B, 8B) are softer, darker, and excellent for shading, covering larger areas, and achieving rich blacks. Many artists recommend starting with a set including HB (general purpose), 2B (general sketching and shading), and 6B (darkest tones).
- Erasers: A kneaded eraser is invaluable for lifting graphite without smudging and can be molded into various shapes for precise highlighting. A gum eraser or a vinyl eraser is also useful for general erasing.
- Blending Tools: To achieve smooth transitions and eliminate harsh lines, blending stumps (also called tortillons) are essential. These are tightly rolled paper tools that can smudge and soften pencil marks. Cotton swabs or even soft tissues can also be used as blending alternatives, but avoid using your fingers, as the oils from your skin can stain the paper and create uneven blending.
- Paper: The texture of your paper (its “tooth”) affects how shading appears. Smoother paper allows for finer, more detailed shading, while paper with more tooth can create interesting textures and holds graphite well for layering. Experimenting with different paper types is part of the learning process in “Shading Techniques For Drawing Guide For Beginners.”
Mastering the Core Shading Techniques
Now that we understand the fundamentals and have our tools ready, let’s delve into the specific “Shading Techniques For Drawing Guide For Beginners” that will bring your drawings to life. Each technique offers a unique way to build tone and texture.
Hatching
Hatching is one of the simplest and most fundamental shading techniques. It involves drawing a series of closely spaced parallel lines to create tonal value. The closer the lines are together, the darker the value appears, and conversely, spacing them further apart creates lighter areas.
To apply hatching effectively:
- Start by drawing light, even parallel lines in one direction.
- To create darker values, draw more lines closer together, or layer additional sets of parallel lines in the same direction.
- Varying the line width and spacing can create different textural effects, making it a versatile tool for any “Shading Techniques For Drawing Guide For Beginners” seeking to add nuance to their work.
For instance, if you’re shading a sphere using hatching, you might start with broadly spaced lines on the lighter side, gradually increasing the density of the lines as you move towards the shadowed area. This technique is particularly effective for depicting subtle changes in form and can be used on its own or as a base for other techniques. Think of how old engravings or woodcuts use hatching to build up intricate scenes and portray realistic depth. This simple yet powerful method is a core “Shading Techniques For Drawing Guide For Beginners” that provides a solid foundation.
Cross-Hatching
Building on hatching, cross-hatching introduces another layer of lines, drawn perpendicular or at an angle over the initial set of parallel lines. This crisscross pattern creates a mesh-like effect, allowing for the rapid build-up of darker tones and rich shadows.
When practicing cross-hatching:
- Begin with a layer of parallel lines, just as you would for simple hatching.
- Then, draw a second set of parallel lines across the first, perhaps at a 90-degree angle or a shallower angle, depending on the desired effect.
- For even darker values, you can add third, fourth, or even more layers of lines, intersecting them in different directions.
Cross-hatching is excellent for creating a strong sense of texture and dense shadows. It’s a favored technique in ink drawings and illustrations, where the visible lines contribute to the drawing’s aesthetic. Observing how comic book artists or classical masters like Albrecht Dürer utilized cross-hatching reveals its incredible potential for adding depth and drama. For anyone seeking to deepen their “Shading Techniques For Drawing Guide For Beginners,” cross-hatching offers a robust method for achieving varied tonal range.
Stippling
Stippling is a meticulous shading technique that uses small dots to build up tone and texture. The density of the dots determines the value: more dots clustered closely together create darker areas, while fewer, more spaced-out dots produce lighter tones.
Key aspects of stippling:
- This technique requires patience, as it can be time-consuming, but the results offer a unique, textural quality.
- Vary the size and spacing of the dots to create different effects. Uniformly sized dots can give a smooth, consistent appearance, while varied dot sizes can add to the perceived texture.
- Stippling is often used in pen and ink drawings, as it allows for precise control over tone in a non-blending medium.
Imagine creating the rough texture of a stone or the delicate fuzz on a peach using only dots. The subtle gradients achieved through stippling can be incredibly effective. While it demands a steady hand and a good deal of time, the visual impact of stippling, especially when executed well, is undeniable. It’s an advanced yet rewarding “Shading Techniques For Drawing Guide For Beginners” that pushes your precision and patience.
Scribbling / Scumbling
Scribbling, also known as scumbling, involves using random, loose, overlapping circular or swirling strokes to create tone and texture. Unlike the controlled lines of hatching, scribbling embraces a more organic and spontaneous approach.
To master scribbling/scumbling:
- Use a continuous, light, circular motion to lay down your initial layers.
- To darken an area, increase the density of your scribbles, making the circles smaller and closer together, or layering more overlapping strokes.
- For lighter areas, spread the scribbles out more, allowing more of the paper to show through.
Scribbling is excellent for conveying texture, such as foliage on trees, clouds, or unruly hair. It offers a less rigid feel than hatching and can be a quick way to block in shadows in a preliminary sketch. The beauty of scumbling lies in its apparent randomness that, when controlled, creates cohesive form. It’s a dynamic “Shading Techniques For Drawing Guide For Beginners” that can add expressive energy to your artwork.
Blending
Blending is arguably the most common and intuitive “Shading Techniques For Drawing Guide For Beginners.” It focuses on creating smooth, seamless transitions between different tones, making the application of marks less visible. The goal is to achieve a gradual gradation from light to dark without harsh lines.
Steps for effective blending:
- Apply graphite in light, even layers, building up the tone gradually.
- Use a blending stump, tortillon, or a soft tissue to gently rub and merge the graphite marks. Work from lighter areas to darker areas to avoid spreading dark pigment into highlights.
- Maintain a light touch initially and build up pressure slowly. Blending too aggressively can result in a muddy or blurry effect.
Blending is crucial for rendering smooth surfaces like skin, glass, or polished metals, where sharp transitions would look unnatural. It helps to create a soft, photographic quality in your drawings. The key to success with this “Shading Techniques For Drawing Guide For Beginners” is patience and a delicate hand, allowing the tones to melt into one another to suggest genuine volume and form.

Circulism
Circulism is a highly detailed blending technique that uses tiny, overlapping circles to build up tone and create a smooth, skin-like texture. It’s a variation of blending, but instead of sweeping motions, you use very small, controlled circular movements.
How to practice Circulism:
- Using a very sharp pencil (a 2H or HB for lighter areas, B or 2B for mid-tones), make minuscule, overlapping circular strokes.
- The pressure should be incredibly light.
- To darken an area, simply add more layers of these tiny circles, gradually increasing their density.
Circulism is particularly favored by hyper-realist artists for rendering skin tones and other intricate organic textures because it minimizes visible pencil strokes, creating an incredibly smooth and lifelike surface. While it’s extremely time-consuming, the results are often breathtakingly realistic. This specialized “Shading Techniques For Drawing Guide For Beginners” is for those ready to commit to meticulous detail and achieve a truly polished finish.
Practical Tips for Effective Shading
Beyond learning the techniques, adopting certain practices will significantly enhance your shading abilities. These practical insights are invaluable for any artist navigating a “Shading Techniques For Drawing Guide For Beginners.”
Practice Regularly
Consistency is key to improving any artistic skill. The more you practice shading, the better your hand-eye coordination will become, and the more intuitive the process will feel. Dedicate a small amount of time each day to exercises like:
- Value scales: Regularly creating value scales helps you maintain and improve pressure control, ensuring you can produce a full range of tones smoothly.
- Shading basic forms: Practice shading geometric shapes like spheres, cubes, and cylinders. These fundamental forms are the building blocks of more complex objects, and mastering their shading will translate directly to your advanced drawings. Observing how light and shadow fall on these simple shapes under different light sources is a vital exercise.
Make drawing and shading a regular habit. Even short, focused practice sessions can lead to significant improvements over time. This consistent application of “Shading Techniques For Drawing Guide For Beginners” will solidify your understanding and skill.
Observe Light and Shadow
Developing a keen observational eye is perhaps the most important skill for realistic shading. Train yourself to see objects not just as colors or lines, but as patterns of light and shadow.
- Study your surroundings: Place simple objects (like fruit, eggs, or mugs) under a single light source and observe how the light interacts with them. Notice the highlights, mid-tones, core shadows, reflected light, and cast shadows.
- Squint your eyes: Squinting can help simplify complex scenes into basic light and dark shapes, making it easier to identify the overall value relationships.
- Use reference photos: Analyze photographs, especially black and white ones, to understand value distribution without the distraction of color.
The ability to accurately translate what you see onto paper is at the heart of realistic drawing. A critical step in “Shading Techniques For Drawing Guide For Beginners” is not just about moving your pencil, but about truly seeing.
Don’t Be Afraid to Experiment
Art is also about exploration and finding your unique style. While this “Shading Techniques For Drawing Guide For Beginners” provides a strong foundation, don’t hesitate to experiment with different tools, techniques, and combinations.
- Mix techniques: Try combining hatching with blending, or use stippling for textured areas and smooth blending for others.
- Vary your tools: Experiment with charcoal, colored pencils, or even ink alongside graphite to see how different mediums influence your shading.
- Try different paper surfaces: A rougher paper might be great for texture, while a smoother one could be perfect for delicate blending.
Embrace mistakes as learning opportunities. Some of the most interesting artistic discoveries come from trying something unexpected. This open-minded approach is key to developing your personal style within the realm of “Shading Techniques For Drawing Guide For Beginners.”
Layering for Depth
One of the most effective strategies for achieving rich, realistic shading is layering. Instead of trying to achieve the darkest value in a single stroke, build up your tones gradually through multiple light layers.
- Start light: Always begin with the lightest possible pressure and pencil grade (e.g., HB or 2B) to lay down your initial layers of tone. It’s much easier to add darkness than to remove it.
- Gradual build-up: Gradually increase pressure or switch to a softer pencil (e.g., 4B, 6B) as you work towards darker values. Each layer refines the tone and adds depth.
- Cross-directional strokes: Even with blending, layering strokes in slightly different directions can help fill the paper’s tooth more effectively and create a smoother, more even tone.
Layering allows for greater control, smoother transitions, and prevents the “muddy” appearance that can result from pressing too hard too soon. It’s a crucial component of any “Shading Techniques For Drawing Guide For Beginners” aimed at realism.
Common Mistakes to Avoid
As you embark on your journey to master “Shading Techniques For Drawing Guide For Beginners,” being aware of common pitfalls can save you frustration and accelerate your learning.
- Using outlines that are too dark: Heavy outlines can make a drawing look cartoonish and flatten the image. Strive to make your initial sketches as light as possible so they don’t show through the shading. Ideally, your outlines should blend into your shading, or be erased as you go along.
- Lack of value range: A common beginner mistake is to stick to a limited range of mid-tones, avoiding true whites and deep blacks. This results in flat, uninteresting drawings. Exaggerate your values to create depth—make dark areas darker and light areas even lighter to make your drawing pop. A full tonal range is the backbone of convincing realism.
- Inconsistent pressure: Shading realistically requires variable pressure control. If you use the same pressure throughout, your shading will look uniform and lack dimension. Practice gradient exercises to develop smooth transitions from light to dark.
- Blending with fingers: As mentioned before, the natural oils from your skin can leave uneven marks and damage the paper over time. Always use proper blending tools like stumps or tortillons.
- Ignoring the light source: Failing to establish a consistent light source will lead to illogical shadows and a lack of coherence in your drawing. Always identify where the light is coming from before you begin shading.
- Making all edges the same: In reality, objects have a variety of edges—some sharp and crisp (hard edges) and others soft and diffused (soft edges). Beginners often keep all edges sharp, which can make a drawing look stiff. Pay attention to how edges soften in areas of shadow or as objects recede into the background.
By consciously avoiding these common errors, you will see a significant improvement in the realism and quality of your shaded drawings, propelling your mastery of “Shading Techniques For Drawing Guide For Beginners.”
Advanced Concepts to Explore
Once you’ve gained confidence with the basic “Shading Techniques For Drawing Guide For Beginners,” you might want to delve into more nuanced concepts that add an even greater level of sophistication to your work.
- Reflected Light: Even in shadowed areas, objects can pick up light reflected from surrounding surfaces. This reflected light appears as a subtle, lighter band within the core shadow, adding to the object’s three-dimensionality. It prevents shadows from looking like flat, dark patches.
- Atmospheric Perspective: This concept deals with how objects appear less distinct, lighter, and bluer as they recede into the distance, due to the atmosphere between the viewer and the object. In shading, this translates to making distant elements have less contrast and lighter values compared to objects in the foreground.
- Understanding Texture through Shading: Different shading techniques inherently lend themselves to rendering various textures. Hatching can mimic wood grain, stippling can create a pebbly surface, and scumbling can suggest rough fabric or foliage. Learning to manipulate these techniques specifically to convey surface quality adds another dimension to your artistic expression.
- Chiaroscuro: This dramatic effect uses strong contrasts between light and dark, usually bold contrasts affecting a whole composition, to give a sense of volume in modeling three-dimensional objects and figures. It’s a powerful tool for creating mood and impact, reminiscent of master painters like Caravaggio.
Exploring these advanced ideas will deepen your understanding of how light, shadow, and form interact, allowing you to create even more compelling and realistic artwork. It’s a natural progression for anyone who has confidently navigated the initial “Shading Techniques For Drawing Guide For Beginners.”
Conclusion
Embarking on the journey of learning “Shading Techniques For Drawing Guide For Beginners” is an exciting step towards transforming your two-dimensional sketches into vibrant, lifelike artworks. By understanding the fundamentals of light sources and value scales, and diligently practicing core techniques like hatching, cross-hatching, stippling, scribbling, and blending, you build an invaluable foundation. Remember that consistent practice, keen observation of the world around you, and a willingness to experiment are your greatest allies. Avoid common pitfalls such as limited value range or finger blending, and instead, embrace layering and the subtle nuances of reflected light. With dedication to these “Shading Techniques For Drawing Guide For Beginners,” you will soon develop the skill and confidence to bring depth, form, and realism to all your drawings, making them truly pop off the page.
FAQ
Q: What is the most important thing for beginners to understand about shading?
A: For beginners learning “Shading Techniques For Drawing Guide For Beginners,” the most important thing is to understand the light source and its effect on an object, which determines the placement and intensity of highlights, mid-tones, and shadows. Equally crucial is mastering the value scale to achieve a full range of tones from white to black.
Q: How can I make my shading look smooth?
A: To make your shading smooth, apply graphite in light, even layers, gradually building up the tone. Use blending tools like blending stumps or tortillons to gently merge pencil marks, working from lighter areas to darker ones. Maintain a light touch and avoid pressing too hard initially to prevent muddy effects.
Q: What pencils should a beginner use for shading?
A: For beginners focusing on “Shading Techniques For Drawing Guide For Beginners,” a small selection of graphite pencils is ideal. An HB pencil is good for initial sketching, while 2B, 4B, and 6B pencils are excellent for shading, offering a range of soft leads that produce progressively darker tones.
Q: Why is observing light and shadow important for shading?
A: Observing light and shadow is vital because it helps you accurately translate the three-dimensional world onto a two-dimensional surface. By studying how light hits objects, you can correctly identify areas of highlight, mid-tone, core shadow, and cast shadow, which are essential for creating realism and depth in your drawings.
Q: Can I use my finger to blend my drawings?
A: It is generally not recommended to use your fingers for blending. The natural oils from your skin can transfer to the paper, leaving behind smudges, uneven marks, and potentially damaging the paper over time. Instead, use dedicated blending tools like blending stumps, tortillons, or even a soft tissue.