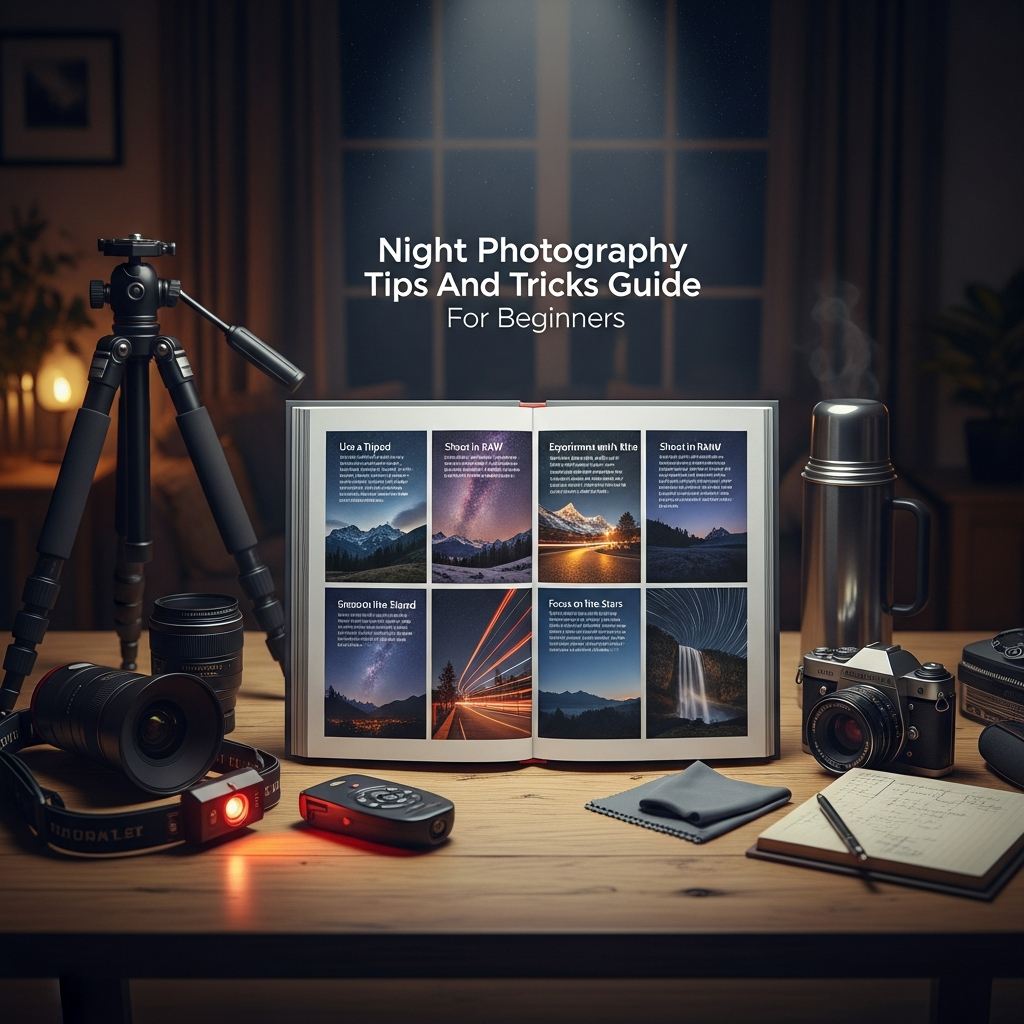
Welcome to the ultimate Night Photography Tips And Tricks Guide For Beginners, a comprehensive resource designed to illuminate the world of low-light shooting. Many people believe capturing the magic of the night sky or the neon glow of a city is incredibly difficult, but with the right foundational knowledge, anyone can create stunning images after the sun goes down. This article provides essential advice on gear, camera settings, and creative techniques to transform your nighttime pictures from dark, blurry snapshots into breathtaking, professional-looking photographs. Getting started with night photography means learning to see light in a completely different way, and this detailed Night Photography Tips And Tricks Guide For Beginners will be your trusted companion on that journey.

—
What are the most crucial settings for beginner night photography?
To capture sharp, stunning images at night, beginners should focus on three main camera settings. These settings—aperture, shutter speed, and ISO—form the core of every Night Photography Tips And Tricks Guide For Beginners. A wide aperture (low f-number, like f/2.8) is necessary to maximize light intake. A long shutter speed (10 to 30 seconds) is essential to let the sensor collect enough light, and a moderately high ISO (1600 to 6400) increases the sensor’s sensitivity to register faint light sources. This combination is the starting point for anyone using this Night Photography Tips And Tricks Guide For Beginners to master the dark.
—
The Essential Gear for Beginner Night Shooters
Stepping out at night with your camera requires a shift in thinking about equipment. Unlike daytime shooting where you can often get by with just a handheld camera, night photography relies heavily on tools that enforce stillness and maximize light collection. Knowing what to pack is the very first step in following any thorough Night Photography Tips And Tricks Guide For Beginners. The difference between a blurry mess and a crisp, stunning image often comes down to the quality and deployment of just a few key accessories.
The Unshakable Foundation: Your Tripod
The most vital piece of equipment you need is a sturdy tripod. This might sound obvious, but the importance of a solid, reliable camera support cannot be overstated in the context of night photography. Since you will be using shutter speeds that last anywhere from five seconds to several minutes, even the slightest movement—a gentle breeze, or the simple act of pressing the shutter button—will result in a noticeable blur across your final image.
Imagine trying to paint a detailed mural on a sheet of paper while the paper is constantly vibrating; that is essentially what happens when you attempt to hand-hold a camera during a long exposure. A tripod locks your composition into place, ensuring every element of the scene remains fixed while the sensor slowly gathers light over a long duration. For a proper Night Photography Tips And Tricks Guide For Beginners, we recommend investing in a model with a ball head, which provides smooth, precise adjustments even in the dark, unlike the more restrictive pan-tilt heads. Look for a tripod that is rated to hold a weight well over the weight of your camera and lens combination for maximum stability. This redundancy ensures that even if you are shooting on uneven ground or in light wind, your setup remains rock-solid, a crucial Night Photography Tips And Tricks Guide For Beginners principle.
Moreover, the act of using a tripod forces you to slow down and consider your composition more carefully. During the day, it is easy to rattle off a dozen shots in a minute, but setting up a tripod, framing your shot, and then waiting 30 seconds for an exposure instills a more contemplative, deliberate photographic approach. This disciplined process often results in more thoughtful and higher-quality images, a valuable takeaway from this Night Photography Tips And Tricks Guide For Beginners. By committing to a tripod, you are committing to the patience required to successfully execute the techniques found throughout this Night Photography Tips And Tricks Guide For Beginners.
Choosing the Right Glass: Fast and Wide Lenses
When it comes to lenses for night photography, two words are paramount: “fast” and “wide.” A “fast” lens is one with a very wide maximum aperture, indicated by a low f-number like f/2.8, f/1.8, or even f/1.4. This is essential because the larger the aperture, the more light can enter the lens and hit the camera sensor in a given time. Think of the aperture as a light collector; at night, you want the largest possible bucket to catch every photon you can. Lenses with an aperture of f/4 or smaller will struggle immensely, making a key part of any good Night Photography Tips And Tricks Guide For Beginners advice the recommendation for fast glass.
A “wide” lens, generally between 14mm and 24mm on a full-frame camera (or 10mm to 16mm on a crop sensor), allows you to capture a much larger field of view. This is especially important for astrophotography, where you want to fit the magnificent sweep of the Milky Way, or a vast number of stars, into your frame while still including an interesting foreground element. The wider the lens, the longer you can keep your shutter open before the stars begin to show movement (star trails), adhering to the crucial 500 Rule we will discuss later. Therefore, investing in a high-quality, fast, wide-angle lens is perhaps the single most important purchase after a tripod for serious students of this Night Photography Tips And Tricks Guide For Beginners. This specific gear choice dramatically improves your chances of capturing breathtaking scenes, which is the ultimate goal of any Night Photography Tips And Tricks Guide For Beginners.
Beyond the Camera Body: Remotes and Red Light
While the camera and lens do the heavy lifting, several small, inexpensive accessories are absolutely essential for a successful night shoot. No comprehensive Night Photography Tips And Tricks Guide For Beginners would be complete without highlighting these simple but critical items.
First, you need a way to trigger the shutter without touching the camera. Pressing the shutter button, even gently, can cause enough vibration to blur your image during a long exposure. The simple fix is a remote shutter release or a simple cable release. Many modern cameras can also be triggered via a smartphone application, which serves the same purpose of completely isolating your hands from the camera during the exposure. If you don’t have a remote, the camera’s built-in two-second timer is a perfect substitute, as it gives any vibrations time to settle before the shutter opens. This hands-off approach is one of the most practical Night Photography Tips And Tricks Guide For Beginners tips you will receive.
Second, a headlamp with a red-light mode is indispensable. Navigating in the dark and adjusting settings is impossible without light, but using a bright white flashlight will ruin your eyes’ adjustment to the darkness, a process called dark adaptation. A red light, on the other hand, allows you to see your camera settings, pack, and surroundings without constricting your pupils, meaning you can switch back to viewing the scene (and the viewfinder) instantly. Furthermore, always pack extra batteries. Long exposures and cold temperatures drain battery life much faster than daytime shooting, a piece of practical wisdom that every Night Photography Tips And Tricks Guide For Beginners must include.
Unlocking Your Camera’s Power: The Exposure Triangle at Night
The heart of night photography lies in understanding and controlling the exposure triangle: Aperture, Shutter Speed, and ISO. Unlike shooting in a well-lit studio or during the day where you have a huge margin for error, capturing a clear night image requires precise, manual control over all three elements. This section of our Night Photography Tips And Tricks Guide For Beginners will break down how to optimize each setting for low-light conditions.
Aperture: Opening the Floodgates to Light
The aperture is the opening within your lens that controls the amount of light hitting the sensor, and it is measured in f-stops. For night photography, your default approach should almost always be to use the widest aperture your lens allows—the lowest f-number, such as f/2.8. By setting the aperture wide open, you maximize the efficiency of your lens, allowing it to collect the maximum amount of available light in the shortest amount of time. This aggressive light collection is essential because at night, you are fighting for every tiny photon.
However, using a wide aperture creates a very shallow depth of field, meaning only a small slice of the scene, from front to back, will be in sharp focus. This is a crucial consideration for anyone studying this Night Photography Tips And Tricks Guide For Beginners. When shooting a cityscape, for example, you may need to close the aperture down slightly, perhaps to f/5.6 or f/8, to ensure both a distant building and a nearby street are sharp. A common creative exception to the wide-open rule is when photographing urban scenes with bright point light sources, like streetlights. Stopping down to a small aperture, such as f/16 or f/22, can create a stunning “starburst” or “sunburst” effect where the lights flare out into sharp, multi-pointed stars. This technique adds an incredible visual drama that few beginner night photographers realize is possible, making it a valuable addition to this Night Photography Tips And Tricks Guide For Beginners.
In summary, for astrophotography (stars, Milky Way), always go as wide as your lens permits (f/2.8 or lower). For urban scenes, start wide but be prepared to stop down for greater depth of field or to achieve that beautiful starburst effect. Finding this balance is a core skill taught in this Night Photography Tips And Tricks Guide For Beginners.
Shutter Speed: The Art of Time Travel
Shutter speed is the length of time your camera’s sensor is exposed to light. At night, this time can stretch significantly, often running from ten seconds to a full minute. This extended exposure time is what enables you to capture light that is otherwise invisible to the naked eye. This is perhaps the most defining characteristic of long-exposure photography and a centerpiece of this Night Photography Tips And Tricks Guide For Beginners.
For capturing the night sky, specifically stars, you must account for the Earth’s rotation. If the shutter is open for too long, the stars will appear as small streaks instead of crisp, pinpoint dots. The most widely accepted rule to calculate the maximum exposure time for pinpoint stars is the “500 Rule.” You take the number 500 and divide it by your lens’s focal length (after accounting for your camera’s crop factor, if applicable).
The 500 Rule for Pinpoint Stars:
| Camera Sensor Type | Focal Length Example | Calculation | Maximum Shutter Speed |
| :— | :— | :— | :— |
| Full-Frame | 20mm lens | 500 / 20 | 25 seconds |
| Crop Sensor (APS-C, 1.5x) | 14mm lens (21mm effective) | 500 / 21 | 23.8 seconds |
Sticking to this simple calculation ensures sharp stars, a fundamental Night Photography Tips And Tricks Guide For Beginners step. However, if your creative goal is to intentionally capture long star trails (where the stars move across the frame as streaks of light), you will need to shoot for much longer—often 30 minutes to several hours. In such cases, you will use your camera’s Bulb Mode, which keeps the shutter open for as long as you hold the shutter release or until you tell it to stop. This ability to manipulate time is what makes night photography so unique and a central focus of any detailed Night Photography Tips And Tricks Guide For Beginners.
For cityscapes, the consideration changes. The long shutter speed is used not to capture faint starlight but to create motion blur with light, such as smoothing out moving water or transforming car headlights and taillights into stunning, colorful ribbons of light trails. In this context, shutter speeds often range from 5 to 60 seconds, adjusted until the bright city lights achieve the desired effect without overexposing the scene. Mastering this control is key to benefiting from this Night Photography Tips And Tricks Guide For Beginners.
ISO: Balancing Brightness and Digital Grain
ISO dictates the sensitivity of your camera’s sensor to light. In daytime photography, the goal is always to keep the ISO as low as possible (typically ISO 100 or 200) to ensure the cleanest image quality with the least amount of digital noise, or “grain.” When shooting at night, however, you have a non-negotiable scarcity of light, forcing you to significantly raise the ISO. This is a necessary compromise taught in every effective Night Photography Tips And Tricks Guide For Beginners.
For star photography, where light is incredibly sparse, you will typically need to push your ISO quite high, often to ISO 3200 or ISO 6400. The exact number depends on your camera model, as newer cameras with larger, full-frame sensors handle high ISO values much better than older or smaller-sensor models. The downside of a high ISO is the introduction of digital noise, which manifests as colorful, tiny specks in the dark areas of your image. Therefore, the trick for any student using this Night Photography Tips And Tricks Guide For Beginners is to find the “sweet spot”—the highest ISO setting that captures enough light for a well-exposed image without producing an unacceptable level of noise.
For scenes with more available light, like moonlit landscapes or urban cityscapes, you can afford to use a lower ISO, perhaps ISO 800 to ISO 1600, combined with a longer shutter speed. A longer exposure at a lower ISO generally produces a cleaner, more detailed image than a shorter exposure at a very high ISO. This fine-tuning process is part of the experimentation and practice encouraged by this Night Photography Tips And Tricks Guide For Beginners. Always remember to take a few test shots at various ISO settings to compare the brightness versus the noise level on your camera’s LCD screen. This test-and-adjust workflow is a cornerstone of this Night Photography Tips And Tricks Guide For Beginners.
Masterful Techniques That Separate the Pros from Newbies
Once you have the gear and a basic understanding of your manual settings, the next stage of learning in this Night Photography Tips And Tricks Guide For Beginners is adopting field techniques that solve the unique problems of low-light shooting. The camera operates very differently in near-total darkness, and relying on automated functions will almost certainly lead to disappointing results.
The Manual Focus Imperative
In low light, your camera’s autofocus system often struggles because it lacks sufficient contrast to lock onto a subject. It will “hunt” back and forth, failing to achieve focus, resulting in a frustratingly blurry final image. For this reason, all successful night photography is executed using Manual Focus (MF). This is a non-negotiable part of every dedicated Night Photography Tips And Tricks Guide For Beginners.

The most reliable technique for achieving tack-sharp focus on distant subjects, especially stars, is the Live View Zoom Method.
- Switch your lens to Manual Focus (MF).
- Point your camera at the brightest star, a distant streetlight, or the Moon.
- Activate your camera’s Live View mode. This displays the image on your camera’s LCD screen.
- Use the digital zoom function (usually a magnifying glass icon) to zoom in 5x or 10x on that bright point of light.
- Manually rotate the focus ring on your lens until that point of light appears as the smallest, sharpest dot possible.
- Disengage the Live View zoom and take your shot.
It is highly recommended to then tape the focus ring in place with gaffer tape. This prevents the ring from accidentally shifting while you are moving around or changing your composition, ensuring that every subsequent shot remains in perfect focus. This detailed step is one of the most practical and often-overlooked Night Photography Tips And Tricks Guide For Beginners methods.
The RAW Difference: Your Digital Negative
The file format you choose can drastically affect the quality of your finished night photographs. Every reputable Night Photography Tips And Tricks Guide For Beginners stresses the importance of shooting in RAW format, not JPEG. A JPEG file is a compressed, “developed” image; your camera throws away a significant amount of the original captured data to make a smaller file size, which saves space but limits your editing flexibility.
RAW, conversely, is the camera’s digital negative. It retains all the original image data, specifically 14-bits of color information compared to the 8-bits found in a JPEG. In low-light conditions, where dark shadows predominate, this extra data is priceless. It allows you to dramatically brighten dark areas, recover detail in shadows, and adjust white balance in post-processing without introducing noticeable color banding or excessive digital noise. If you were to try to brighten a dark JPEG file, the noise would increase rapidly, and the image would quickly fall apart. Shooting in RAW gives you the maximum dynamic range and color depth, which is absolutely essential for creating high-quality results from your long exposures. For beginners, this means your initial images might look dull, but the power you gain in editing is a non-negotiable asset for anyone following this Night Photography Tips And Tricks Guide For Beginners.
Planning Your Perfect Night Shoot
Night photography is less about spontaneous action and more about meticulous planning. You can have the best equipment and settings, but if you show up at the wrong location or at the wrong time of the lunar cycle, your results will be disappointing. Pre-visualization and planning are critical components of any successful Night Photography Tips And Tricks Guide For Beginners.
Finding True Darkness: The Light Pollution Challenge
The single biggest enemy of astrophotography is light pollution. The pervasive, yellow-orange glow emanating from cities washes out the faint light of distant stars and completely obscures the Milky Way. To capture a stunning Milky Way core, you must escape this light dome entirely, making location scouting a paramount concern detailed in this Night Photography Tips And Tricks Guide For Beginners.
One of the most effective tools for planning is a Dark Sky Map, such as the Bortle Scale map. This map assigns a class (Class 1 being the darkest, Class 9 being inner-city) to various locations, allowing you to visually identify areas far from urban centers. You may need to drive an hour or more out of town to find a Class 3 or Class 4 location, which offers a significantly clearer view of the cosmos. For a truly dark sky capable of revealing the Milky Way in all its glory, you’ll want to aim for a Class 2 location, a step-up for anyone dedicated to the principles in this Night Photography Tips And Tricks Guide For Beginners.
Furthermore, consider your altitude. Shooting from a higher elevation reduces the amount of atmospheric haze and airborne particles between your camera and the stars, resulting in clearer, crisper images. By moving away from ground-level light and up into cleaner air, you dramatically increase the quality of your raw capture. This dedication to seeking out pristine environments is a core tenet of every serious Night Photography Tips And Tricks Guide For Beginners.
Celestial Timing: The Role of the Moon
The Moon, while beautiful, is a colossal light source that can easily overpower the faint light of the distant stars and the Milky Way. For this reason, the most successful astrophotographers time their shoots around the lunar calendar. This strategic planning is the difference between a passable shot and a mind-blowing one, a key takeaway from this Night Photography Tips And Tricks Guide For Beginners.
The Milky Way Sweet Spot:
To photograph the Milky Way core, you must shoot during a New Moon phase, or within a few days on either side. During the New Moon, the Moon is not visible in the night sky, providing the darkest possible canvas. This timing is absolutely essential for capturing the maximum detail in the galaxy.
The Moonlit Landscape Strategy:
Conversely, a different kind of night photography is achievable when the Moon is nearly full. A bright, nearly full Moon can act as a giant, natural light source, illuminating the foreground landscape (mountains, trees, or buildings) and providing a pleasing sense of depth to your scene. In these conditions, you can often lower your ISO and shorten your shutter speed because you have so much ambient light to work with.
To help with this complex planning, professional tools are now available to beginners. Applications like PhotoPills or Stellarium use augmented reality to show you exactly where the Moon and the Milky Way will be at any time and date, allowing you to scout your composition during the day and know exactly where to point your camera once night falls. Utilizing these modern resources elevates the game for anyone following this Night Photography Tips And Tricks Guide For Beginners.
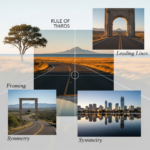
Creative Composition Ideas for Your First Night Photos
Technical mastery of exposure settings and focus is only half the battle. To create a truly compelling image, you need a strong, well-thought-out composition. Night photography offers a unique set of compositional opportunities, leveraging light and shadow in ways that are impossible during the day, making it a critical aspect of this Night Photography Tips And Tricks Guide For Beginners.
The Foreground Anchor: Storytelling in the Dark
A common mistake among beginners is to point the camera straight up at the stars, resulting in a photograph that, while technically interesting, lacks context or scale. The most impactful night photos include a compelling foreground element—an anchor—to ground the image and provide a sense of place. This element helps the viewer relate to the vastness of the cosmos, a vital compositional tip in any comprehensive Night Photography Tips And Tricks Guide For Beginners.
Consider finding an interesting tree silhouette, a weathered fence, a distinct rock formation, or a quiet, abandoned structure to include in the bottom third of your frame. The dark foreground element serves as a counterpoint to the bright, detailed sky. You can use your red-light headlamp (or a dedicated small flashlight) to quickly “paint” light onto this foreground during the long exposure, a technique known as light painting. A quick sweep of light can subtly reveal details and textures in the foreground without overly distracting from the sky. This careful balance between illuminated ground and starry sky is a hallmark of high-level night shooting, and a technique we encourage you to practice as part of this Night Photography Tips And Tricks Guide For Beginners.
Drawing the Eye: Light Trails and Leading Lines
In urban night photography, light trails become one of your most effective compositional tools. By setting a long shutter speed (e.g., 10 to 30 seconds) on a busy bridge or street, the moving headlights and taillights of cars are transformed into streaks of color—white/yellow for the front and red for the back. These trails can be used as leading lines, drawing the viewer’s eye from the bottom of the frame and into the scene, perhaps to a distant, well-lit landmark. This technique adds dynamic movement to an otherwise still image, a powerful element of this Night Photography Tips And Tricks Guide For Beginners.
Look for locations like elevated pedestrian walkways or overpasses to position your camera above the traffic, which allows you to capture the complete flow of the light trails unobstructed. Furthermore, reflections on wet pavement or calm water (such as a river or lake) are another powerful compositional technique. The lights of the city or the lines of a bridge, when perfectly reflected, create a striking symmetry that doubles the visual interest of the scene. Incorporating these lines and reflections is a highly effective way to utilize the unique properties of light and time available to a practitioner of this Night Photography Tips And Tricks Guide For Beginners.
The Starburst Effect in Cityscapes
As touched on earlier, the starburst effect is a stunning visual flourish that can instantly elevate an ordinary cityscape photo. This effect occurs when light hits the edge of your aperture blades. To achieve the sharpest, most defined starbursts, you must use a very small aperture, typically between f/16 and f/22. This is the only major exception to the “shoot wide open” rule for night photography, and it’s a fantastic inclusion in this Night Photography Tips And Tricks Guide For Beginners.
By stopping down to f/22, you restrict the light severely, meaning you will need a significantly longer shutter speed (often 30 seconds or more) to achieve proper exposure. The tiny aperture forces the light from streetlights, signs, or distant building lights to diffract, creating those beautiful, pointy star shapes. The number of points in the starburst is determined by the number of aperture blades in your lens. A lens with nine rounded blades will generally produce an 18-point starburst, for example. Experimenting with this technique in an urban setting is a fun and rewarding way to complete your early understanding provided by this Night Photography Tips And Tricks Guide For Beginners.
The Final Frontier: Post-Processing for Night Photography
The final and arguably most crucial stage of the process is the development of your RAW files. Post-processing is not merely ‘editing’ your photos; it is the act of developing your digital negatives to bring out the details that the sensor captured but cannot display on the camera’s small LCD screen. No Night Photography Tips And Tricks Guide For Beginners is complete without acknowledging this essential step.
The primary goals in post-processing night photos are to reduce noise, boost the light in the shadows (where most of the interesting data is hiding), and correct the white balance. At night, cameras often misinterpret the color of the faint light, resulting in a color cast—usually a strong yellow or green tone from light pollution. Adjusting the white balance to a cooler temperature (bluer tones) brings the image closer to what the naked eye perceives, especially in sky images. This is a common adjustment for users of this Night Photography Tips And Tricks Guide For Beginners.
Dedicated software, such as Adobe Lightroom or Capture One, provides powerful tools specifically for reducing digital noise without destroying fine details in the stars. By selectively brightening the shadows and increasing the clarity and contrast, you can transform a seemingly dark, flat RAW image into a vibrant, three-dimensional scene with details in both the black night sky and the foreground. Learning these few simple processing steps is what truly separates a beginner from a confident night shooter, making the entire journey guided by this Night Photography Tips And Tricks Guide For Beginners a success.
—
The world after dusk is a boundless canvas for creativity, offering opportunities to capture light and time in ways that daytime photography simply cannot match. This Night Photography Tips And Tricks Guide For Beginners has provided you with the necessary roadmap, from selecting the right equipment to mastering the crucial manual camera settings and creative compositional techniques. The key now is to take this knowledge, head out under the stars, and start experimenting. Embrace the trial and error; patience and practice are the final, unwritten tips in this Night Photography Tips And Tricks Guide For Beginners that will inevitably lead you to stunning, light-filled results. The journey of mastering the darkness is incredibly rewarding, and following the steps in this Night Photography Tips And Tricks Guide For Beginners is the perfect way to begin your adventure.
FAQ (Pertanyaan yang Sering Diajukan)
Q: What is the “500 Rule” and how do I apply it for my night photography?
The “500 Rule” is a simple calculation used in astrophotography to determine the maximum shutter speed you can use before stars begin to appear as trails instead of sharp, pinpoint dots. This is a must-know element of any Night Photography Tips And Tricks Guide For Beginners.
How to Apply the 500 Rule:
- Formula: 500 / (Focal Length of your lens) = Maximum Exposure Time in Seconds.
For Crop-Sensor Cameras: If you have an APS-C sensor (which typically has a 1.5x crop factor), you must first multiply your lens’s focal length by the crop factor. For example, a 16mm lens on a 1.5x crop sensor acts like a 24mm lens (16 1.5 = 24). The calculation becomes 500 / 24, giving you a maximum shutter speed of about 20.8 seconds.
- Goal: By using a shutter speed that is equal to or slightly less than the result, you guarantee sharp stars. Mastering this rule is essential for this Night Photography Tips And Tricks Guide For Beginners.
Q: Why should I use manual focus when my camera has a great autofocus system?
While modern autofocus (AF) systems are excellent in daylight, they rely on contrast to function. In the deep darkness of night, the light levels and contrast are too low for the AF sensors to lock onto a subject accurately, causing the lens to “hunt” endlessly or focus incorrectly. This is a common frustration for new students of a Night Photography Tips And Tricks Guide For Beginners. Using manual focus, combined with the Live View Zoom Method, allows you to visually confirm that the stars or distant lights are perfectly sharp, eliminating the risk of a soft or blurry image.
Q: What is the best kind of lens to get if I’m just starting out with astrophotography?
For beginners focusing on astrophotography, the best lens is a wide-angle prime lens with a fast maximum aperture, ideally f/2.8 or lower (like f/1.8 or f/1.4). Focal lengths between 14mm and 24mm (on full-frame) are generally recommended. This type of lens maximizes the amount of light collected (due to the low f-number) and allows for a longer exposure time without star trailing (due to the wide focal length). It is the most critical piece of optical equipment recommended by this Night Photography Tips And Tricks Guide For Beginners.
Q: How can I avoid the noise or ‘grain’ that appears when I shoot with a high ISO?
The key to minimizing noise while using the high ISO required for night shooting is a multi-pronged approach that every comprehensive Night Photography Tips And Tricks Guide For Beginners suggests:
- Shoot in RAW: This format preserves maximum data, making noise reduction in post-processing much more effective.
- Use the Lowest Necessary ISO: Always start at a mid-range ISO (e.g., 1600 or 3200) and only increase it if your image is still too dark. A longer exposure at a lower ISO is generally better than a shorter one at a very high ISO.
- Use In-Camera Noise Reduction: Many cameras have a setting called “Long Exposure Noise Reduction.” When activated, the camera takes a second, identical exposure (a “dark frame”) after the main shot with the shutter closed. It then uses this frame to map and subtract the noise pixels from the original image, drastically cleaning up the final picture.