Welcome to the ultimate guide for capturing the world after the sun sets. The darkness presents unique challenges for any photographer, but it also unlocks incredible visual opportunities that daytime shooting simply cannot offer. Mastering the art of low-light imaging requires a specific blend of gear, camera settings, and composition techniques. By applying these specific Night Photography Tips and Tricks, you can transform your blurry, noisy shots into stunning, crisp images of the stars, cityscapes, and light trails that define true low-light mastery.

Night photography is essentially about collecting light over an extended period, which means slowing things down and embracing stability. The foundation of successful low-light image-making rests on three pillars: using a sturdy tripod, keeping your aperture wide open, and setting your focus manually. The following Night Photography Tips and Tricks will equip you with the knowledge to conquer the darkness and achieve breathtaking results consistently.
Essential Gear: Building Your Kit for the Dark
Successful night photography relies almost entirely on having the right equipment to keep your camera stable and collect maximum light. Attempting to handhold shots after dusk is a common mistake that leads to frustration and motion blur. Therefore, the very first of the crucial Night Photography Tips and Tricks involves a meticulous check of your gear bag before you head out.
Featured Snippet Answer: Essential Night Photography Gear
Essential gear for mastering Night Photography Tips and Tricks includes:
- Sturdy Tripod: Eliminates camera shake during long exposures.
- Fast Lens (f/2.8 or wider): Maximizes light capture, reducing necessary ISO and noise.
- Remote Shutter Release: Prevents vibration from pressing the shutter button.
- Extra Batteries: Long exposures rapidly drain power.
- Headlamp with Red Light: Allows navigation without ruining night vision.
- Manual Focus Capability: Crucial for precise focusing in near-total darkness.
The Unsung Hero: Tripod and Remote Shutter
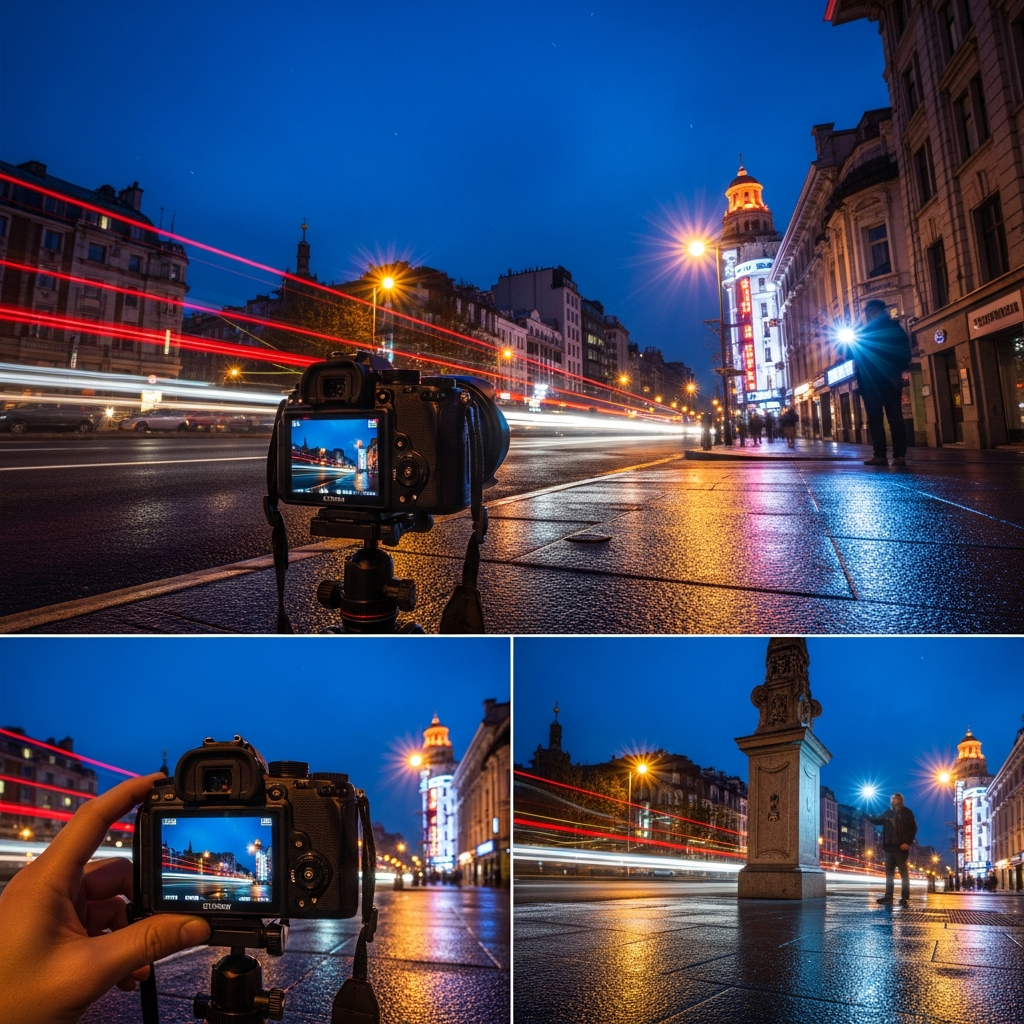
The tripod is arguably the single most critical piece of equipment for night photographers. Since effective night shooting almost always involves shutter speeds ranging from several seconds to several minutes, any movement will destroy the image clarity. A cheap, flimsy tripod will vibrate, especially in the slightest breeze, rendering your image unusable. Invest in a heavy-duty, carbon-fiber tripod that provides maximum stability.
When setting up, remember a key piece of wisdom among advanced Night Photography Tips and Tricks: Always use the camera’s built-in timer (2-second delay) or, better yet, a remote shutter release. Even touching the shutter button on a sturdy tripod can introduce enough vibration to cause blur at 10-second exposures. A remote shutter release, whether wired or wireless, ensures zero physical contact with the camera during the critical moment of exposure.
The concept here is simple: if you are using a shutter speed of 30 seconds, even a fraction of a second of movement at the beginning or end of the exposure can register as blur. Using a remote release and a mirror lock-up function (if applicable on a DSLR) are small but powerful Night Photography Tips and Tricks that separate the sharp images from the soft ones.
Lens Choices: Fast Apertures Rule the Night
When light is scarce, your lens’s aperture becomes your primary ally. The ability of a lens to open wide—that is, to have a low f-number like f/2.8, f/1.8, or even f/1.4—is the secret sauce in the best Night Photography Tips and Tricks. A wider aperture allows the camera sensor to gather more light in a shorter amount of time.
Consider the difference between an f/4 lens and an f/2.8 lens. The f/2.8 lens collects twice the amount of light as the f/4 lens. This means you can either halve your exposure time (reducing the risk of star trails) or halve your ISO setting (significantly reducing image noise). For demanding subjects like the Milky Way, a fast prime lens (like a 24mm f/1.4 or 35mm f/1.8) is often preferred over a variable-aperture zoom lens.
While wide-angle lenses are most popular for capturing vast night skies and cityscapes, remember that telephoto lenses can be used effectively for detailed shots of the moon or distant urban scenes. However, using a longer focal length greatly exaggerates any vibration, making the tripod stability even more critical—another key consideration among advanced Night Photography Tips and Tricks.
Power Management and Illumination: Don’t Get Caught in the Dark
Night photography is notoriously demanding on camera batteries. Long exposures, cold temperatures, and the constant use of the Live View screen drain batteries rapidly. A common pitfall for beginners is neglecting this detail, only to have the camera die halfway through a perfect shooting window. These practical Night Photography Tips and Tricks are non-negotiable for a successful shoot.
Always carry at least two to three fully charged spare batteries for a typical night shoot. If shooting in freezing conditions, keep spare batteries close to your body (e.g., in an inner pocket) to maintain their charge, as cold significantly reduces battery performance.
For personal illumination, a headlamp is essential for hands-free setup. However, standard white light will ruin your eyes’ adaptation to the dark, which can take up to 30 minutes to recover. The best Night Photography Tips and Tricks recommend using a headlamp with a red light mode; red light has a minimal impact on night vision and is courteous to any other photographers sharing the location.
The Exposure Triangle in the Dark: Settings That Matter
The fundamental challenge in night photography is managing the lack of available light. The standard Exposure Triangle (Aperture, Shutter Speed, ISO) must be manipulated to its extremes. Understanding how these settings interact in low-light scenarios is the heart of effective Night Photography Tips and Tricks. Unlike daylight where you might prioritize a high shutter speed or deep depth of field, at night, the priorities shift entirely to light gathering.
Aperture Priority: Going Wide Open
As discussed earlier, aperture is the light-gathering tool. For nearly all night sky or astrophotography, the general rule is to use the widest aperture your lens allows (the lowest f-number), such as f/2.8, f/4, or wider. This is the first adjustment in the sequence of effective Night Photography Tips and Tricks.
Using a wide aperture immediately brings in maximum light, allowing for shorter shutter speeds or lower ISOs. However, going too wide (e.g., f/1.4) can introduce lens aberrations and reduce sharpness around the edges. Many lenses achieve their optimal sharpness around one stop down from their widest opening. For instance, if your lens opens to f/1.8, often f/2.8 will yield a sharper image overall while still gathering plenty of light. This subtle adjustment is a crucial Night Photography Tips and Tricks detail for achieving professional results.
Shutter Speed: Balancing Light and Motion
Shutter speed is the component of the exposure triangle where the longest exposures are needed. In night photography, shutter speed serves two primary functions: collecting light and managing the motion of light sources (stars, cars, etc.).
When shooting a stationary cityscape, you might use a 15-second exposure to allow the streetlights and building lights to register clearly on the sensor. The longer the shutter remains open, the brighter the scene becomes. This is a basic premise of all Night Photography Tips and Tricks.
However, when photographing the night sky, you face a unique problem: star movement. Due to the Earth’s rotation, stars will begin to register as small trails rather than sharp points after a certain exposure length. To combat this and maintain sharp stars, you must adhere to specific limits. This is where specialized Night Photography Tips and Tricks like the “500 Rule” come into play.
The classic “500 Rule” states that you divide 500 by your lens’s focal length (in 35mm equivalent terms) to find the longest exposure time (in seconds) before star trailing becomes noticeable. For example, using a 20mm lens: $500 / 20 = 25$ seconds. If you are using a crop sensor camera, you must first multiply the focal length by the crop factor (e.g., 1.5x or 1.6x). More recently, a stricter “300 Rule” or even the complex NPF rule (developed by Nikon for higher-resolution sensors) is often recommended to ensure sharper results. Applying these formulas is one of the most technical but essential Night Photography Tips and Tricks.
ISO Management: The Noise Dilemma
ISO sensitivity is how much your camera’s sensor amplifies the collected light. Increasing ISO makes the image brighter, but it also introduces digital noise (graininess), which is significantly more noticeable in dark areas than in bright ones. A major goal of applying these Night Photography Tips and Tricks is to keep noise to a minimum.
The recommended starting point for night sky photography is often ISO 1600 or ISO 3200. This range provides a good balance between brightness and noise for most modern cameras. However, the ‘safe’ ISO limit varies drastically between camera models. Newer cameras with full-frame sensors handle high ISO much better than older cameras or those with smaller, crop sensors.
The best strategy, often repeated in Night Photography Tips and Tricks guides, is to maximize light gathering via a wide aperture and a long shutter speed first, and only then increase the ISO as a last resort to achieve the desired brightness. Always shoot in RAW format as it retains more data, allowing for more effective noise reduction during post-processing compared to JPEGs. Shooting in RAW is one of the foundational Night Photography Tips and Tricks for maximizing quality.
Composition and Focus: Seeing in the Dark
Technical settings will give you an exposed image, but composition and focus are what make it a great photograph. The dark environment makes both tasks infinitely harder because the camera’s autofocus system is useless, and the lack of visible elements can make framing challenging. Mastering these compositional Night Photography Tips and Tricks is crucial for creating impactful images.
Achieving Pin-Sharp Focus: Manual is Mandatory
The autofocus system on nearly all cameras relies on contrast, which is essentially non-existent in true darkness. Trying to autofocus on a distant star or an obscure foreground object will result in frustrating “focus hunting” and blurry results. The most non-negotiable of all the Night Photography Tips and Tricks is: Switch your lens and camera to Manual Focus (MF).
To achieve critical focus for astrophotography (i.e., focusing on the stars), follow this process:
- Use Live View: Frame your shot, then switch the camera to Live View (or the electronic viewfinder on mirrorless cameras).
- Zoom In: Manually zoom the Live View image (usually 5x or 10x magnification) onto the brightest star or distant light source visible in your frame.
- Adjust Manually: Slowly turn the focus ring until the star appears as the smallest, sharpest point of light possible. This takes patience.
- The Infinity Mark Trap: Never rely on the infinity symbol ($\infty$) on your lens barrel. True optical infinity is often slightly before or past the mark, and relying on it will result in slightly soft stars.
For scenes with a close foreground element and a distant background (like stars), you may need to use focus stacking or focus on the hyperfocal distance. Hyperfocal distance is the closest point you can focus on while keeping the furthest point (infinity) acceptably sharp. Calculating and applying this is one of the advanced Night Photography Tips and Tricks that ensures both the foreground and the sky are sharp.
Finding Foreground Interest: More Than Just the Sky
A picture of just the stars can be beautiful, but it often lacks context or a sense of scale. The most compelling night photos incorporate a strong foreground element. This element gives the viewer a visual anchor and makes the sky seem grander and more remote. Integrating a powerful foreground is one of the most often cited Night Photography Tips and Tricks for enhancing visual impact.
Foreground elements can include things like a distinctive tree, a mountain peak, an old barn, a reflective lake, or an iconic building. The challenge is illuminating them.

Techniques for illuminating the foreground include:
- Silhouettes: Position the foreground element directly in front of a bright light source (like the city lights or the moon) to create a dark, dramatic shape.
- Light Painting: During your long exposure, quickly ‘paint’ the foreground with a flashlight, LED panel, or headlamp. The key is to keep the light moving to avoid hot spots and only illuminate for a fraction of the total exposure time. Effective light painting is a learned skill among the various Night Photography Tips and Tricks.
- Ambient Light: Utilize light pollution or the faint moonlight to subtly reveal the foreground, often requiring a slightly longer exposure time.
By integrating a strong, properly exposed foreground, you elevate your image from a technical snapshot to a true visual story. This is a hallmark of high-quality Night Photography Tips and Tricks.
The Magic of Light Trails and Star Trails
Beyond static scenes, many of the most captivating night images involve capturing motion, specifically through light trails and star trails. These creative applications of Night Photography Tips and Tricks exploit the long-exposure technique to its fullest.
Vehicle Light Trails:
These shots are common in cityscapes, capturing the streaks of red and white lights from passing cars. The technique is straightforward: use a mid-to-high aperture (f/8 to f/11) to ensure a deep depth of field and a slow shutter speed (10 to 30 seconds) while aiming the camera at a busy road. The small aperture and long exposure balance the bright artificial lights effectively. Getting the timing right to capture full, flowing lines of light is a specific skill within these Night Photography Tips and Tricks.
Star Trails:
Star trails are captured by exposing the sensor for an extremely long time, making the stars appear as concentric circles around the North Star (Polaris in the Northern Hemisphere).
There are two main methods, which are crucial Night Photography Tips and Tricks for this genre:
- Single Long Exposure (Bulb Mode): Use a remote release in Bulb mode and hold the shutter open for a very long period, often 30 minutes to two hours. This requires an extremely dark environment and poses a risk of introducing significant sensor noise and heat-related artifacts.
- Image Stacking (Recommended): This method involves taking dozens or hundreds of consecutive shorter exposures (e.g., 20 seconds each) and later combining them in specialized software (like StarStax). This approach minimizes noise, maintains battery life, and allows for much more control. This technique is now considered one of the definitive Night Photography Tips and Tricks for star trails.
Specialized Night Subjects and Techniques
The universe of night photography is vast, encompassing everything from close-up shots of the moon to wide, sprawling captures of the Milky Way. Each subject requires a slightly different application of the core Night Photography Tips and Tricks. Deepening your understanding of these specific scenarios will dramatically improve your results.
Astrophotography: Capturing the Milky Way
Astrophotography, particularly capturing the Milky Way galaxy, is the holy grail for many who seek out Night Photography Tips and Tricks. To succeed, you need four key elements: the right time, the right location, the right settings, and the right preparation.
- Timing and Location: You must shoot when the Moon is new (or below the horizon) to avoid its light washing out the faint stars. You also need to be in a location far away from light pollution (Bortle Class 1-3). The core of the Milky Way is only visible during certain months and hours, depending on your hemisphere, making planning essential.
- The Rule of Thumb Settings (Start Here):
- Aperture: Widest possible (f/2.8 is ideal).
- Shutter Speed: Use the 500 Rule (typically 15-30 seconds) to avoid star trailing.
- ISO: ISO 3200-6400 (depending on your camera’s noise tolerance).
For maximum detail, advanced Night Photography Tips and Tricks involve using a star tracker (an equatorial mount that moves the camera slowly to track the stars), allowing for exposures of several minutes without star trails. This allows the use of much lower, cleaner ISOs, yielding images with significantly less noise and more detail.
Cityscape Night Photography: Managing Dynamic Range
Shooting urban scenes at night presents a different challenge from star photography: dynamic range. The scene will contain extremely bright sources (streetlights, illuminated signs) and deep shadows, overwhelming the camera’s sensor. Successfully capturing cityscapes requires a different set of Night Photography Tips and Tricks compared to the dark sky.
Instead of maximizing light, the goal is often to control light and capture detail in both highlights and shadows.
- Aperture: Use a smaller aperture (f/8 to f/16) to increase depth of field and, crucially, to create beautiful sunburst or starburst effects from point light sources.
- Shutter Speed: Use a long exposure (5 to 30 seconds) to smooth water, capture light trails, and brighten shadows.
- Bracketing and HDR: Since the contrast is often too high for a single exposure, bracket your shots (take one underexposed, one normal, and one overexposed) and blend them in post-processing using an HDR (High Dynamic Range) technique. This is a specialized Night Photography Tips and Tricks method for urban environments.
Lunar Photography: The Exposure Challenge
The Moon is by far the brightest object in the night sky, yet it is often incorrectly photographed using standard night settings, resulting in a blown-out, featureless white orb. The truth is that the Moon, being illuminated by the sun, is essentially a daylight subject.
A helpful starting point for lunar photography settings—a valuable piece of Night Photography Tips and Tricks—is the Looney 11 Rule:
- Aperture: f/11
- Shutter Speed: 1/ISO (e.g., if you set ISO to 100, use 1/100th of a second).
This rule ensures a properly exposed Moon that retains surface texture and crater detail. When photographing the full Moon, you will need a long telephoto lens (300mm to 600mm or more) to make it appear large in the frame. These specific Night Photography Tips and Tricks ensure you capture the lunar surface details accurately.
Post-Processing: Unlocking the Night’s Potential
The work of night photography is not finished when the shutter closes. In fact, post-processing is a massive and often overlooked part of effective Night Photography Tips and Tricks. Since low-light conditions push the sensor to its limits, the resulting RAW files are often dark, noisy, and flat, requiring careful attention in the digital darkroom to reveal their full potential.
Handling Noise Reduction Naturally
Noise is the biggest problem in night photography, especially when shooting at high ISOs (3200 and above). Noise generally appears in two forms: Luminance Noise (grayscale graininess) and Color Noise (splotches of random color). Addressing this is a critical step in these Night Photography Tips and Tricks.
Modern processing software handles noise reduction extremely well, but it must be applied carefully. Over-aggressive noise reduction will smooth out the image detail, making the stars look mushy and textures disappear—a result known as the “plastic look.”
A recommended workflow, which is one of the essential Night Photography Tips and Tricks for post-processing, is:
- Fix Color Noise First: Color noise is generally easier to remove with minimal impact on detail.
- Apply Luminance Noise Reduction Gradually: Only apply enough luminance reduction to make the noise acceptable, not completely disappear. A little grain is often preferable to an over-smoothed image.
- Selective Sharpening: Apply sharpening selectively, mainly to the stars and the foreground, while keeping sharpening away from the large black areas of the sky, which can amplify noise.
Color Correction and White Balance: Finding the True Color
The night sky is not simply black. It contains subtle colors that contribute to the mood and atmosphere of the image. The camera’s automatic white balance setting often fails miserably at night, producing overly yellow or green casts, especially in areas with light pollution. Correcting the color balance is a vital part of these Night Photography Tips and Tricks.
The best approach is to set a manual Kelvin temperature while shooting. For pure astrophotography away from light pollution, a Kelvin setting of around 3800K to 4200K (cooler) can help bring out the blues and purples of the sky, giving a more dramatic look. Conversely, if you are near heavy city lights, you might use a much lower Kelvin (like 2800K or the Tungsten preset) to neutralize the orange glow of sodium vapor lamps. Experimenting with different Kelvin values is one of the most artistic Night Photography Tips and Tricks.
Stacking and Compositing: Beyond the Single Frame
As cameras and post-processing software advance, the most impressive night photographs are often the result of combining multiple images. Image stacking and compositing are key advanced Night Photography Tips and Tricks.
Focus Stacking: If your image requires both a very sharp foreground and sharp stars, you take two separate images: one focused on the foreground and one focused on infinity (the stars). These two images are then blended in post-processing to create a single image that is sharp throughout.
Star Stacking (Noise Reduction): To reduce noise without sacrificing detail, you can take a series of 10 to 20 identical images of the night sky and use software (like Sequator or specialized astrophotography programs) to stack them. The software averages the noise away from the stars, leaving a much cleaner image than a single exposure taken at the same settings.
Mastering all these Night Photography Tips and Tricks takes time, but the rewards—stunning images that capture the universe’s majesty—are well worth the effort.
Conclusion: Taking the Leap Into the Night
Embarking on the journey of night photography is a rewarding challenge. It forces you to slow down, be methodical with your gear, and truly master the technical aspects of your camera. From setting up a rock-solid tripod and choosing the fastest lens you own, to calculating the precise shutter speed using the 500 Rule and managing the ever-present dilemma of ISO noise, every detail matters. By diligently applying these comprehensive Night Photography Tips and Tricks, you will find that the darkness is no longer an obstacle but an opportunity.
Remember that the ultimate success in this specialized field is a combination of technical precision and artistic vision. Practice achieving sharp focus in the dark, explore creative foreground lighting with light painting, and embrace the post-processing phase to clean up the noise and bring out the stunning colors hidden in your RAW files. Continue to experiment with new compositions and refine your settings, and you will soon be capturing the magnificent beauty of the night sky and the luminous drama of the urban landscape. These Night Photography Tips and Tricks are your roadmap to spectacular low-light imaging.
*
Frequently Asked Questions (FAQ)
What is the ideal aperture setting for Milky Way photography?
The ideal aperture setting for Milky Way photography is the widest possible opening on your lens, typically between f/2.8 and f/4. A wide aperture allows the camera to collect maximum light in a short period, which is essential for keeping the ISO low and the shutter speed fast enough (around 15-30 seconds) to prevent star trailing. This is one of the most crucial Night Photography Tips and Tricks to remember.
Should I use Auto White Balance (AWB) for night shots?
No, you should avoid using Auto White Balance (AWB) for night shots, as it tends to incorrectly guess the color temperature, often resulting in an unnatural yellow or green color cast, especially near light pollution. Instead, set a manual Kelvin temperature, typically ranging from 2800K to 4200K, to neutralize the warmth of artificial lights and bring out the natural blues and purples of the night sky, a core detail among effective Night Photography Tips and Tricks.
Why are my night photos blurry even when I use a tripod?
Your night photos are likely blurry despite using a tripod due to camera movement caused by touching the shutter button or star movement during long exposures. To fix this, use a remote shutter release or the camera’s 2-second delay timer to eliminate vibration. If the stars are blurry (trailing), you are likely using too long of a shutter speed; apply the 500 Rule to reduce the exposure time and ensure pin-sharp stars, which is a key component of advanced Night Photography Tips and Tricks.