Learning how to retouch skin in Snapseed is the secret weapon of modern mobile photography, transforming everyday portraits into gallery-worthy images. Snapseed, a powerful and free application developed by Google, provides a suite of professional-grade tools that are surprisingly intuitive and effective for delicate skin enhancements. Unlike many single-purpose filters, Snapseed allows for nuanced, localized adjustments, ensuring your final image maintains a natural, authentic quality while eliminating distractions like blemishes, uneven tones, or excessive texture. Mastering the combination of the Healing Tool and the specialized Portrait Tool is the fundamental step to understanding how to retouch skin in Snapseed successfully.

Many amateur photographers struggle with portraits because they believe a ‘good photo’ requires expensive desktop software. This is simply not true. With just your phone and the right techniques, you can execute precise skin retouching that rivals results from complex programs. The key lies in understanding that great skin retouching is about subtlety and consistency, not turning the subject into a plastic doll. This guide will take you deep into every technique available, ensuring you know exactly how to retouch skin in Snapseed for truly professional outcomes.
—
Why Snapseed is Your Go-To Mobile Skin Editor
Snapseed stands out in the crowded field of photo editing apps because it provides professional-level control without the steep learning curve. The application’s design philosophy focuses on flexibility, allowing users to apply multiple edits non-destructively, a feature that is essential when learning how to retouch skin in Snapseed. This non-destructive workflow means you can always undo or adjust a single step without affecting the entire image.
Understanding the Core Tools for Retouching
Effective skin retouching within the Snapseed ecosystem relies primarily on a combination of two distinct but complementary tools. The choice of tool depends entirely on the specific skin issue you are trying to address:
- The Healing Tool: This is the workhorse for removing small, distracting elements, such as blemishes, acne, scars, or stray hairs. The tool intelligently samples surrounding pixels to seamlessly cover the targeted area, making it essential for a clean canvas.
- The Portrait Tool: This specialized tool automatically detects facial features and offers targeted adjustments for Skin Smoothing, Eye Clarity, and Face Spotlight. It is the fastest way to learn how to retouch skin in Snapseed for a general, even tone.
The combination of precision spot removal (Healing) and overall skin texture refinement (Portrait) is what delivers truly high-quality results. Without both, your edits will either look incomplete or overly processed. Therefore, a complete understanding of how to retouch skin in Snapseed involves toggling between these functions.
The Power of Non-Destructive Editing
One of the most valuable aspects of using Snapseed for skin work is its non-destructive editing capability. Every time you apply a tool, it is saved as a separate layer in the Stacks menu.
This layered approach is crucial for high-level portrait work. Imagine you spend fifteen minutes removing every small blemish perfectly with the Healing Tool, only to realize later that you applied too much overall brightness. In other apps, you might have to start over. In Snapseed, however, you can simply:
- Go to the Stacks icon (the box with an arrow).
- Select the specific Tune Image layer.
- Adjust the brightness slider, leaving your intricate spot removal work completely untouched.
This feature gives you the confidence to experiment, knowing that you can always backtrack and refine a specific aspect of how to retouch skin in Snapseed without destroying the subsequent edits. This layered control is what truly differentiates Snapseed from simpler mobile editors.
—
Step-by-Step Guide: How to Retouch Skin in Snapseed with the Portrait Tool
The Portrait Tool is the quickest and most powerful method for applying general skin enhancement, which is the cornerstone of learning how to retouch skin in Snapseed. This tool uses facial detection technology to isolate the face, ensuring that the smoothing effect is not accidentally applied to hair, background, or clothing.
Direct Answer: Essential Steps for Snapseed Skin Retouching
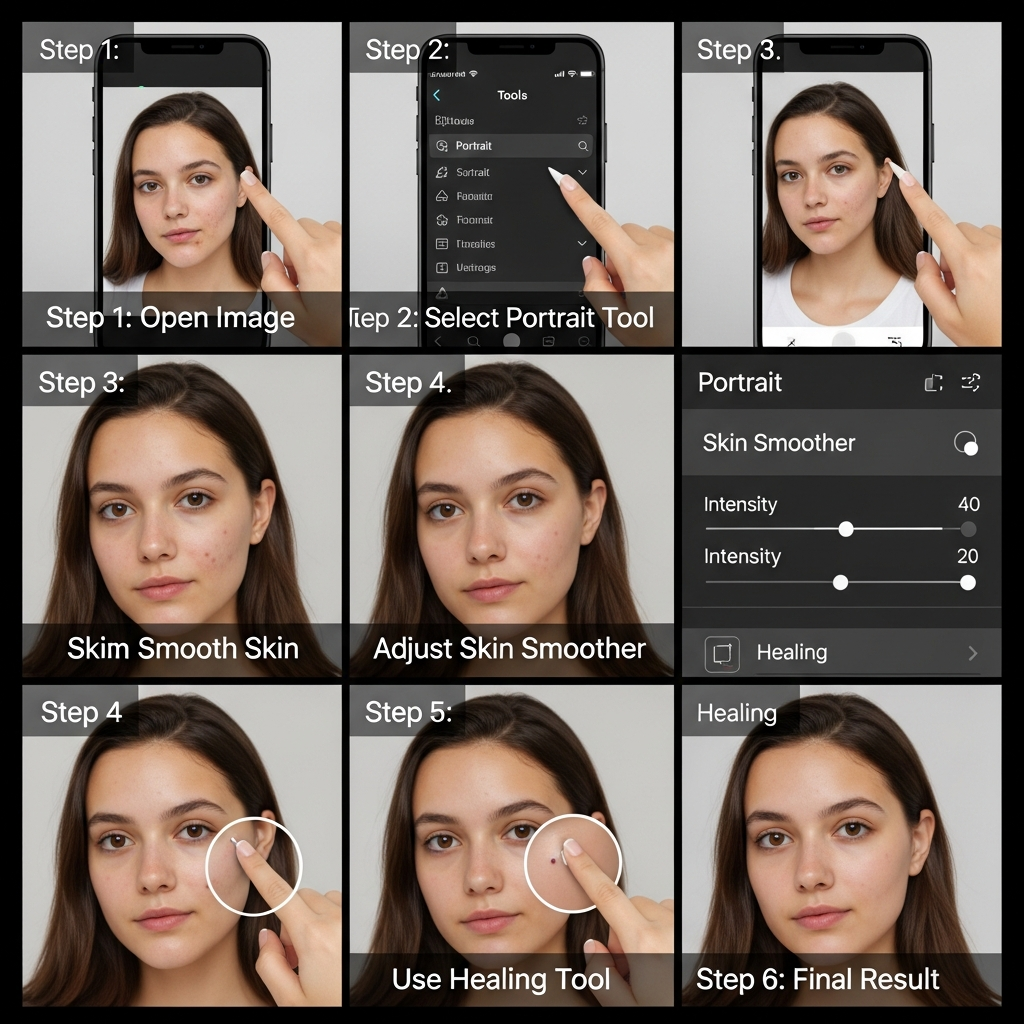
To quickly and effectively retouch skin in Snapseed, follow these three core steps using the specialized Portrait Tool:
| Step | Action within Snapseed’s Portrait Tool | Recommended Range/Goal |
| :— | :— | :— |
| 1. Selection | Tap the Face Icon to ensure auto-detection is correct. | Select a suitable style (e.g., ‘Smooth 2’) as a starting point. |
| 2. Smoothing | Swipe vertically to select ‘Skin Smoothing,’ then swipe horizontally. | Keep value below 30. Excessive smoothing creates an unnatural ‘plastic’ look. |
| 3. Detail | Swipe vertically to select ‘Eye Clarity,’ then swipe horizontally. | Slightly increase (around +10 to +20) to add natural sharpness to eyes. |
These parameters offer a fast, balanced approach to how to retouch skin in Snapseed and should be used as the base layer before any further blemish removal.
Activating and Navigating the Portrait Mode
Once your image is loaded, you can access this feature by:
- Tapping the Tools icon (the pencil).
- Selecting the Portrait tool.
Snapseed will immediately analyze the photo and highlight the detected face. This feature is remarkably robust and is a key reason why many portrait photographers rely on this method when learning how to retouch skin in Snapseed. You will notice that the tool provides various ‘Styles’ at the bottom of the screen, such as ‘Smooth 1,’ ‘Smooth 2,’ ‘Bright,’ and ‘Pop.’ These are pre-set combinations of the adjustment parameters. While they are useful starting points, for truly customized and natural results, you should always move past the presets and into manual control.
To enter manual adjustment, swipe vertically on the screen. This action reveals the menu of adjustable parameters, which usually include ‘Face Spotlight,’ ‘Skin Smoothing,’ and ‘Eye Clarity’. Understanding how to fine-tune these parameters is paramount to mastering how to retouch skin in Snapseed. The tool is designed to save time, and by learning the optimal settings, you save even more.
Adjusting ‘Skin Smoothing’ and ‘Eye Clarity’
These two settings are the most critical components of the Portrait Tool when learning how to retouch skin in Snapseed. Their careful balancing determines the success of your portrait.
Skin Smoothing
This parameter utilizes an intelligent blurring mechanism that focuses on minimizing skin texture while attempting to preserve crucial facial details like pores and hair. The core difficulty when learning how to retouch skin in Snapseed is knowing when to stop, and this is especially true for the Skin Smoothing slider.
- The Problem with Over-Smoothing: Pushing the smoothing slider too high is the single most common mistake made by beginners. When the value exceeds 40-50, the skin begins to lose all discernible texture, resulting in a flat, artificial, and “plastic” appearance. The effect immediately screams ‘edited’ rather than ‘naturally beautiful.’
- The Professional Approach: A professional approach to how to retouch skin in Snapseed involves using a low to moderate setting, generally between 15 and 30. This range subtly minimizes minor imperfections and evens out skin tone without eliminating the natural depth and variation that makes a face look real. Always zoom in to a 100% view to check the texture after applying the adjustment; if you can no longer see any faint pores, you have gone too far.
Eye Clarity
While smoothing the skin, it is crucial to ensure that the subject’s eyes remain sharp and engaging. The Eye Clarity slider does exactly this, selectively increasing the local contrast and sharpness around the eye area.
- Balancing the Detail: Since the overall Skin Smoothing effect can slightly soften the entire face, Eye Clarity serves as a countermeasure. A small boost (typically +10 to +25) will make the eyes pop, drawing the viewer’s focus back to the most important element of the portrait.
- Warning: Just like smoothing, over-sharpening the eyes can introduce a jarring, unnatural look. If you see bright, hard halos around the iris or excessive texture in the white of the eyes, reduce the clarity. The aim here is subtle enhancement, not hyper-realism. True mastery of how to retouch skin in Snapseed involves this delicate dance between soft skin and sharp eyes.
—
Advanced Techniques: Using the Healing Tool for Perfect Spot Removal
While the Portrait Tool provides a beautiful foundation, blemishes, stray strands of hair, or small distractions require the targeted precision of the Healing Tool. This is where the manual finesse of learning how to retouch skin in Snapseed truly shines, allowing you to clean up the image with surgical accuracy.
Mastering Zoom and Precision
The effectiveness of the Healing Tool is directly proportional to how much you zoom into the image. Attempting to remove a small spot while viewing the entire photo will inevitably lead to blurry or patchy results.
- Zoom In Deep: Always pinch-to-zoom until the blemish or distraction fills a significant portion of your screen. This magnification allows you to see the exact boundaries of the area you need to ‘heal.’
- Use Short, Controlled Taps: The Healing Tool works by copying textures and tones from the immediate surrounding area. For tiny spots like pimples or moles, use a single, quick tap that completely covers the spot.
- For Larger Areas, Use Quick Brushing: If you are trying to cover a larger patch of uneven texture or a prominent scar, use short, rapid brush strokes rather than one long swipe. Snapseed refreshes its source area for texture with every new brush stroke, ensuring the patch blends more seamlessly with the adjacent skin. This precision is vital for anyone serious about how to retouch skin in Snapseed without leaving obvious patches.
Dealing with Difficult Areas (Hairlines, Shadows)
Some areas of the face present a greater challenge for the automatic healing function, requiring a more tactical approach to how to retouch skin in Snapseed. These are generally areas where the skin meets a distinct line or changes rapidly in brightness or color.
- The Border Rule: The Healing Tool struggles when the brush stroke crosses a high-contrast boundary, such as a sharp jawline, an eyebrow, or a hairline. Never drag the Healing Tool across a boundary line. For instance, if you are removing a spot near the eyebrow, only brush up to the brow line. Brushing across it will smear the hair texture onto the skin, creating an artifact that is very difficult to remove.
- Shadow and Light: When removing a blemish that sits in a transitional area between light and shadow (e.g., a cheekbone), work slowly. Sometimes, the initial tap will pull texture from the wrong side of the shadow, creating a visible patch. In this case, slightly adjust your zoom or try tapping adjacent to the spot first, then tap the spot itself. The app is often smart enough to use the texture from your last successful heal as its new source. The difference between a patchy heal and a seamless one often determines the level of expertise in how to retouch skin in Snapseed.
—
My Personal Journey: A Story of Over-Retouching and Learning
When I first started to figure out how to retouch skin in Snapseed years ago, I fell into the exact trap every beginner does: I thought more smoothing meant better results. I was working on a lovely portrait of my friend, aiming for that ‘magazine cover’ look. I cranked the ‘Skin Smoothing’ slider in the Portrait Tool up to 80. The face became one perfect, porcelain oval, but the photo was instantly dead. All the life, all the character—the tiny lines around her smiling eyes, the natural variation in her skin tone—vanished. She looked more like a video game character than a real person.

I showed it to a mentor, and he simply said, “If you can tell it’s retouched, you’ve failed.” That experience became my personal guiding rule. Since then, my entire approach to how to retouch skin in Snapseed has been based on an ‘80% rule.’ I only apply the smoothing or healing effect until I am 80% happy with the result, forcing myself to stop before it becomes obvious. The true art of mobile editing, I learned, is in the unseen refinement, using Snapseed to help the subject look like the best version of themselves, not a digitally airbrushed version. Now, when I teach people how to retouch skin in Snapseed, I always stress this simple principle: The best edits are the ones nobody notices. This philosophy ensures your work always retains a human connection.
—
Selective Retouching: The Magic of Brush and Selective Tools
While the Portrait and Healing tools handle the bulk of skin work, the true depth of professional how to retouch skin in Snapseed techniques involves the use of the Brush and Selective tools. These allow for targeted adjustments of brightness, contrast, and saturation on specific parts of the skin that need a little extra attention.
Enhancing Features vs. Smoothing Skin
The fundamental difference between general retouching and selective retouching is purpose. The Portrait Tool is for general improvement; the Selective and Brush Tools are for feature emphasis and correction.
Using the Brush Tool for Dodging and Burning
The concept of ‘Dodging and Burning’—lightening (dodging) or darkening (burning) specific areas—is a classic darkroom technique that translates perfectly into modern digital editing. When learning how to retouch skin in Snapseed, the Brush Tool is used to achieve this subtle dimensionality.
- Dodging (Lightening): Use the Brush tool set to ‘Exposure’ (e.g., at +0.3 or +0.7). You can gently paint over areas that need a subtle lift, such as under the eyes to diminish shadows, or over the center of the forehead and nose to create a subtle contour. This adds depth to the face and distracts from minor skin imperfections without heavy smoothing.
- Burning (Darkening): Use the same Exposure Brush, but set to a negative value (e.g., -0.3). This can be painted along the jawline or under the cheekbones to add definition, which in turn makes the skin appear more sculpted and smooth. This level of detail in how to retouch skin in Snapseed requires patience but yields the most striking results.
The Selective Tool for Tone Correction
Sometimes, a patch of skin has a slight color cast or is slightly brighter than the surrounding area. The Selective Adjustment tool (often referred to as the ‘Selective Tool’ or ‘Control Points’) is ideal for isolating these problems.
- Place a Control Point: Tap the Selective Tool and place a control point (a ‘P’ icon) directly onto the problematic area of the skin.
- Define the Area: Pinch-out to increase the size of the selection (the red overlay will show you the affected area). Keep this area confined to the skin patch you want to fix.
- Adjust Tone: Swipe vertically to access ‘Brightness,’ ‘Contrast,’ ‘Saturation,’ and ‘Structure.’ If the patch is too red, slightly decrease the Saturation. If the patch is too dark, slightly increase the Brightness.
The beauty of this method when learning how to retouch skin in Snapseed is that the adjustments are constrained only to the selected color and brightness range within the pinned area. This makes for incredibly natural and powerful local corrections that are impossible with global sliders.
The Art of Layering and Stacking Edits
A common mistake is trying to do too much in a single step. The key to truly understanding how to retouch skin in Snapseed is to treat the editing process as a series of light, incremental layers, taking full advantage of the Stacks feature.
- Why Layering Works: A heavy adjustment applied once often leads to an artificial look. For example, instead of one heavy application of ‘Skin Smoothing,’ consider three lighter layers:
- Layer 1 (Portrait Tool): Apply Skin Smoothing at +20.
- Layer 2 (Brush Tool): Use a negative ‘Structure’ brush (-10) to paint over particularly rough patches.
- Layer 3 (Selective Tool): Use a Selective Adjustment to slightly desaturate a single red area on the nose.
By spreading the adjustments across different tools and layers, the final effect appears more integrated and less processed. The goal of using the Snapseed stack is to build up a complex edit without creating a digital footprint that screams ‘retouched.’ This is the hallmark of professional-grade work on how to retouch skin in Snapseed.
—
Achieving a Natural Look: The Final Polish
The difference between a snapshot and a polished portrait often comes down to the final, subtle adjustments that unify the image. After all the spot removal and smoothing are complete, the final steps in mastering how to retouch skin in Snapseed involve correcting the overall tone and knowing when to finally put the phone down.
Color Grading and Skin Tone Correction
Perfect skin can look strange if the overall color of the image is off. A cold, blue image will make the retouched skin look sickly, while an overly warm, yellow image might make it appear jaundiced.
- Using Tune Image: The ‘Tune Image’ tool is the global control center. After all selective edits, use this tool to slightly adjust the overall white balance. Swipe vertically and select ‘Warmth’ or ‘White Balance’ (depending on the version you are using).
- Goal: Most portraits benefit from a very slight increase in warmth (often +5 to +10). This subtle shift adds a healthy, glowing appearance to the skin that complements the smoothing you have done previously.
- The Tonal Contrast Test: A great technique for professional finishers is the Tonal Contrast tool. While designed for landscape depth, it can also subtly enhance facial features. Apply a very low setting of Tonal Contrast (e.g., set Medium Tones to +5, leave High and Low Tones at 0). This gentle boost increases the micro-contrast in the mid-range colors, which can make the skin texture look slightly more defined in a natural way, preventing the fully smoothed look from becoming too flat. It’s an advanced secret for refining how to retouch skin in Snapseed.
The Importance of Subtlety (When to Stop)
The absolute hardest part of editing is knowing when to stop. This is especially true for skin retouching, where every additional adjustment pushes the image further away from reality.
- The 5-Minute Rule: When I am teaching someone how to retouch skin in Snapseed, I tell them to use the ‘5-Minute Rule.’ Once you think the image is finished, set your phone down for five minutes and look at something else (or better yet, get up and stretch). When you return and look at the image fresh, your brain will quickly pick up on any processing errors or areas that look overdone.
- The Before/After Toggle: Always use the fundamental Snapseed feature: Tap and hold the screen to see the “before” image. Release your finger to see the “after” image.
- If the difference is jarring, harsh, or dramatic, you have gone too far.
- If the difference is a subtle improvement—clearer eyes, fewer blemishes, slightly more even tone—you have succeeded.
The ultimate goal of learning how to retouch skin in Snapseed is to create a portrait that honors the subject while quietly removing any distractions that detract from the story of the photo. Aim for improvement, not transformation.
—
FAQ: Questions on How to Retouch Skin in Snapseed
Q: What is the single most important tool in Snapseed for removing blemishes?
The single most important tool for targeted blemish and spot removal is the Healing Tool. It operates much like a clone stamp or spot removal brush in desktop software, using surrounding pixel information to seamlessly fill the area you tap or brush. When learning how to retouch skin in Snapseed, you must master zooming in closely and using short, quick taps to ensure the tool samples the best possible texture for an invisible correction.
Q: Does Snapseed have a built-in ‘smooth skin’ filter that works automatically?
Yes, Snapseed features a specialized tool called Portrait that automatically detects the face and provides a dedicated ‘Skin Smoothing’ parameter. This is an intelligent filter that focuses the smoothing effect specifically on the facial skin, minimizing the risk of accidentally blurring hair or background elements. While it is automatic, professional results require manual adjustment of the slider, typically keeping the smoothing effect below a value of 30 to maintain natural skin texture.
Q: How do I ensure my skin retouching in Snapseed doesn’t look overly fake or “plastic”?
The key to preventing an artificial look when you retouch skin in Snapseed is a principle called Subtlety in Layers. First, always keep the Skin Smoothing slider in the Portrait Tool at a low setting (15-30). Second, rely heavily on the Healing Tool for blemishes, as targeted removal is better than global smoothing. Third, use the Structure slider in the ‘Tune Image’ or ‘Selective’ tools; slightly decreasing (pulling to the left) the structure on the skin can soften it without creating the plastic effect of excessive blurring. Always use the ‘Before/After’ view to check that key details (like eyelashes, lips, and hair) remain sharp and natural.
Q: Can I whiten teeth or brighten eyes using the Snapseed skin retouching process?
While not explicitly part of the ‘skin smoothing’ feature, you can effectively whiten teeth and brighten eyes using the Brush Tool in Snapseed. Select the Brush tool, choose the Exposure setting (e.g., set to +0.7), and carefully paint only over the teeth or the whites of the eyes. For eyes, you can also use the Portrait Tool’s Eye Clarity slider to add a sharp, natural sparkle. The controlled application of the Brush tool is an essential extension of learning how to retouch skin in Snapseed for comprehensive portrait perfection.
Q: What should I do if the Healing Tool creates a noticeable patch or smudge on the skin?
If the Healing Tool leaves a patch or smudge when you retouch skin in Snapseed, it means the tool sampled a contrasting area of texture or color. To fix this, first, try tapping the same spot again—Snapseed will use a new reference point. If the issue persists, undo the edit (using the undo arrow or Stacks menu), zoom in closer, and try using a series of very small, precise taps instead of a single brush stroke. For stubborn areas, try healing the surrounding, clearer skin first, and then moving in on the problematic spot. This technique “teaches” the tool the correct texture to use for the seamless blending of the skin.
—