The modern world of photography has dramatically shifted, moving professional-grade tools from the desktop darkroom to the palm of your hand. If you are serious about photography, knowing How to Edit Photos in Lightroom Mobile is no longer a luxury—it’s a necessity. This powerful application transforms your smartphone or tablet into a comprehensive editing suite, allowing you to capture, refine, and share stunning images instantly. Whether you are working with RAW files from a professional camera or just snapping candid moments with your phone, mastering the steps for How to Edit Photos in Lightroom Mobile will unlock your creative potential and give your images that distinctive, polished look.

Many professionals now utilize the mobile application as a primary editing platform. The flexibility and cloud-syncing capabilities mean that a photo taken on your mirrorless camera can be imported and edited on your tablet during a commute, ready for social media posting minutes later. Learning How to Edit Photos in Lightroom Mobile effectively involves understanding both the fundamental tools and the suite’s sophisticated, newer features that push the boundaries of mobile image manipulation.
Your First Steps: Getting Setup and Organized
Before you even begin to adjust sliders, an efficient setup is key to learning How to Edit Photos in Lightroom Mobile. Think of this preparation phase as tidying your digital workspace. A clean workspace leads to faster, more effective editing sessions.
Importing and Cloud Synchronization
Lightroom Mobile operates on a cloud-centric system, which is arguably its greatest strength. When you import an image, it is automatically synced across all your devices—desktop, tablet, and phone—via the cloud. This means you can start to Edit Photos in Lightroom Mobile on one device and seamlessly finish the job on another.
- Camera Roll Integration: For most users, importing is as simple as granting the application access to your phone’s camera roll. New photos will appear in the “Lightroom Photos” section, or you can manually select specific images to add to an album.
- RAW File Support: A significant feature is the app’s ability to handle high-quality RAW files from dedicated cameras, not just JPEGs. This gives you maximum flexibility when you Edit Photos in Lightroom Mobile, retaining all the precious data captured by the camera sensor for significant tonal and color adjustments.
- Albums for Workflow: Always organize your imports into specific albums (e.g., ‘Vacation 2024’, ‘Client Shoot – Portraits’). This organizational step is foundational to a professional workflow and drastically simplifies the process when you decide How to Edit Photos in Lightroom Mobile for different projects.
Navigating the Mobile Interface
The screen real estate on a phone is limited, so the interface is intelligently designed for touch control. The editing tools are logically grouped, appearing as icons at the bottom of the screen once you select an image. Familiarize yourself with these icons: Crop, Preset, Light, Color, Effects, Detail, and the newer Masking tools.
The interface is also optimized for quick navigation. For instance, recent updates emphasize simple gestures. You can speed up your initial culling and rating process by using gestures like swiping up on the left side to quickly assign a star rating or swiping up/down on the right side to mark a picture as Pick or Rejected. This allows you to rapidly filter hundreds of images before you even decide How to Edit Photos in Lightroom Mobile.
The Essential Starting Steps for a Perfect Base
If you want to know How to Edit Photos in Lightroom Mobile like a professional, you must always start with the foundational adjustments. Skipping these steps is like building a house without a proper foundation—everything that follows will be unstable. This section details the sequence of basic edits that should be applied to almost every photograph.
The Foundation of Every Good Edit
To begin to Edit Photos in Lightroom Mobile effectively, you should always follow a crucial three-step process: cropping and straightening, adjusting the white balance, and setting the exposure.
Direct Answer: The Initial Three Steps for Editing Photos in Lightroom Mobile
The best practice for starting an edit in Lightroom Mobile involves three fundamental adjustments to establish a solid base before refining details:
- Crop and Straighten: Correct the composition and horizon line.
- White Balance: Ensure colors are true-to-life by adjusting temperature and tint.
- Exposure: Set the overall brightness and contrast by balancing Highlights and Shadows.
Step 1: Cropping and Composition
Composition is the first thing a viewer notices. The crop tool is non-negotiable.
- Straightening: Even a slight tilt in the horizon line can ruin a landscape. Use the straighten slider or the grid overlay to align vertical and horizontal elements precisely.
- Ratio and Framing: Do you need a 4×5 for Instagram, 16×9 for a banner, or the original sensor ratio? Setting this first dictates the rest of your composition. A simple adjustment here can dramatically improve the visual impact of the image you want to Edit Photos in Lightroom Mobile.
- The Rule of Thirds: Use the grid guides provided in the crop tool to place your subject at intersecting points, instantly making the photo more dynamic and engaging.
Step 2: White Balance (The Color Temperature)
White Balance corrects the overall color cast caused by different light sources (e.g., tungsten lights are yellow, shade is blue).
- The Eyedropper Tool: The fastest way to set this is to tap the eyedropper and select a neutral white or grey area in the photo. The application will instantly calculate the correct temperature (yellow/blue) and tint (green/magenta).
- Manual Sliders: You can fine-tune the color by manually moving the Temp (Temperature) and Tint sliders. For example, slightly increasing the Temp slider adds warmth, which is often desirable for portraits, whereas slightly decreasing it can give a cooler, more dramatic feel to a cityscape. This is a critical step when you Edit Photos in Lightroom Mobile because it defines the foundational mood.
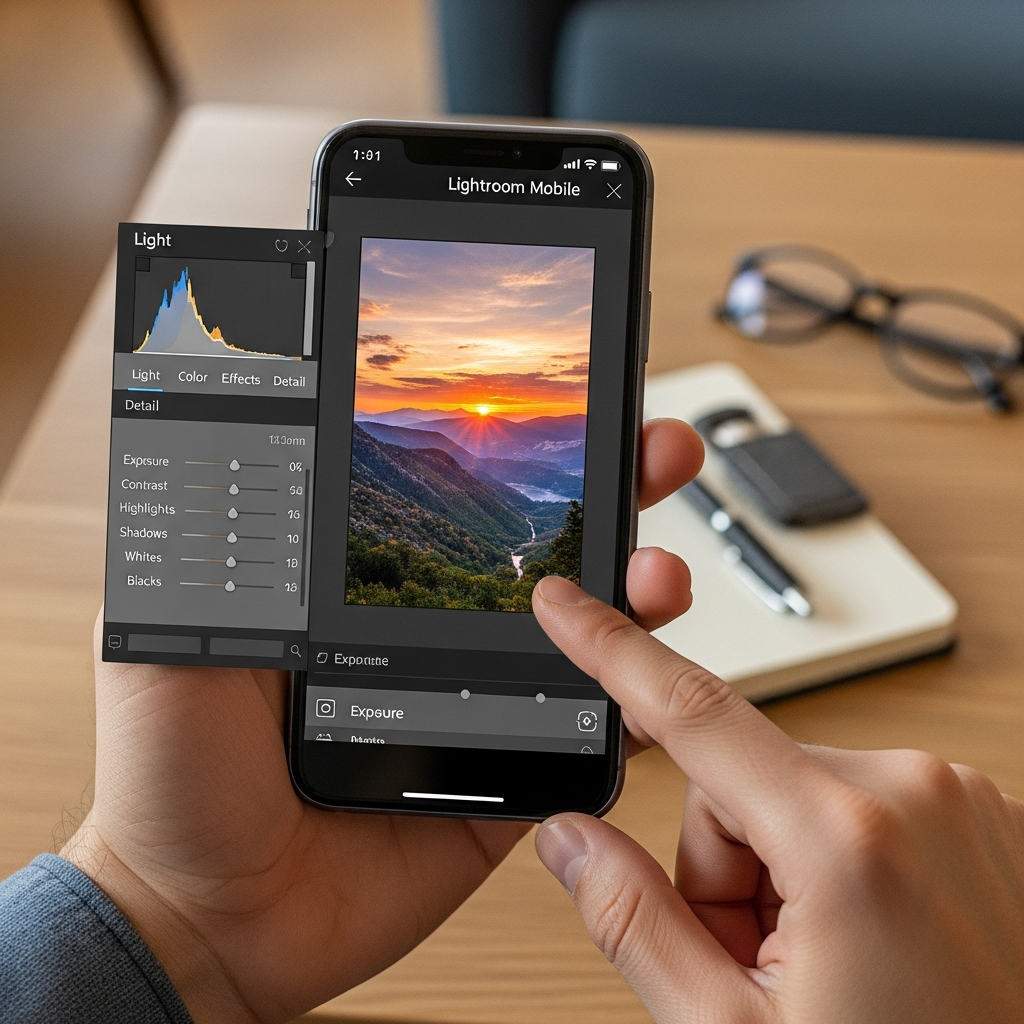
Step 3: Setting the Tonal Range (Exposure & Contrast)
The Light panel is where you define the image’s overall brightness and contrast, ensuring you are utilizing the full dynamic range of the file.
- The Exposure Slider: This is your master brightness control. Adjust it until the main subject is correctly illuminated, ensuring you don’t “clip” (lose data) in the highlights or shadows.
- Highlights and Shadows: These are your recovery tools. Reduce Highlights to bring back detail in bright areas (like skies or white shirts). Increase Shadows to reveal hidden detail in dark areas. A good strategy is to pull the highlights down and push the shadows up for a balanced, HDR-like look.
- Whites and Blacks: Use these to set the absolute brightest and darkest points of your image. Pushing the Whites slider often adds punch, while dropping the Blacks slider adds depth and contrast, which dramatically improves the result of How to Edit Photos in Lightroom Mobile. Always watch the histogram (the mountain graph) to ensure you aren’t losing data on either end.
Mastering the Classic Adjustment Tools
Once the foundation is set, you dive into the classic adjustment tools to refine the mood and detail of your image. This is where most of the artistic choices are made when learning How to Edit Photos in Lightroom Mobile. The process moves from global (Light and Color) to local (Detail and Optics).
Deep Dive into Color Adjustments
The Color panel is your palette. It goes far beyond simple saturation and vibrancy.
HSL/Color Mixer (Hue, Saturation, Luminance)
This is the most powerful and important color tool for learning How to Edit Photos in Lightroom Mobile. It allows you to target eight specific colors within your image and adjust them individually without affecting other colors.
- Hue: Changes the shade of a color. For example, you can shift the color of a blue sky toward cyan or indigo.
- Saturation: Controls the intensity of a color. You might decrease the saturation of greens to make them less distracting, or increase the saturation of reds to make a piece of clothing pop.
- Luminance: Adjusts the brightness of a color. Decreasing the luminance of blue makes the sky darker and more dramatic, while increasing the luminance of oranges and reds can lighten skin tones. This granular control is vital to understanding How to Edit Photos in Lightroom Mobile at a high level.
Color Grading (Split Toning’s Successor)
Color Grading is a sophisticated tool for introducing specific color casts into the three main tonal regions: Shadows, Midtones, and Highlights.
- Shadows: Often, adding a subtle touch of blue or teal to the shadows creates a cinematic look, a popular modern trend.
- Highlights: Introducing warmth (yellow/orange) to the highlights can mimic golden hour sunlight.
- Midtones: This new addition allows for even finer control, tying the shadows and highlights together with a harmonizing color. Mastering this feature is key for anyone who wants to know How to Edit Photos in Lightroom Mobile with a modern, film-like finish.
Texture, Clarity, and Dehaze: The Effects Panel
These sliders manipulate the local contrast, profoundly affecting the perceived sharpness and atmosphere of your photo.
- Texture: Adjusts the details of medium size, perfect for enhancing skin texture in portraits (subtle increase) or softening it (decrease) without affecting fine details like hair.
- Clarity: A broader local contrast tool. Increasing Clarity makes images punchier and slightly darker (often great for landscapes and architecture), while decreasing it adds a dreamy, soft glow. However, too much can make an image look garish, so use it sparingly when you Edit Photos in Lightroom Mobile.
- Dehaze: This tool adds or removes atmospheric haze. Increasing it adds contrast and saturation, especially in skies, making distant objects clearer (hence ‘Dehaze’). Decreasing it can add a matte, faded, or misty look, popular in some vintage styles.
Sharpening and Noise Reduction
The Detail panel ensures your image is crisp where it needs to be and clean where it shouldn’t be distracting.
- Sharpening: While you want your photo to be sharp, sharpening should be applied carefully. Using the Masking slider here is crucial. Hold the slider and look at the black and white overlay: white areas will be sharpened, and black areas will be ignored. This prevents you from sharpening smooth areas like skies or skin, which can introduce noise.
- Noise Reduction: High ISO settings or dark environments cause digital noise. The Luminance Noise Reduction slider smooths out the grainy look. Be cautious, as overdoing this can make the photo look plasticky and destroy fine detail. A slight application is often enough to significantly improve the final output when you Edit Photos in Lightroom Mobile.
Leveraging Modern and Advanced Features (2024 Updates)
The continuous evolution of the application means that the answer to How to Edit Photos in Lightroom Mobile is constantly getting more sophisticated. Recent updates in 2024 have introduced powerful, Context-Aware tools that used to be exclusive to desktop-grade applications. These innovations are critical for reaching a professional standard.
Generative Remove and Object Cleanup
One of the most exciting additions is the integration of advanced tools for object removal, enhancing the photo cleanup process significantly.
- The Power of Context: The Generative Remove feature, for example, allows users to remove unwanted distractions—a lamp post, a distracting pedestrian, or even a small bit of trash—by intelligently filling the area with content that matches the surrounding textures and lighting. This capability is revolutionary for mobile editing, transforming a simple brush tool into a powerful, automated solution.
- How to Use It: Simply select the Generative Remove brush, paint over the object you wish to remove, and the application analyzes the image to generate a seamless replacement. This saves photographers immense time compared to manual cloning and stamping, making it much faster to beautifully Edit Photos in Lightroom Mobile.
- Beyond Simple Healing: While the standard Healing Brush is still available for simple spot removal (like dust spots on a sensor), Generative Remove handles complex backgrounds and larger objects with a level of accuracy that was unthinkable on a mobile device just a couple of years ago.
The Power of Masking and Local Adjustments
The ability to make localized, targeted edits is what separates a basic editor from a professional. The Masking feature in Lightroom Mobile is incredibly intuitive and robust.
- Targeting Specific Subjects: Instead of adjusting the entire image, you can create a “mask” to isolate specific areas. Modern tools include Select Subject and Select Sky, which use machine learning to perfectly detect and outline the boundaries of a person or the sky with a single tap. Once the mask is created, you can apply any adjustment (exposure, color, effects) only to that isolated area.
- Linear and Radial Gradients: These classic tools remain essential. The Linear Gradient is perfect for adjusting exposure or clarity across a sky or foreground without affecting the middle ground. The Radial Gradient allows you to create a spotlight effect, brightening the center (your subject) and darkening the edges (vignette). This precise control over light is the secret to How to Edit Photos in Lightroom Mobile with depth and dimension.
Enhanced Lens Blur: Depth and Aesthetic
Another significant enhancement brought to Lightroom Mobile is the improved Lens Blur feature, which allows you to simulate the shallow depth of field (bokeh) typically created by expensive, fast lenses.
- Simulated Bokeh: You can specify the focal point, and the app will intelligently blur the foreground and background according to a customizable amount. This is incredibly useful for mobile photos that naturally have a greater depth of field than a DSLR or mirrorless camera, giving them a more professional, stylized look.
- Customizing the Look: Recent updates also allow users to choose the type of bokeh effect they want to mimic (e.g., circular, spherical, or standard). This level of artistic control over the aesthetic blur is a powerful tool for those who want to Edit Photos in Lightroom Mobile to achieve a distinctive portrait style.
Adaptive Presets for One-Tap Mastery
To further streamline the workflow and appeal to trending aesthetics, Adobe introduced Adaptive Presets. These aren’t like standard presets that apply global settings; they are context-aware.
- Targeted Adjustments: Adaptive Presets like Adaptive Sky or Adaptive Portrait analyze the image and apply specific edits only to the detected area (sky or subject). For example, an Adaptive Sky preset might increase the clarity and luminance reduction specifically on the sky area, leaving the rest of the landscape untouched.
- Speed and Consistency: For busy creators who need to quickly Edit Photos in Lightroom Mobile for immediate social media posting, these presets are a huge time-saver. They provide professional-looking results with just one tap, while still allowing for further manual fine-tuning.
Developing a Consistent and Efficient Mobile Workflow
A great editor doesn’t just know the tools; they have a system. Knowing How to Edit Photos in Lightroom Mobile efficiently means establishing a repeatable workflow that ensures consistency across all your images, often referred to as ‘maintaining a cohesive feed.’

The Power of Presets and Synchronization
Presets are the heart of efficiency. They are stored sets of adjustments that can be applied to any photo.
- Creating Your Signature Style: Once you have perfectly edited one photo, save those adjustments as a custom preset. This preset captures your unique style—your ideal contrast, specific color grading, and favorite texture settings. When you apply this preset to your next photo, 80% of the work is already done.
- Preset Synchronization: Because the application is cloud-based, any custom presets you create on your phone or tablet are instantly available on your desktop and vice-versa. This is essential for maintaining brand consistency, especially for businesses or influencers who need to Edit Photos in Lightroom Mobile in the same style every day.
- In-App Learning: The application also features in-app learning and inspiration, allowing you to discover and sometimes even download presets used by other photographers. This is an excellent way to learn new styles and see how different combinations of sliders achieve certain looks before creating your own.
Batch Editing for High Volume
For events, travel, or any large volume of similar images, batch editing is indispensable.
- Copy and Paste Settings: This is the ultimate time-saver. After you perfect the first image in a set (e.g., all photos taken in the same lighting conditions during a sunset), you can copy the edit settings. Then, select all the remaining photos in that series and paste the settings onto them.
- Tweak, Don’t Redo: After batch application, each photo might only require minor individual adjustments, such as a slight exposure bump or a minor crop correction. The time spent learning How to Edit Photos in Lightroom Mobile with a batch workflow saves hours of redundant editing.
Exporting and Sharing Your Masterpiece
The final step in How to Edit Photos in Lightroom Mobile is preparing the image for its final destination. The export process is flexible and critical for image quality.
- File Type and Quality: You generally want to export as a high-quality JPEG for social media and web use. The application allows you to select the image quality (100% is standard for maximum quality) and the dimensions.
- Watermarking: For professional use, you can apply a simple text or graphic watermark during the export process directly within the mobile app.
- Streamlined Sharing: Recent updates have streamlined sharing to popular social platforms like Instagram, making the final step faster and more convenient. You can bypass the need to save a file locally and then upload it, shaving off precious seconds when speed is paramount.
Advanced Techniques and Analogies for Deeper Understanding
To truly master How to Edit Photos in Lightroom Mobile, we must look beyond the simple function of each slider and understand the artistic intent behind the moves. This is the difference between simply adjusting a photo and truly developing an image.
Analogy: The Tone Curve is a Sculptor, Not a Carpenter
When learning How to Edit Photos in Lightroom Mobile, many users avoid the Tone Curve, but it is perhaps the most powerful tool for controlling contrast and color.
The S-Curve: The most common curve adjustment is the “S-Curve.” By lifting the top-right quarter (highlights) and dipping the bottom-left quarter (shadows), you create contrast that is richer and more sophisticated than the simple ‘Contrast’ slider. The Contrast slider affects all tones equally, but the S-Curve allows you to define how much the highlights brighten and how* much the shadows darken.
- Fading (The Matte Look): If you want a popular vintage or ‘matte’ look, lift the absolute lowest point of the curve (the black point) slightly up from the baseline. This prevents true black from existing in the photo, giving the shadows a soft, lifted, faded appearance. This single move is a cornerstone for many modern presets and defines a signature editing style for many who Edit Photos in Lightroom Mobile.
- Color Curves: Beyond the main luminosity curve, you have individual curves for Red, Green, and Blue. For instance, if you want a subtle green cast in the shadows (a popular cinematic look), you would select the Green curve and slightly pull the shadow point down. This introduces the complementary color, magenta, into the shadows. Conversely, to introduce green, you lift the shadow point up. This level of color manipulation is key to advanced How to Edit Photos in Lightroom Mobile techniques.
Managing Digital File Size and Performance
While the goal is to Edit Photos in Lightroom Mobile, a practical consideration for mobile users is storage space. The cloud synchronization, while a huge benefit, can lead to the app using significant local storage for cached data, especially if you download many originals for offline editing.
- Smart Previews and Caching: The application primarily works with ‘Smart Previews,’ smaller versions of your files that contain enough data for editing but save space. However, when you zoom in on a photo or download the original for full-resolution work, the local data usage can quickly balloon to several gigabytes.
- Clearing the Cache: Periodically clearing the application’s cache is necessary to reclaim phone storage without deleting your edits or original files (since they live in the cloud). This ensures that your ability to Edit Photos in Lightroom Mobile isn’t hampered by an overloaded phone, keeping the app fast and responsive.
Conclusion: The Mobile Studio is Here
The journey to master How to Edit Photos in Lightroom Mobile is one of continuous learning, largely because the software itself is constantly evolving. What was once a simple companion app is now a fully-fledged, professional-grade editing studio capable of complex masking, generative content removal, sophisticated color grading, and complete cloud synchronization.
By focusing on a disciplined workflow—starting with the correct foundation of crop and exposure, mastering the HSL and Color Grading tools, and then leveraging the cutting-edge features like Generative Remove and Adaptive Presets—you ensure your photographs achieve their maximum potential. The accessibility and power of the mobile application means that a flawless, professional edit is always just a few taps away. Understanding How to Edit Photos in Lightroom Mobile doesn’t just improve your pictures; it transforms your ability to create and share high-quality visual content instantly, making it an indispensable tool for any modern creator. The ability to perform complex edits, from simple exposure tweaks to intricate local adjustments, all from your handheld device, confirms the mobile platform’s dominance in the contemporary photography landscape. Keep practicing these core principles, and your photography will undoubtedly stand out.
—
Frequently Asked Questions (FAQ)
Is the Lightroom Mobile app free, and what features are paid?
The core editing features needed to Edit Photos in Lightroom Mobile, including the Light, Color, Effects, and Detail panels, are generally free to use. However, advanced features such as Masking (like Select Subject/Sky), Healing/Generative Remove, Cloud Storage synchronization, and access to Premium Presets require a paid Adobe Creative Cloud subscription. A subscription is typically required to fully leverage the power and cross-device sync capabilities of the service.
Can I edit RAW files on Lightroom Mobile?
Yes, absolutely. The mobile application supports editing RAW files from many professional cameras (DNG, CR2, NEF, ARW, etc.), as well as ProRAW files from modern iPhones. Working with RAW files gives you significantly more data to manipulate, especially in the highlight and shadow areas, which is crucial for high-quality, professional results when you Edit Photos in Lightroom Mobile.
What is the best order to apply edits when learning How to Edit Photos in Lightroom Mobile?
A standard, efficient editing order is:
- Crop and Geometry: Correct alignment and lens distortion.
- Light (Global): Set Exposure, Contrast, and White/Black points.
- Tone Curve: Refine global contrast (S-Curve).
- Color (Global): Adjust White Balance, Vibrance, and Saturation.
- HSL/Color Mixer: Make precise, targeted color changes (e.g., changing only the sky’s blue).
- Color Grading: Introduce color casts to Shadows, Midtones, and Highlights.
- Effects: Apply Texture, Clarity, and Dehaze.
- Masking (Local): Use Select Subject/Sky or gradients for specific area adjustments.
- Detail: Apply final Sharpening and Noise Reduction.
- Export: Save or share the finished image.
How often does Lightroom Mobile get new features?
Adobe is known for its continuous development cycle. New features, enhancements, and performance updates are released frequently, often coinciding with major technology announcements. The most recent significant updates, as of late 2024, include major enhancements to the Lens Blur tool, the introduction of Generative Remove, and new Adaptive Presets. It’s beneficial to check for updates often to ensure you are using the latest techniques for How to Edit Photos in Lightroom Mobile.