Learning how to draw human proportions correctly is arguably the most crucial step in figure drawing, transforming flat, awkward sketches into dynamic, believable figures. The secret lies in understanding a few standardized, time-tested ratios that govern the human body’s visual measurements. This foundational knowledge is essential for every artist, whether you are aiming for realistic representation or stylized figures, and it is the key to mastering your artistic craft.

A correct understanding of human figure proportions is based on the ‘Head Count’ method, which uses the size of the head as the primary unit of measurement for the entire body.
- The average adult figure measures 7.5 to 8 heads tall for realism.
- The halfway point of the body is typically at the crotch or pubic bone.
- The shoulders are about 2 to 3 head-widths wide.
- The legs should generally make up about half the total body height.
Mastering these core ratios provides the bedrock for all your figurative work, helping you consistently produce balanced and natural-looking artwork. The journey to understand how to draw human proportions correctly starts here.
The Foundation: Why Proportions Matter More Than Muscles
Many aspiring artists rush to detail—focusing on muscled torsos, intricate facial features, or dynamic clothing—only to find their final piece feels “off.” The reason is almost always a failure in proportion. Proportions are not just about individual measurements; they are about how all the parts of the subject relate to each other. If the head is too large for the torso, or the arms are too short for the legs, the whole drawing collapses, regardless of how beautifully the individual elements are rendered.
Think of it like building a house. You cannot start by painting the walls and hanging curtains (detail work) before you lay a solid foundation (proportions). A slight miscalculation in the foundation means the whole structure will be crooked. In drawing, this means that even if you beautifully shade a hand, if it is proportionally too small for the figure’s body, the overall impression will be one of a mistake. Therefore, before you even consider anatomy, light, or shadow, you must first master how to draw human proportions correctly.
This understanding is particularly vital because it establishes the figure’s visual weight and balance. An adult figure’s balance is often felt subconsciously by the viewer. When a figure’s center of gravity—which generally aligns with the waist or hips—is correctly positioned relative to its mass, the figure looks grounded. Conversely, a figure with a disproportionately heavy upper body and weak, short legs will look unstable and top-heavy. This principle applies universally, whether you are trying to figure out how to draw human proportions correctly for a realistic portrait or a stylized comic book character. The fundamental structure must hold.
For example, a common error is starting a drawing with a small, detailed area, like the eye, and completing it piece by piece. This approach inevitably leads to scaling errors because you lose the frame of reference. The correct approach is to start with a “gestural block-in”—a loose, underlying structure that marks the top of the head, the bottom of the feet, and the major joint lines first. This initial rough sketch is entirely about proportion and relationship, ensuring that you establish the entire height and width of the figure before committing to any detail. This disciplined initial stage is the key to consistently learning how to draw human proportions correctly.
The Head Count Method: The Artist’s Standard Ruler
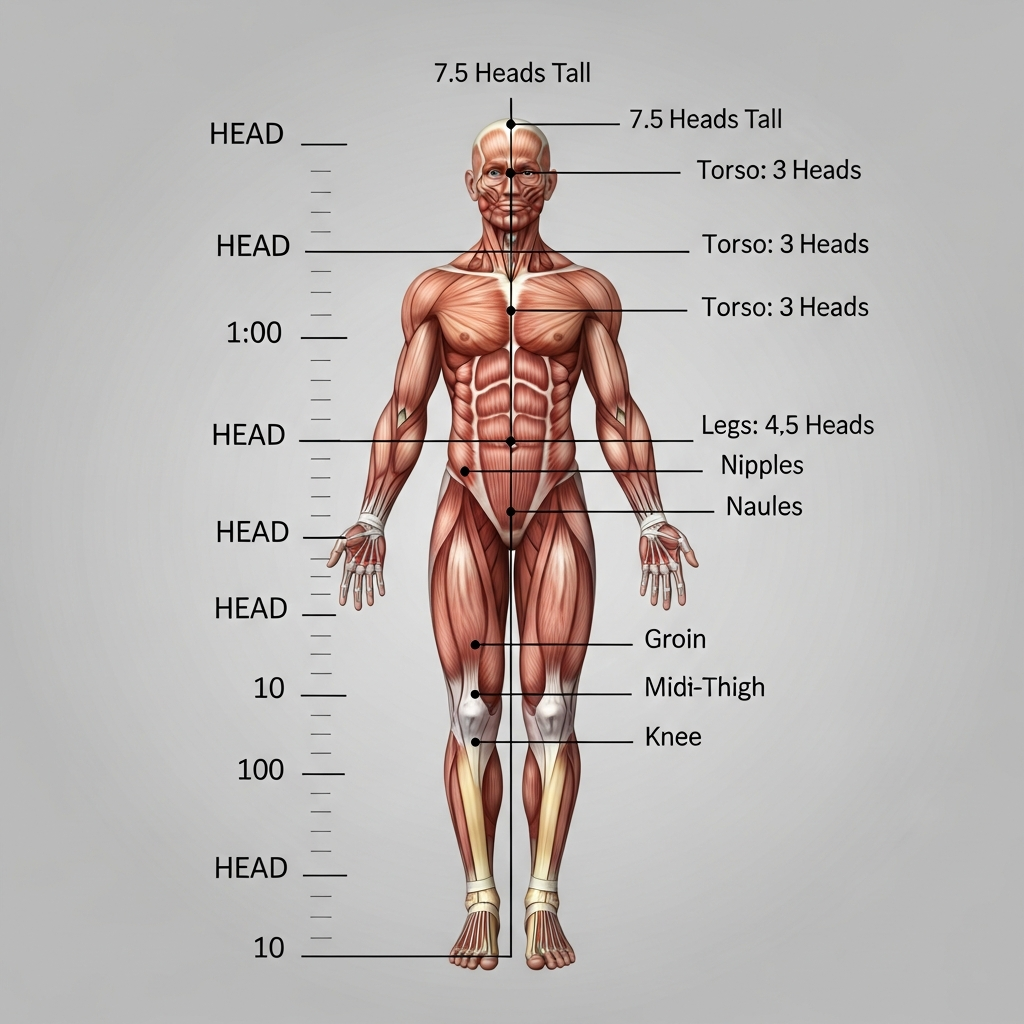
The most popular and effective way for artists to learn how to draw human proportions correctly is the Head Count method. This system establishes the length of the head as the basic unit (or module) for measuring the entire height and width of the body. For a standard adult figure, this height is typically standardized at about 7.5 heads for a classical, realistic figure, but many artists round it up to 8 heads for a slightly more heroic or idealized look, particularly in modern illustration and concept art.
Understanding the 8-Head Canon is absolutely essential for anyone who wants to learn how to draw human proportions correctly. This method breaks down the figure’s height into eight easily measurable segments, each the height of the head:
- Head 1: Top of the head to the chin. This is your base unit.
- Head 2: Chin to the nipple line (or middle of the chest). The shoulder line is usually around the one-and-a-half mark.
- Head 3: Nipple line to the navel (belly button). The elbows typically rest near the bottom of this segment.
Head 4: Navel to the crotch/pubic bone. This marks the exact halfway point* of the average adult body.
- Head 5: Crotch to the mid-thigh.
- Head 6: Mid-thigh to just below the knee (the top of the calf).
- Head 7: Below the knee to the mid-calf/ankle.
- Head 8: Mid-calf to the bottom of the foot/heel.
By simply drawing a vertical line, dividing it into eight equal segments, and using these lines as guideposts, you can map out a perfect, proportional figure every time. This ensures that the upper body (4 heads) is perfectly balanced with the lower body (4 heads), and that key joints like the knees (at the 6-head line) and the elbow (near the 3-head line) fall in the right places. This systematic grid removes all the guesswork from the initial sketching phase, allowing you to confidently move forward in your quest to learn how to draw human proportions correctly.
Moreover, the Head Count system isn’t just about vertical alignment; it also dictates width. The shoulder width of an average male figure is about 2.5 to 3 head-widths, while a female figure is typically closer to 2 to 2.5 head-widths. The width of the hips often corresponds to about 1.5 head-widths for men and slightly wider for women. By constantly relating every part of the figure back to the head’s size, you maintain a consistent scale, which is the ultimate goal when learning how to draw human proportions correctly. When you internalize these numbers, you’ll find that you can sketch proportional figures from imagination without needing the measurement lines, relying instead on your trained eye.
Common Mistakes and How to Fix Them to Draw Human Proportions Correctly
Even with the Head Count system, beginners often fall into predictable traps. Recognizing these pitfalls is half the battle in learning how to draw human proportions correctly. The most common mistakes stem from a failure to observe the relationships between distant points, instead focusing only on local details.
| Common Proportion Mistake | Effect on Figure | Solution to Draw Human Proportions Correctly |
| :— | :— | :— |
| Shrinking as you go down | The lower body appears small or tapers awkwardly. | Always start with a top-to-bottom bounding box. Mark the feet placement first before drawing any limb details. |
| Hands and feet too small | Figures look doll-like and lack grounding. | A hand is often the size of the face (from chin to hairline). A foot is roughly the length of the forearm (from elbow to wrist). |
| Breasts or hips placed too high | Creates a disproportionately short abdomen, making the figure look compressed. | The navel must sit at the 4-head line. The breasts or pectoral muscles are firmly placed in the 2nd head-segment. |
| Elbows and knees in the wrong spot | Legs or arms look awkwardly long or short. | The elbow should align with the waist, and the fingertips should reach about mid-thigh. Knees are positioned exactly at the 6-head mark. |
To actively fix these issues and better learn how to draw human proportions correctly, implement the “Sketch Skeletal Figures” drill. Instead of drawing outlines, sketch simplified stick figures or lay-in forms (like boxes for the torso and pelvis) first. This forces your focus onto the placement of joints and the length of bones, completely sidelining details until the proportions are locked in. For instance, if you often draw arms too short, consciously exaggerate the length of the humerus and ulna in your stick-figure stage to ensure the hands fall correctly near the mid-thigh. This intentional over-correction can help you recalibrate your internal proportional sense, which is key to truly internalizing how to draw human proportions correctly.
Scaling the Figure: Proportions for Different Ages and Genders
While the 8-head canon is the standard for the idealized adult figure, not every figure you draw will be a standard adult. To truly master how to draw human proportions correctly, you must understand how these ratios shift across different demographics—especially age and gender. Ignoring these variations is a frequent rookie mistake.
The Dynamics of Age: Proportions from Baby to Adult
The most significant shift in human proportion occurs between infancy and adulthood. This change is dictated by the concept of cephalocaudal gradient, meaning that the head and upper body grow much slower than the legs.
- Infant (Newborn): A baby is roughly 3 to 4 heads tall. The head is disproportionately large, making up a quarter of the total height. The legs are very short, placing the halfway point of the body high up, near the navel.
- Child (Age 5): The figure is typically 5 to 6 heads tall. The head is still large, but the torso and limbs have lengthened significantly.
- Adolescent (Age 12-14): Proportions approach the adult standard, usually around 6.5 to 7 heads tall. The limbs are lengthening rapidly, sometimes creating a ‘gangly’ look before the torso and shoulders fully mature.
- Adult (Idealized): 7.5 to 8 heads tall. The halfway point is at the crotch, and the lower body (legs) is finally equal to the upper body (head, neck, torso, and hips).
This proportional growth explains why drawing a child is not merely drawing a smaller adult; their entire body ratio is fundamentally different. If you are learning how to draw human proportions correctly for children, you must be careful to keep the head large and the legs relatively short compared to the upper body. A child with 8-head adult proportions will look like a miniature adult, lacking the natural charm of childhood.
Gender Differences in Proportions
While both male and female adult figures generally adhere to the 7.5 to 8-head rule, their proportional distribution differs, mainly in the bony structure (skeleton) and muscle mass. When working on how to draw human proportions correctly for specific genders, focus on these key structural differences:
- Shoulder vs. Hip Width:
- Male: Shoulders are generally wider than the hips (a V-shape torso). The shoulder width can be up to 3 head-widths.
- Female: Hips are generally wider relative to the waist and often closer to or slightly wider than the shoulders (an hourglass or pear shape).
- Torso Length: The female torso is often proportionally slightly longer relative to the legs, which can make the upper leg look comparatively shorter.
- Center of Gravity (COG): Due to a generally wider pelvis, a woman’s COG is typically lower than a man’s, affecting balance in dynamic poses.
- Muscle Mass: While this is a matter of anatomy, it affects the visual perception of proportion. Male figures generally have greater bulk in the shoulders and chest; female figures tend to have greater soft tissue and fat distribution in the hips and thighs.
By recognizing these fundamental, structural proportional differences, you move beyond merely replicating outlines and start to capture the inherent form and mass of the figure, which is paramount in learning how to draw human proportions correctly.
The Limbs: Getting Arms and Legs to the Right Length
The arms and legs are the areas where proportional mistakes are most glaring, yet they are also the easiest to measure once you know the key landmarks. Many people struggle with how to draw human proportions correctly in the limbs because they estimate based on visual memory rather than established proportional rules.
Mastering Arm Proportions
The length of the arm must be determined relative to the torso, not in isolation. A common rule is that a fully extended arm, hanging naturally by the side, has its major landmarks fall at specific head-count lines:
- Shoulder (Deltoid): Near the 1.5-head line.
- Elbow: Falls around the 3-head line, which is approximately the level of the waist/navel area.
- Wrist/Palm Break: Falls around the 4-head line, which is the exact center of the body (the crotch).
- Fingertips: The longest finger should reach to about the mid-thigh, around the 4.5-head line.
A helpful analogy to ensure you draw human proportions correctly for the arm is the ‘Three-Circle Rule’: The entire arm can be broken down into three roughly equal-length segments: the upper arm (humerus), the lower arm (radius and ulna), and the hand. If you sketch these three simplified oval shapes, one after the other, before drawing the contours, you will almost always get the length correct.
Precision in Leg Proportions
The legs constitute approximately half of the body’s total height, starting at the 4-head line (crotch). This equal division is crucial for balance.
- The Thigh (Femur): The section from the crotch (4-head line) to the knee (6-head line) is roughly two heads long.
- The Shin (Tibia/Fibula): The section from the knee (6-head line) to the ankle (7.5-head line) is also roughly two heads long.
Notice that the knee is the critical proportional hinge, sitting exactly halfway down the lower half of the figure (between the crotch and the foot). When learning how to draw human proportions correctly, mark the knee position first, then draw the two major leg segments to meet that point.

Another common pitfall is ignoring the size of the feet. A common, contemporary rule of thumb used by artists to avoid the “small feet” mistake is to use the face as a measuring unit: The length of the foot is generally equal to the length of the head, from the chin to the hairline. By applying this simple, comparative measure, you can ensure that the feet are not only large enough to support the figure but are also proportionally consistent with the rest of the drawing. This holistic approach ensures you truly master how to draw human proportions correctly.
Beyond the Ideal: Understanding Stylization and Artistic License
While mastering the 8-head standard is necessary for anyone learning how to draw human proportions correctly, it is important to remember that this is a tool, not a rigid prison. No real person perfectly fits the 8-head canon; it represents an idealized average. Furthermore, most creative fields, such as comic books, animation, and fashion illustration, intentionally break these rules for dramatic effect or aesthetic preference.
This intentional distortion is called stylization, and it is one of the current trends in artistic figure work. However, you cannot effectively break the rules until you have mastered them. Understanding how to draw human proportions correctly provides you with a proportional ‘control panel.’ Once you know the standard, you can turn the knobs to create a desired effect:
- Heroic/Comic Book Style: Figures are often drawn at 9 to 10 heads tall. This lengthens the legs and torso dramatically, creating an imposing, imposing, and visually powerful character. This proportional exaggeration makes the character appear more grand and dynamic.
- Chibi/Cute Style: Figures can be as short as 2 to 3 heads tall. The Head-to-Body ratio becomes extremely high (e.g., 1:2), emphasizing the large head for cuteness and reducing the limbs for simplicity.
- Fashion Illustration: Often features figures that are 9 heads tall or more, with particularly elongated legs and necks, emphasizing elegance and a tall silhouette.
The key to successful stylization is to maintain internal consistency. For example, if you decide to draw a character 9 heads tall to learn how to draw human proportions correctly for a heroic figure, you must ensure that all other proportional measurements—the elbow placement, the hand size, the width of the shoulders—also scale up consistently with that 9-head ratio. A figure that is 9 heads tall but still has hands the size of an 8-head figure will look like a proportional mistake, not a stylistic choice. The most effective way to learn how to draw human proportions correctly for any style is to first internalize the base measurements and then apply a consistent scaling factor to all elements.
Practical Strategies and Tools to Draw Human Proportions Correctly
Moving from theory to practice requires consistent application of measuring techniques. Your initial focus should be on the block-in and gesture, ensuring that the foundational lines are right before adding volume. This is the difference between a proportional drawing and a beautiful outline of a poorly structured figure.
The Power of Measurement Tools
While eventually, you want to measure by eye, using simple tools in the early stages can rapidly improve your sense of how to draw human proportions correctly:
- The Vertical Center Line (Plumb Line): Always start your figure with a single, light vertical line. This line serves as the central axis of balance. If the figure is posed, this line should represent the figure’s central balance point, allowing you to check if the mass of the figure is distributed correctly on either side of this axis.
- The Head Unit (Ruler): Literally cut out a piece of paper the size of your intended figure’s head. Use this paper cutout as a portable ruler to mark the eight segments on your vertical line. This simple, tangible action dramatically reinforces the 8-head canon.
- Comparative Measurement (Sighting): When drawing from life or photo reference, use your pencil as a measuring stick. Hold the pencil at arm’s length and align it with a part of the subject (e.g., the length of the head). Then, keeping your thumb at that length, ‘measure’ how many times that unit (the head length) fits into the height of the rest of the body. This practice of sighting is the most time-tested method for an artist to learn how to draw human proportions correctly accurately.
The Value of Simplification: Mannequins and Geometric Forms
Before you draw the curve of a bicep or the sweep of a calf, you must simplify the entire figure into basic three-dimensional shapes. This geometric simplification is a powerful technique for mastering how to draw human proportions correctly in perspective and space:
- Head: Sphere or Egg-shape.
- Torso (Ribcage): Box or Egg-shape.
- Pelvis: Box or Simplified Bowl-shape.
- Limbs: Cylinders or Tapering Cones.
By sketching a figure as a collection of boxes and cylinders, you are forced to focus on the overall shape and proportional relationship of these main masses. You can clearly see if the ribcage box is too large compared to the pelvic box, or if the limb cylinders are of the correct length. The geometric lay-in is non-negotiable for anyone who wants to learn how to draw human proportions correctly with depth and volume, not just as a flat outline.
Furthermore, this method directly addresses one of the most common beginner issues: proportions in perspective. When a figure is leaning or viewed from a high or low angle, the 8-head canon appears to break due to foreshortening. However, by drawing the figure as geometric volumes in a 3D space, you can apply perspective rules to the proportionally correct boxes of the torso, pelvis, and limbs. You start with the correct proportions in the ‘mind’s eye’ and then apply the rules of perspective, which is the professional way to ensure you draw human proportions correctly even in complex poses.
Conclusion: The Mastery of How to Draw Human Proportions Correctly
The journey to consistently and confidently draw human proportions correctly is one of discipline and deliberate practice. It is the silent language of great figure art, often overlooked in favor of flashier techniques but absolutely critical to success. This foundational skill transcends style; whether you are sketching a quick gesture drawing, creating a highly detailed portrait, or designing a stylized character, the fundamental ratios established by the Head Count system and the relative sizing of the limbs remain the immutable framework.
To truly master how to draw human proportions correctly, you must commit to an iterative process: Measure, Block-in, Compare, and Correct. Start every drawing by establishing the figure’s overall height and key proportional landmarks (the 4-head centerline, the knees at 6, and the elbows at 3). Use geometric forms to check the mass and relationship of the body’s major sections. And finally, never be afraid to step back and use your pencil to sightly the measurements, comparing the size of the hand to the face, or the length of the torso to the leg.
By making the 8-head canon your second nature, you stop guessing at proportions and start knowing them. This knowledge frees your mind to focus on the expressive elements of drawing—the gesture, the emotion, and the light—transforming a mechanical exercise into a truly creative act. Consistent practice of how to draw human proportions correctly is the single best investment you can make in your development as an artist.
*
FAQ (Pertanyaan yang Sering Diajukan)
How do you start drawing a figure to ensure the proportions are correct?
Answer: To ensure correct proportions from the start, begin with the Head Count method. First, draw a vertical line and divide it into eight equal segments. This establishes your 8-head canon. Mark the halfway point at the 4th line (the crotch). Then, lightly sketch in the head (1st segment), the shoulders (1.5 segment), and the knees (6th segment). This structured “block-in” forces you to place the major joints in the right proportional spots before you add any volume or detail, making it the most reliable technique for anyone learning how to draw human proportions correctly.
What is the most common mistake when drawing human proportions?
Answer: The most common mistake is drawing limbs, hands, and feet too small relative to the rest of the body. Another critical error is failing to establish the correct centerline, often resulting in the torso being disproportionately long or short compared to the legs. To fix this, remember that the legs make up approximately half of the figure’s total height (below the 4-head line), and the hand should be roughly the size of the face.
Do I have to use the 8-head rule when drawing children or highly stylized figures?
Answer: While you don’t use the 8-head rule directly for children, you must still use a Head Count. Children have different proportions, such as a 4-head count for an infant, or a 5-6 head count for a young child, with the head being proportionally larger. For highly stylized figures (like a 9-head superhero), you must use an expanded head count to maintain consistency. The rule is: Master the standard first, and then intentionally and consistently scale all proportional measurements for your desired style.
How long should the arms be when drawing human proportions correctly?
Answer: When the arms are hanging naturally by the figure’s side, the elbow should align with the waist (at the 3-head mark), and the fingertips should reach about the mid-thigh (around the 4.5-head mark). A helpful check is to remember that the entire arm, from the shoulder to the fingertips, is roughly equal in length to the entire leg, from the hip joint to the ankle. Ensuring the hand rests near the mid-thigh is essential for anyone who wants to consistently draw human proportions correctly.
Is there a difference in proportions between male and female figures?
Answer: Yes, there are key structural differences. Both typically follow the 7.5 to 8-head canon, but the proportional distribution of width changes. Male figures typically have shoulders wider than the hips (broader ribcage and clavicle). Female figures typically have hips that are wider relative to the waist, often resulting in a hip-width that is equal to or slightly wider than the shoulder width. Learning how to draw human proportions correctly requires acknowledging these shifts in the skeletal and mass distribution.