Have you ever taken a fantastic photograph, only to realize later that the magic of the moment was swallowed up by deep, unforgiving shadows? It’s an incredibly common frustration. Whether it was a stunning sunset silhouette that turned too black, or an indoor birthday snapshot that was simply underexposed, learning how to brighten dark photos is perhaps the most essential skill in post-processing. This isn’t just about cranking up the brightness slider; it’s an art that requires precision, a careful touch, and a deep understanding of light to rescue those lost details without making the image look faded or unnatural.

To successfully brighten dark photos and recover lost image information, you should follow a layered approach that prioritizes detail retention over brute force brightness.
Here are the key steps on how to brighten dark photos effectively:
| Step | Editing Tool | Primary Goal | Pitfall to Avoid |
| :— | :— | :— | :— |
| 1. | Shadows Slider | Initial detail recovery in the darkest areas. | Introducing noise or a “flat” look. |
| 2. | Exposure Slider | Global brightness adjustment (subtle only). | Blowing out highlights (overexposure). |
| 3. | Contrast Slider | Reintroduce depth and separation between tones. | Making the photo too harsh or crunchy. |
| 4. | Curves Tool | Fine-tuning specific tonal ranges (advanced). | Creating unnatural color shifts or posterization. |
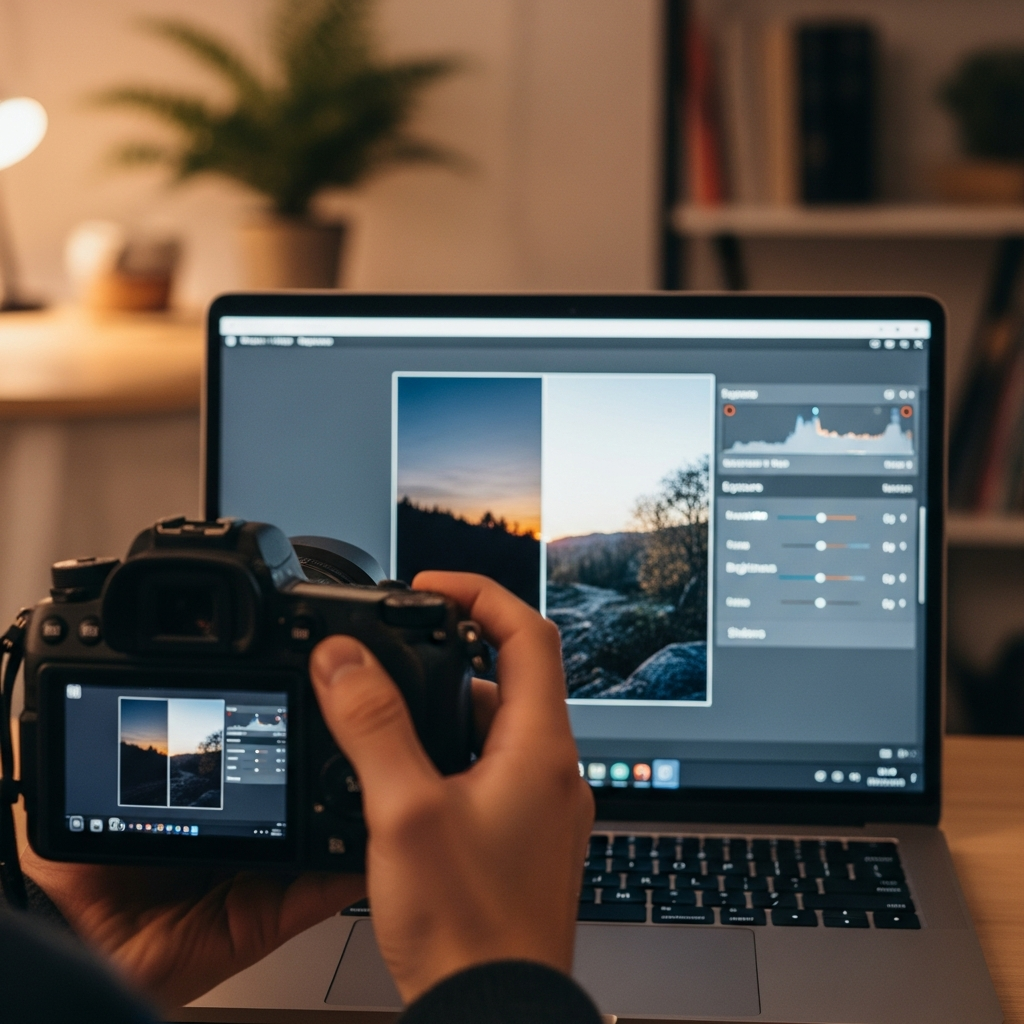
A successful edit is a balanced one. The secret to how to brighten dark photos lies in knowing which tool to use for which part of the image, allowing you to selectively lighten the darkest areas while preserving the integrity of the midtones and highlights. This detailed guide will show you precisely how to brighten dark photos using both fundamental and advanced techniques, making your underexposed shots look as vibrant as you remember them.
A Personal Journey into the Darkroom
I vividly remember one of my earliest and most frustrating experiences with underexposed images. I was photographing a friend’s wedding reception, a beautiful, intimate scene lit by soft, warm string lights. Because I was trying to capture the ambiance, my camera’s settings were a little too conservative. When I looked at the photos later, the faces were silhouettes, and the beautiful decoration was lost in a sea of blackness. I thought the entire shoot was ruined. I spent an entire weekend furiously trying to figure out how to brighten dark photos I had captured. My first attempts were disastrous; I simply slammed the “Brightness” slider to 100, which turned the entire image into a pale, noisy, washed-out mess. It looked terrible, completely fake, and had introduced more digital grain than the original dark image.
It was a crucial learning moment. I realized that the answer to how to brighten dark photos wasn’t a single, magic slider, but a sequence of deliberate, nuanced adjustments. It was the difference between a rough restoration and a delicate refinement. Ever since that lesson, I’ve approached underexposed images with respect for the light they do contain, rather than forcing them into brightness. This experience is why I’m passionate about teaching you the proper methods, so you can avoid my early mistakes and learn exactly how to brighten dark photos with professional-grade subtlety.
The Foundation: Understanding Light and Underexposure
Before we dive into the sliders and buttons, we must first understand why your pictures are dark in the first place, or “underexposed.” Underexposure occurs when your camera’s sensor doesn’t capture enough light. This results in an image where the overall tone is too dark, and the details in the shadows are merged into a uniform black mass. Learning how to brighten dark photos is essentially the process of digitally redistributing the light captured in your RAW or JPEG file.
The quality of your original file dramatically impacts your success when trying to brighten dark photos. If you shoot in RAW format, you have a massive advantage. RAW files contain significantly more data (up to 16,000 different tonal levels versus 256 in a JPEG), particularly in the shadow areas. This extra information acts like a safety net, allowing you to pull details out of the deepest shadows with minimal degradation. Therefore, the first and most fundamental tip for how to brighten dark photos is to always use the RAW format if your camera allows it.
On the other hand, if you are working with a JPEG, the process of how to brighten dark photos becomes more challenging. JPEGs are compressed and discard much of that crucial shadow data to save file space. When you try to lighten a JPEG, those shadow areas often break apart, revealing unsightly digital noise (a grainy, mottled pattern) or color banding. Knowing this limit is key to setting realistic expectations for how to brighten dark photos in various formats.
This foundational understanding is your roadmap. You are not creating light; you are revealing the light data that was already recorded by the sensor but was buried in the shadows. The methods we will discuss next are precisely engineered to recover this specific, latent information when you need to know how to brighten dark photos.
Phase 1: The Essential Sliders (The Non-Destructive Approach)
The primary goal in the initial phase of how to brighten dark photos is to lift the dark tones without destroying the bright tones (Highlights). Most modern editing applications, from mobile apps to desktop suites, offer a “Basic Panel” with these crucial sliders. Mastering the order and function of these four tools is the core of how to brighten dark photos effectively.
1. The Shadow Slider: Your First and Best Friend
When considering how to brighten dark photos, most people instinctively reach for “Exposure.” However, the Shadow slider should be your starting point. This slider specifically targets the darkest parts of your image, leaving the mid-tones and highlights virtually untouched.
- Action: Slowly move the Shadows slider to the right. As you do, watch the deep black areas of your photo. You should see details—the texture of a dark jacket, the leaves on a tree, the expression on a face—start to emerge from the blackness.
- The Power: Using Shadows is the best method for how to brighten dark photos locally. It prevents the overall image from getting globally washed out, which is a common mistake when dealing with underexposure.
- Analogy: Think of the Shadow slider as turning on a small, focused flashlight in a dark room. It only illuminates the specific corner that needs light, leaving the rest of the room’s atmosphere intact. This is the delicate touch required to know how to brighten dark photos like a true professional.
2. The Exposure Slider: Global Light Control
Only after you’ve recovered the specific shadow detail should you touch the Exposure slider. This tool is a global adjustment; it shifts the brightness of the entire photograph. Using it too aggressively is the number one mistake people make when figuring out how to brighten dark photos.
- Action: Only apply a small, incremental positive adjustment to the Exposure. If you’ve done a good job with the Shadows slider, you might only need a +0.5 or +1.0 exposure boost.
- The Limit: The danger here is blowing out the highlights. If the sky or any bright surface turns to pure, detail-less white (known as clipping), you’ve gone too far.
Balancing Act: If you notice your brighter areas getting clipped, you need to pull back the Exposure and use the Highlights slider to compensate. The Highlights slider, which works in the opposite direction of Shadows, should be pulled down* (to the left) to recover detail in the brightest areas that may have over-lightened during your attempt to brighten dark photos.
3. The Contrast Slider: Reintroducing Depth
Once you’ve used the Shadows and Exposure sliders to brighten dark photos, the image often looks a little “flat” or muddy. This happens because increasing brightness reduces the visual separation between light and dark tones. Contrast is the difference between the brightest and darkest areas, and you must reintroduce it.
- Action: Gently push the Contrast slider to the right. This will deepen the blacks (the ones you didn’t lighten with the Shadow slider) and brighten the whites, making the image pop.
- The Nuance: The proper contrast level brings back the three-dimensional look that was lost in the initial underexposure. When learning how to brighten dark photos, remember that contrast is the secret ingredient that makes the final result look sharp and deliberate, not soft and hazy.
The Trend: A subtle, modern trend in editing is to keep contrast slightly lower* than traditional standards, which results in a softer, more cinematic look. However, for a truly underexposed image, a slight boost is usually necessary to make the work of how to brighten dark photos truly successful.
Phase 2: Advanced Control with the Tonal Curve (Curves Tool)
For true mastery of how to brighten dark photos, you must move beyond the basic sliders and learn the Curves tool. The Tonal Curve (or simply ‘Curves’) provides the most precise control over the luminosity and colors in your photograph, allowing you to manipulate the brightness of any specific point in the tonal range.
The Anatomy of the Tonal Curve
The Curves graph is a diagonal line stretching from the bottom-left corner to the top-right corner.
- Bottom-Left: Represents the shadows (darkest tones).
- Center: Represents the mid-tones (the bulk of your image).
- Top-Right: Represents the highlights (brightest tones).
The Classic “S-Curve” and “Bumping”
The most common way to subtly brighten and enhance a photo is by applying a gentle “S” shape to the curve. This is not the primary technique for how to brighten dark photos, but it is a perfect finishing touch:
- Darken Shadows: Pull the bottom-left part of the line down slightly to deepen the darkest shadows.
- Brighten Highlights: Push the top-right part of the line up slightly to enhance the brightest highlights.
- The Result: The S-Curve increases contrast by separating the tones without affecting the subtle color relationships.
For the specific goal of how to brighten dark photos, the technique is different; we focus on the lower-mid and mid-tones. Instead of an S-curve, you will create a slight upward bulge or “bump” in the middle of the curve.
Action: Click once in the center of the diagonal line to create a fixed point (this anchors your mid-tones). Then, click a second time on the lower half of the curve (the shadow/mid-shadow area) and gently drag that point upward*.
Why it Works: This process allows you to lift the shadows and lower mid-tones (the parts that are too dark) without affecting the brightest highlights at the top-right of the graph. It is the most sophisticated and non-destructive answer to how to brighten dark photos because it provides granular control over the precise amount* of light added at specific tonal levels.
This detailed, point-by-point adjustment ensures that you don’t introduce noise into the darkest areas while still achieving the desired brightness. No other tool gives you the precision of the Curves panel for the task of how to brighten dark photos with complete artistic control.

Phase 3: Dealing with Color, Noise, and Mobile Solutions
Once the exposure is right, you have to polish the image. Two major issues emerge when you brighten dark photos: color shifts and increased digital noise. Furthermore, many users only have access to mobile apps, which require a different approach for how to brighten dark photos.
1. Correcting Color Shifts (White Balance and Saturation)
Dark images often appear cooler (bluer) or have a slight color cast. When you brighten dark photos, this color cast can become more pronounced and distracting.
- White Balance: Check your White Balance settings. If the photo is too blue, slide the Temperature (or ‘Warmth’) slider slightly to the right to introduce yellow and correct the cool cast. The goal is to make the colors look neutral and true to life.
- Saturation/Vibrance: Underexposed photos tend to look undersaturated. As you brighten dark photos, you may need to subtly boost the color intensity.
- Vibrance is generally preferred over Saturation because it only boosts muted colors and leaves skin tones and already-saturated areas alone.
Saturation is more aggressive and boosts all* colors equally. Use it sparingly, or you risk an unnatural, cartoonish look. A gentle touch of Vibrance after you brighten dark photos often makes the colors snap back to life.
2. Noise Reduction: The Cost of Lifting Shadows
As mentioned, pulling detail out of a dark image—a necessary step for how to brighten dark photos—introduces digital noise. This grainy texture is more noticeable in dark, flat areas.
- The Trade-off: Be aware that all noise reduction tools soften the image, sometimes making it look blurry.
- Luminance Noise Reduction: This focuses on the monochrome grain. Apply it conservatively to smooth out the graininess that resulted from your effort to brighten dark photos.
- Color Noise Reduction: This targets the speckles of unnatural color often seen in the shadows. This can usually be applied more aggressively without major loss of detail.
- Modern Tools: Some modern desktop editing suites now utilize more sophisticated, automated noise reduction, sometimes described as a form of AI Lighting or advanced de-noise filter, which can dramatically clean up a dark image with minimal loss of detail.
3. How to Brighten Dark Photos on Mobile Devices
Mobile editing has become the primary method for many photographers. The concepts remain the same, but the names of the tools might differ slightly.
Focus on Local Edits: Many mobile apps offer a Selective Adjustment feature. Use this to draw a circle or brush a specific dark area (like a face or a corner) and only* apply brightness/exposure to that targeted area. This is a powerful, professional-level method for how to brighten dark photos without affecting the entire frame.
- Dedicated Tools: Look for sliders specifically labeled ‘Shadows’ and ‘Highlights’ in apps like Adobe Lightroom Mobile or Snapseed. Avoid the main ‘Brightness’ slider for heavy lifting.
- Utilize Presets/Filters: While often frowned upon by purists, high-quality “Bright & Airy” or “Underexposure Fix” presets in mobile apps can give you a quick, clean starting point, saving you time when trying to figure out how to brighten dark photos on the go.
Phase 4: Common Mistakes to Avoid When Brightening
Knowing how to brighten dark photos is as much about knowing what not to do as what to do. Avoiding these common mistakes will ensure your images look professional and natural.
1. Over-Brightening and the ‘Flat’ Look
The most common error is simply pushing the Shadow and Exposure sliders too far to the right. The resulting photo will have no true blacks; everything will be a dull gray. This over-brightening results in a flat look, lacking the depth and punch of a properly exposed image. Remember to reintroduce contrast to maintain separation and depth after you brighten dark photos.
2. Excessive Noise and Sharpness
As you lift the shadows, digital noise appears. Many novice editors try to compensate for the softness of noise reduction by drastically increasing the Sharpness slider. This creates a grainy, over-sharpened image that looks artificial. When learning how to brighten dark photos, understand the relationship between noise reduction and sharpness; a little of both goes a long way. Use sharpening only to enhance edges, not to cover up noise.
3. Ignoring the Histogram: The Unseen Guide
The Histogram is a graphical representation of the tones in your image. It shows the distribution of pixels from the darkest blacks (left side) to the brightest whites (right side).
- A Dark Photo’s Histogram: The bulk of the graph will be bunched up on the left side, indicating a predominance of shadows.
- The Goal: When you successfully brighten dark photos, the histogram will shift to the right, showing that the tones are more evenly distributed.
The Warning: If the graph runs off the right edge* (known as “clipping”), it means you have lost detail in the highlights, and you need to pull back your Exposure or Highlights slider. Ignoring the Histogram is a fundamental mistake when trying to figure out how to brighten dark photos. It is your most objective tool for judging light.
4. Not Working in Non-Destructive Software
Always use an editing application that works non-destructively, such as Adobe Lightroom, Capture One, or Luminar Neo. These programs don’t make permanent changes to the original image file. Instead, they save a list of instructions (your edits) and apply them on export. If you make a mistake on how to brighten dark photos, you can undo any step, any time. Using a destructive editor means your changes are permanent, limiting your flexibility and ability to correct mistakes.
Conclusion: Mastering the Art of How to Brighten Dark Photos
The journey of learning how to brighten dark photos is a transformation from merely fixing a problem to mastering a fundamental photographic art form. It moves you past the simplicity of a single brightness slider and into the nuanced world of tonal control, selective adjustments, and detail recovery. Whether you are dealing with a RAW file that holds infinite possibilities or a JPEG that requires a more careful touch, the process remains the same: prioritize shadows, gently adjust exposure, and restore contrast.
Remember that every time you successfully brighten dark photos without sacrificing quality, you are proving that the initial error in exposure does not have to be a permanent flaw. With practice, you will develop the intuitive eye to know exactly how far you can push the Shadow slider before noise appears, and how much Exposure you can add before the highlights clip. This precision is the hallmark of a skilled editor. By following these steps and avoiding the common pitfalls, you now have the comprehensive knowledge and strategic toolkit for how to brighten dark photos and transform your underexposed memories into stunning, vibrant masterpieces. Continue to experiment, continue to refine, and continue to successfully brighten dark photos across your entire portfolio.
*
Frequently Asked Questions (FAQ)
Q: Why do my photos look grainy after I brighten them?
A: Photos look grainy—a phenomenon called digital noise—after brightening because you are pushing the limits of the image data recorded in the shadows. The darker the original image, the harder your editing software has to work to digitally create tones that were not adequately captured by the camera sensor. This process amplifies the random variations in the sensor’s electronic signals, which appear as noise or grain. The best solution is to use the Luminance Noise Reduction tool in your editing software after you successfully brighten dark photos.
Q: Is it better to use the Exposure or Shadows slider to brighten a dark photo?
A: It is almost always better to primarily use the Shadows slider first when you need to know how to brighten dark photos. The Exposure slider is a global adjustment that brightens the entire image, including the highlights, which can lead to overexposure and loss of detail in the brightest areas. The Shadows slider is selective, targeting only the darkest tones, allowing you to recover crucial information without blowing out the highlights. Only use the Exposure slider for small, overall adjustments once the shadows are recovered.
Q: What is the single best tool for advanced control on how to brighten dark photos?
A: The Curves Tool (Tonal Curve) is the single best tool for advanced, non-destructive control. Unlike basic sliders, the Curves tool allows you to place anchor points and manipulate the brightness of highly specific tonal ranges (shadows, mid-shadows, mid-tones, highlights). By gently “bumping” up the lower-middle section of the curve, you can lift the dark areas without affecting the brightest highlights, giving you the most precise and professional solution on how to brighten dark photos while maintaining image quality.
Q: Can I brighten dark JPEG photos as effectively as RAW photos?
A: No, you cannot brighten dark photos captured in JPEG format as effectively as those in RAW. JPEG files are compressed and have significantly less tonal data, especially in the shadows. When you try to lighten them, the lack of data quickly leads to the introduction of noticeable digital noise, color banding, and a loss of smooth gradients. While you can still improve a dark JPEG, RAW files provide a much larger safety net, making them far superior when attempting to recover a severely underexposed image.
*