The debate over which image format is superior is one of the oldest and most fundamental discussions in the world of digital photography. For anyone stepping beyond the simple point-and-shoot camera or even exploring the advanced settings on a modern smartphone, understanding the Difference Between Raw and Jpeg is absolutely essential. This choice isn’t just about saving a file; it profoundly impacts the quality, editing potential, and overall workflow of your image-making process. The technical Difference Between Raw and Jpeg files comes down to how your camera’s sensor data is processed and stored, resulting in vastly different possibilities once the shutter clicks. Mastering the Difference Between Raw and Jpeg will unlock a new level of control over your images, transforming a good photograph into a truly great one through the power of post-capture refinement.

The Core Difference Between Raw and Jpeg: A Direct Comparison
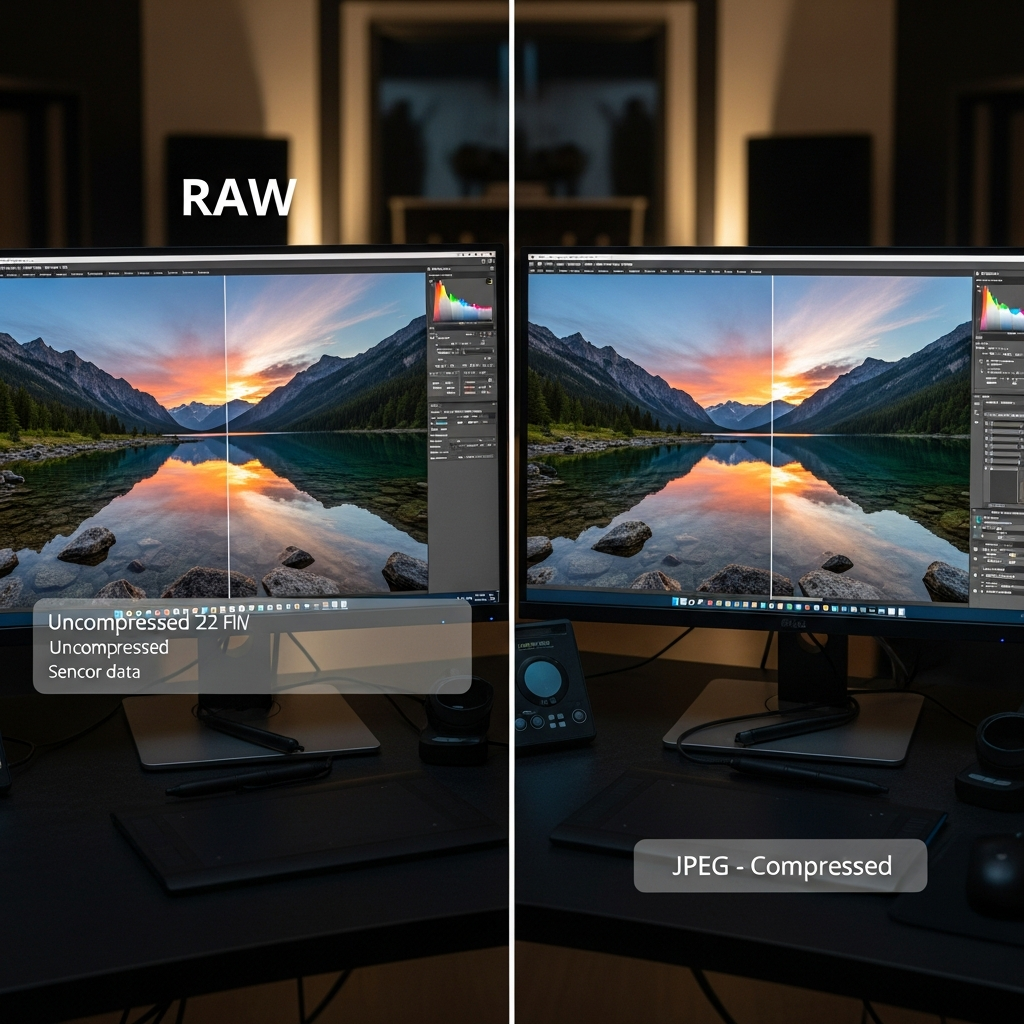
If you are looking for the absolute, fundamental Difference Between Raw and Jpeg, it boils down to two key concepts: processing and compression. A Raw file is the unprocessed, uncompressed, and untouched data straight from your camera’s image sensor—it’s the digital ‘negative.’ A Jpeg (Joint Photographic Experts Group) file, on the other hand, is a universal, processed, and compressed file that is ready to use immediately.
The following table summarizes the primary Difference Between Raw and Jpeg to provide a clear, quick answer for photographers seeking to understand the core distinctions:
| Feature | RAW File | JPEG File |
| :— | :— | :— |
| Data Status | Unprocessed, Uncompressed | Processed, Compressed |
| Color Depth | High (Typically 12-bit or 14-bit) | Low (Always 8-bit) |
| File Size | Very Large (Uncompressed Data) | Small (Lossy Compression) |
| Editing Flexibility | Extreme (Maximum detail recovery) | Limited (Destructive edits) |
| Usability | Requires Post-Processing | Ready-to-use |
| Universal Support | Requires Specific Software/Converter | Universal (Web, Print, Devices) |
A Raw file captures the maximum possible range of color and tonal information, offering unparalleled flexibility for adjustments after the picture has been taken. Conversely, the Jpeg format applies a permanent processing recipe inside the camera, prioritizing small file size and immediate usability over post-production flexibility. The Difference Between Raw and Jpeg means choosing between maximum data retention and maximum convenience.
The Analogy of the Negative Film vs. The Instant Print
To truly grasp the profound Difference Between Raw and Jpeg, consider the classic analogy of traditional film photography: the negative versus the instant print.
A Raw file is essentially the digital equivalent of a film negative. The negative contains all the photographic information captured by the light hitting the film—the latent image. It is not yet a viewable photo; it needs to be developed in a darkroom. The darkroom process allows the photographer to control every variable: exposure, contrast, color temperature, dodging, and burning. A Raw file gives you this same level of control; you are the one doing the “developing” in software like Adobe Lightroom or Capture One. The data is vast, allowing you to recover details from severely under- or overexposed areas, something that is nearly impossible with a simple print.
The Jpeg file, by contrast, is like an instant, ready-to-use print from a camera like an old Polaroid. The camera takes the shot, instantly processes the image (applying color, contrast, sharpening, and compression), and hands you a finished product. It’s fast, convenient, and immediately viewable. However, if the instant print is too dark or too bright, there is very little you can do to fix it without destroying the image quality. The moment the camera generates that Jpeg, a substantial amount of original sensor data is thrown away forever, crystallizing the core Difference Between Raw and Jpeg in terms of data loss.
Processing and Compression: The Data Destruction Factor
The most critical aspect defining the Difference Between Raw and Jpeg is how the camera handles the sensor data. When you shoot in Jpeg, your camera’s internal processor takes the massive amount of data from the sensor and immediately performs several irreversible actions:
- Demosaicing: The camera converts the raw data, which only records one color per pixel (Red, Green, or Blue), into a full-color image.
- Image Adjustments: It applies the camera’s chosen white balance, contrast, saturation, and sharpening settings.
- Compression: It uses a ‘lossy’ compression scheme to drastically reduce the file size.
This lossy compression is the “destruction factor.” It identifies visual data that it deems “unnecessary” (information the human eye is less likely to notice) and discards it permanently. This is why a Jpeg is so much smaller, but also why editing it later can quickly introduce ugly artifacts or banding. The Difference Between Raw and Jpeg in this context is one of data integrity: Raw retains everything, while Jpeg discards what it can.
Technical Deep Dive: Understanding Color Depth and Compression
To fully appreciate the editing power that a Raw file offers, you must understand the technical metrics that create the Difference Between Raw and Jpeg files: bit depth and compression type. These concepts are the bedrock of image quality and editing flexibility.
The Critical Role of Bit Depth (8-bit vs. 14-bit)
Bit depth, also known as color depth, determines the total number of colors and tonal steps an image file can record. This is arguably the single most important Difference Between Raw and Jpeg files in terms of post-processing potential.
- JPEG (8-bit): An 8-bit image can record $2^8$ (256) levels for each of the three color channels (Red, Green, Blue). When these are combined, the total number of colors that an 8-bit Jpeg can display is about 16.7 million colors (256 x 256 x 256). While 16.7 million sounds like a lot, the smooth transitions between subtle shades are limited, and pushing the image in editing will quickly reveal ‘banding,’ where smooth gradients look blocky.
- RAW (12-bit or 14-bit): Most modern professional cameras capture Raw files at 14-bit, though some use 12-bit. A 14-bit image can record $2^{14}$ (16,384) levels for each color channel. This results in a staggering total of 68.7 billion distinct colors (16,384 x 16,384 x 16,384). This monumental Difference Between Raw and Jpeg means the Raw file captures exponentially more information, especially in the subtle tonal variations of shadows and highlights. When you recover detail from an underexposed area in a Raw file, you have billions of colors to work with, allowing for a perfectly smooth transition that is simply not possible with an 8-bit Jpeg.
Consider a sunset photograph where you want to darken the sky to bring out the vivid oranges and purples. If you try this on a Jpeg, the limited 8-bit data may cause the smooth blue of the sky to break into noticeable stripes—color banding—because there aren’t enough discrete shades (bits) to make the transition appear seamless. The same edit on a 14-bit Raw file would retain a perfectly smooth, photorealistic gradation of color, demonstrating the true power of the extra bit depth that defines the Difference Between Raw and Jpeg.
Lossy vs. Lossless Compression: What Happens to Your Data?
Compression is the second technical pillar that defines the Difference Between Raw and Jpeg. It determines how small the file is and, more importantly, whether the process throws away any of the original image data.
The JPEG’s Lossy Approach
Jpeg compression is lossy. The goal is maximum file size reduction, and to achieve this, the compression algorithm permanently discards information. It works by analyzing the image and identifying data redundancies, particularly in the color channels, which are often sampled at a lower resolution than the brightness (luminance) channel. This is why Jpegs are so compact and fast to transmit. However, every time you save an edited Jpeg file, a new layer of lossy compression is applied, further degrading the image quality. This is a non-negotiable Difference Between Raw and Jpeg that makes Jpeg a ‘destructive’ format for editing. It’s fast, but it compromises the data.
The RAW’s (Near) Lossless Approach
The very name ‘Raw’ implies that the data is unprocessed, and consequently, it is not subjected to the severe compression seen in Jpeg. A Raw file is essentially a direct dump of the sensor data. While some camera manufacturers do apply a form of compression to Raw files, it is usually lossless compression. This is similar to creating a digital ‘zip file’ where the data is compacted to save space, but it can be perfectly unzipped later to restore every single bit of the original information. The vast Difference Between Raw and Jpeg in file size—Raw files can be anywhere from 2 to 6 times larger than their Jpeg counterparts—is a direct result of Raw’s commitment to preserving all data. This is why professional photographers rely on Raw files; they are the ultimate, uncompromised source of image data.
Real-World Scenarios: When to Choose Raw, When to Choose Jpeg
The practical Difference Between Raw and Jpeg truly emerges when you analyze various photographic scenarios. No single format is universally “best”; the ideal choice depends entirely on your subject, your workflow, and your final output needs.
The Professional Studio and Portrait Workflow (RAW Focus)
For portrait, fine art, commercial, and landscape photography, the Difference Between Raw and Jpeg is overwhelming, and Raw is the undisputed champion. This is because these fields require the highest quality, most flexibility, and absolute control over the final look of the image.
- Portrait Photography: Imagine a studio shoot where a subtle fill light on one side of a subject’s face was slightly too dim. Shooting in Raw allows the photographer to pull up the shadows on that side by several stops in post-processing without introducing noise or unnatural color shifts. This is a classic example where the 14-bit color depth and dynamic range of the Raw file are the only things standing between a discarded photo and a client-ready masterpiece. The ability to correct white balance flaws with total accuracy is also crucial; if the ambient studio lighting casts a slightly yellow tint, Raw allows for a perfect, non-destructive correction, which is much harder and riskier with Jpeg. This massive editing leeway is the main Difference Between Raw and Jpeg that pros leverage.
- Landscape Photography: When capturing a sunrise or sunset, the scene often has an extremely high dynamic range, with bright skies and deep, dark foregrounds. The superior data retention of a Raw file allows the photographer to simultaneously recover intricate cloud detail in the overexposed sky and lift the shadows in the foreground trees, essentially exceeding the camera’s original capturing ability. Without the vast data reserve of the Raw format, attempting these dramatic dynamic range adjustments in a Jpeg would result in ugly artifacts and blotchy colors. The professional’s reliance on this power illustrates the fundamental Difference Between Raw and Jpeg.
This high-stakes, high-reward approach is why nearly all top-tier commercial and wedding photographers insist on Raw. They know the Difference Between Raw and Jpeg is the difference between achieving a perfect final product and settling for a compromised one.
Action, Sports, and Photojournalism (JPEG Consideration)
While Raw dominates the studio, there are legitimate, professional use cases where the speed and small file size of Jpeg files make them the preferred format, despite the clear Difference Between Raw and Jpeg in image quality. These scenarios prioritize immediate delivery and shooting speed over ultimate editing flexibility.
- High-Speed Sports Photography: During a fast-paced football game or track meet, a professional sports photographer might fire off bursts of images at 15 or 20 frames per second. If they shoot Raw, the camera’s internal buffer (temporary memory) will fill up almost instantly due to the massive file size of each Raw image. Once the buffer is full, the camera slows down dramatically or stops shooting entirely. By switching to the much smaller Jpeg format, the photographer can shoot continuously for much longer periods, ensuring they don’t miss the critical moment. The immediate need for speed trumps the desire for maximum editability, representing a key practical Difference Between Raw and Jpeg.
- Breaking News Photojournalism: When a news photographer is on assignment, the pressure is on to get the image from the camera to the editor and published online as fast as possible. They often shoot Jpeg because the file can be immediately transferred, viewed, and uploaded with minimal, or even zero, post-processing. A Raw file, which requires time-consuming conversion and processing, simply adds a layer of delay that a fast-moving news cycle cannot tolerate. The small file size of the Jpeg also makes transmission via often-slow field networks or satellite links much quicker. In this context, the speed of delivery is the paramount factor that determines the choice over the image quality Difference Between Raw and Jpeg.
In these fields, the workflow is designed to maximize throughput and minimize latency. The images may be slightly less flexible than Raw, but they meet the immediate technical and logistical requirements of the job.
The Everyday Shooter and Smartphone Dilemma
The vast majority of everyday photos taken by casual photographers are captured and stored as Jpeg files, often without the user even realizing there is a Difference Between Raw and Jpeg. This is particularly true for smartphone photography.
Smartphones and Computational Photography: Modern smartphones automatically process, compress, and save images as Jpegs (or HEIC, which is a modern, more efficient compressed format). They use sophisticated computational photography techniques—like combining multiple exposures, enhancing details, and applying sharpening—all before* the image is saved. This heavy in-camera processing is designed to produce a perfectly finished, shareable Jpeg instantly, relying on powerful internal hardware to bridge the quality Difference Between Raw and Jpeg as much as possible for a small device.
- When to Use Raw on a Phone: However, most high-end smartphones now offer a ‘Pro’ or ‘Raw’ mode. This is specifically for users who want to bypass the phone’s heavy-handed automated processing and take advantage of the sensor’s full data range. If you are shooting a complicated scene—say, a dimly lit restaurant or a high-contrast landscape—using the Raw mode on your phone is the only way to retain the data needed to fix exposure and lighting issues later. For the casual user who just wants to share a picture to social media, the Jpeg’s convenience far outweighs the Difference Between Raw and Jpeg in quality. But for the enthusiast looking to edit on a tablet or desktop, Raw is the key to unlocking the true potential of the phone’s sensor.
For the vast audience of social media users, the small file size and immediate usability of Jpeg make it the logical choice, as platform compression often minimizes the final visible Difference Between Raw and Jpeg quality anyway.
Workflow, Storage, and Speed: The Practical Difference Between Raw and Jpeg
Beyond the technical data quality, the practical and logistical Difference Between Raw and Jpeg has a massive impact on a photographer’s day-to-day workflow, affecting everything from memory card capacity to processing time.
File Size and Memory Card Capacity (Statistical Context)
The sheer volume of data is one of the first practical differences you will encounter when comparing Raw and Jpeg. As established, Raw files are significantly larger because they contain all the sensor data, including all 14-bits of color information and often an uncompressed preview Jpeg.

A typical modern 24-megapixel camera might produce a Jpeg file of about 8MB to 15MB, depending on the quality setting. The same camera will produce a Raw file (e.g., a `.CR2`, `.NEF`, or `.ARW` file) that can range from 30MB to 60MB, or even larger for medium format or high-resolution cameras (like 60MP+ models, which can produce 100MB+ Raw files). This massive Difference Between Raw and Jpeg in file size has critical consequences:
- Storage Costs: If a photographer shoots 5,000 images on a week-long assignment, their total data storage requirement for Jpegs might be around 50GB. The same shoot in Raw format could easily exceed 250GB. This exponentially higher storage demand means a Raw-based workflow necessitates larger, more expensive memory cards, faster and larger external hard drives, and more robust cloud storage solutions.
- Archiving: The long-term archiving of Raw files is a major consideration. If you keep all your Raw files from years of shooting, the total storage volume quickly becomes immense and expensive to maintain in a redundant backup system. The Jpeg’s smaller size offers a compelling advantage for long-term storage of images that are not intended for high-end reproduction, reducing the cost associated with this particular Difference Between Raw and Jpeg.
Ultimately, the commitment to Raw is a commitment to investing in storage capacity. For the professional, the flexibility gained is worth the cost, but for the hobbyist, the storage requirements can be a significant deterrent against shooting Raw.
Post-Processing Power and Flexibility
The editing flexibility is the single greatest and most persuasive reason for choosing Raw, illustrating the immense power inherent in the Difference Between Raw and Jpeg data structures.
When you open a Jpeg in an editor, the changes you make are permanent and cumulative. Every adjustment to exposure, contrast, or color is applied to the image’s limited 8-bit data, and repeated edits lead to a rapid deterioration of quality. The edits are destructive.
When you open a Raw file, you are not actually changing the file itself. Instead, the editing software (often called a ‘Raw converter’) reads the Raw data and generates a list of instructions, or a ‘recipe,’ for how that data should be displayed and processed. These instructions are saved in a small file called a sidecar file (or stored in a database), leaving the original Raw data completely untouched.
- Non-Destructive Editing: You can go back a week later and change the white balance from “Sunny” to “Cloudy,” and the software simply updates the recipe. The original, pristine Raw data remains a master copy. This non-destructive workflow is the huge, practical Difference Between Raw and Jpeg and is indispensable for client work where revisions are common.
- Exposure Correction: The greater dynamic range (from 12-bit/14-bit data) means Raw files can rescue details that are completely lost in a Jpeg. For example, a Raw file can often recover 2 to 3 stops of underexposure and 1 to 2 stops of overexposure while maintaining acceptable image quality, a feat that is simply beyond the capability of a compressed Jpeg. This power to save a poorly exposed shot is often the deciding factor in the Difference Between Raw and Jpeg for many photographers.
Speed and Buffer Performance
The practical Difference Between Raw and Jpeg also plays out in terms of camera operational speed, specifically the buffer. As mentioned in the photojournalism section, the size of the file directly impacts how fast the camera can write the image to the memory card.
When you shoot a burst of photos, the camera’s buffer quickly fills up with the massive Raw files waiting to be written. The write speed is limited by the memory card and the camera’s processor. Since Raw files are so much larger, the buffer fills up much faster, causing the camera to choke and slow down, sometimes dramatically reducing the frames-per-second rate.
By contrast, the small Jpeg file size means the buffer takes much longer to fill, allowing for extended bursts of high-speed shooting. This is a critical functional Difference Between Raw and Jpeg for those who shoot fast action. Many modern cameras offer a third option: Raw + Jpeg. This allows the photographer to retain the high-quality Raw file while simultaneously generating a small Jpeg. This Jpeg can be used for immediate previews, quick social media posts, or as a fast way to check exposure, while the Raw file is safely stored for high-end editing later. This hybrid approach is a popular way to manage the performance and quality Difference Between Raw and Jpeg.
The Future of Image Formats: Looking Beyond the Difference Between Raw and Jpeg
While the fundamental Difference Between Raw and Jpeg remains the same—unprocessed data versus compressed convenience—the technological landscape is always evolving. New file formats are attempting to bridge the gap by offering more data than Jpeg in a smaller package.
HEIF and the Efficiency Push
The High-Efficiency Image File (HEIF) format, and its video counterpart HEVC (H.265), has emerged as a significant contender to Jpeg, particularly on mobile devices and newer operating systems. HEIF is not a Raw file, but it aims to offer the best of both worlds, providing a much higher image quality and often greater bit depth (up to 10-bit) than a standard Jpeg, all while maintaining a file size that is often half the size of a Jpeg.
- Bridging the Gap: HEIF/HEIC represents a modern attempt to minimize the practical downsides of the Difference Between Raw and Jpeg. It provides better quality and flexibility than Jpeg without the enormous file size and demanding workflow of Raw.
- Adoption: Apple made a significant move by adopting HEIC as the default image format for iPhones, showcasing the industry’s desire to move past the limitations of the decades-old Jpeg format. While it hasn’t replaced Raw for professional work, it provides a much better quality option for instant, everyday sharing.
This push toward more efficient compression formats, such as HEIF, is gradually redefining what a “high-quality, small file” can be, but the core Difference Between Raw and Jpeg—the data density and complete lack of pre-processing—will likely keep Raw files relevant for high-end work indefinitely.
Computational Photography and the Blurring Lines
As cameras and processors become more powerful, especially in smartphones, the lines defining the Difference Between Raw and Jpeg are starting to blur. Computational photography, which uses massive processing power to correct errors, merge multiple exposures, and enhance details, is making Jpegs look significantly better straight out of the camera.
In some cases, a highly processed Jpeg from a modern camera using advanced computational techniques (like deep-stacking for noise reduction) can actually look cleaner than a Raw file from the same camera if the Raw file is poorly processed later. This is a fascinating development that challenges the historical dominance of Raw for every single scenario. However, the fundamental Difference Between Raw and Jpeg still holds: the Raw file contains the original, untouched data, and the potential for the best image still resides there, regardless of how good the camera’s internal processing becomes.
Conclusion: Making Your Own Choice on the Difference Between Raw and Jpeg
The choice between the two formats is fundamentally a trade-off: Quality and Control versus Speed and Convenience. There is no single correct answer, only the answer that is right for your specific needs, subject, and workflow. Understanding the core Difference Between Raw and Jpeg is the first step toward becoming a better, more intentional photographer.
For any situation where the light is challenging, where the photo has commercial value, or where you anticipate needing maximum flexibility for future editing, the only logical choice is Raw. The superior color depth, non-destructive editing, and unparalleled dynamic range recovery inherent in the Raw format far outweigh the inconvenience of larger file sizes and longer processing times. It is the format of ultimate potential and uncompromising quality, and the Difference Between Raw and Jpeg in post-processing ability is simply too vast to ignore for serious work.
Conversely, if you are shooting quickly, have reliable lighting, require immediate delivery, or simply do not want to spend time editing, the Jpeg is the perfect solution. The small file size and universal compatibility make it an effortless format for sharing and storage. The next time you pick up your camera, don’t just choose a file format blindly. Instead, consider the profound Difference Between Raw and Jpeg and make a conscious, informed decision about which format is the best tool for the photographic job at hand. By internalizing the Difference Between Raw and Jpeg, you gain control over your photographic destiny. The technical Difference Between Raw and Jpeg is simply the starting point for a creative, powerful workflow, and mastering the Difference Between Raw and Jpeg will define the quality of your output.
*
Frequently Asked Questions (FAQ)
What is the biggest difference between Raw and Jpeg?
The biggest Difference Between Raw and Jpeg is the level of data captured and retained. Raw files are the untouched, uncompressed data straight from the camera’s sensor, typically containing 12 to 14 bits of color information (billions of colors) and requiring post-processing. Jpeg files are compressed, processed in-camera, and only contain 8 bits of color information (16.7 million colors), making them smaller and ready to use immediately, but with severely limited editing flexibility.
Do I lose image quality if I shoot in Jpeg?
Yes, you do. Jpeg uses a ‘lossy’ compression process that permanently discards data deemed unnecessary to reduce the file size. This means that every time you save a Jpeg, and especially when you try to edit it later, you are working with a limited, compromised set of image data, which can quickly lead to image degradation, visible banding in smooth gradients, and reduced detail recovery in shadows and highlights. The Difference Between Raw and Jpeg quality is most apparent after heavy editing.
Can I convert a Jpeg back to a Raw file?
No, you cannot. Converting a Jpeg to a Raw file is impossible because the Jpeg conversion process involves permanently discarding the vast majority of the original sensor data, including the extra 6 to 8 bits of color depth and all the unprocessed information. You can change the Jpeg file’s extension to a Raw file extension in a superficial way, but the underlying data remains a compressed Jpeg. The missing information that defines the Difference Between Raw and Jpeg cannot be recovered once it has been thrown away by the Jpeg compression algorithm.
Why do Raw files look duller than Jpegs when first opened?
Raw files look duller because they are unprocessed. When a Jpeg is saved, the camera automatically applies its internal ‘recipe’ for saturation, contrast, white balance, and sharpening. Raw files skip all this in-camera processing. When you open a Raw file, you are seeing the flat, neutral data from the sensor. It is the photographer’s job, during post-processing, to apply their own custom recipe to match or exceed the look of the camera’s default Jpeg, thereby turning the raw data into a vibrant, finished image.
Is the Raw + Jpeg setting a good compromise?
The Raw + Jpeg setting is an excellent compromise for many users. It gives you the immediate, shareable Jpeg for quick use and, crucially, preserves the original, high-data Raw file for future professional or detailed editing. The only downside is that it consumes twice the memory card and storage space, as the camera is saving two separate files for every single picture you take. This addresses the practical Difference Between Raw and Jpeg by providing both convenience and quality assurance.