Composition Tips For Professional Photos: The Ultimate Guide For Beginners
Photography is often described as the intersection of technical science and creative art. While understanding your camera’s exposure triangle—ISO, shutter speed, and aperture—is essential, it is composition that truly separates a snapshot from a professional masterpiece. Composition is the arrangement of visual elements within the frame to convey a specific message or emotion.
For many beginners, the challenge lies in seeing the world through a lens rather than with the naked eye. You might see a beautiful sunset, but when you press the shutter, the result feels flat and uninspiring. This is where composition tips for professional photos come into play. By applying structured techniques, you can guide the viewer’s eye and create a narrative within a single frame.
In this comprehensive guide, we will explore the foundational principles and advanced strategies of photography composition. Whether you are using a high-end DSLR or a smartphone, these rules will help you elevate your visual storytelling to a professional level.
1. Understanding the Power of the Rule of Thirds
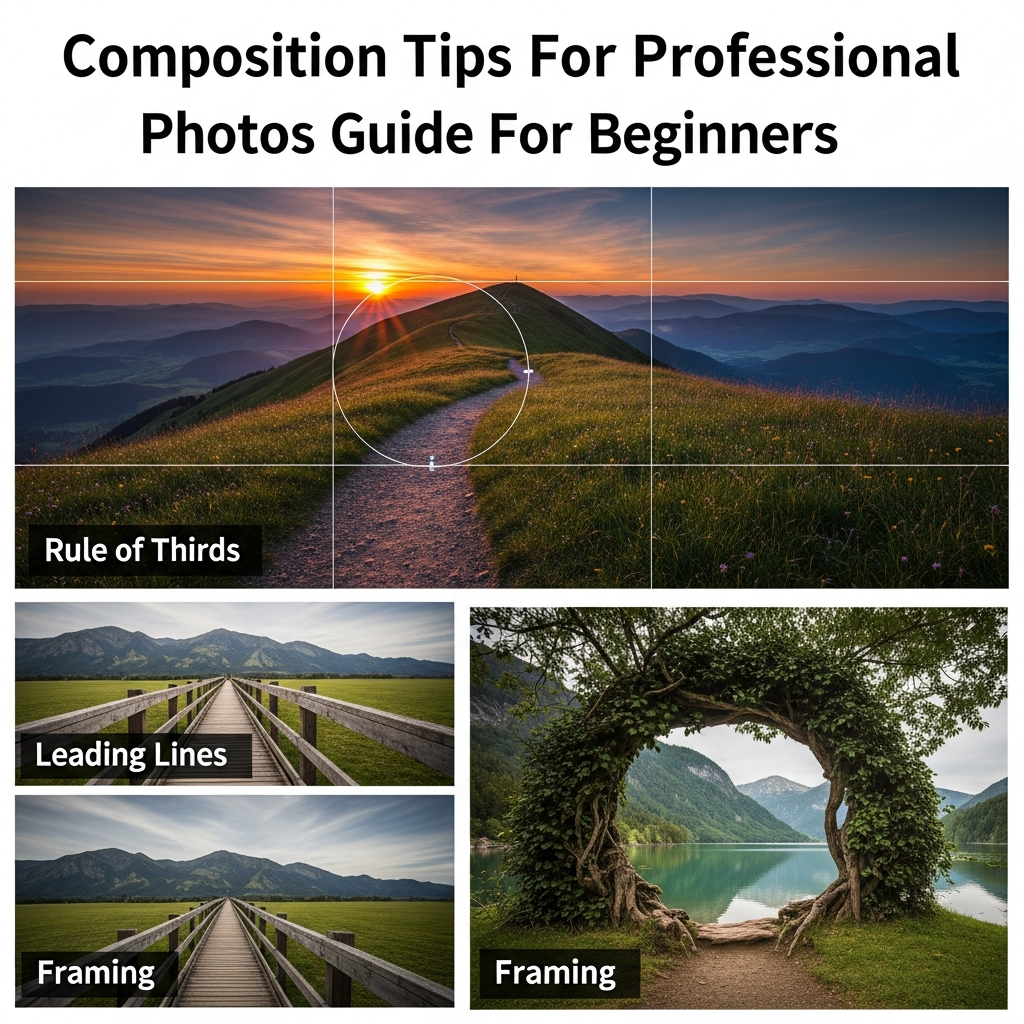
The Rule of Thirds is perhaps the most well-known principle in photography. Imagine your image is divided into a 3×3 grid by two horizontal lines and two vertical lines. This creates nine equal rectangles and four intersection points.
Instead of placing your subject directly in the center, which can often result in a static and boring image, try placing the most important elements along these lines or at the intersection points. This technique creates more tension, energy, and interest in the composition.
- For Landscapes: Place the horizon line on the top or bottom third line rather than in the middle.
- For Portraits: Align the subject’s eyes with the upper intersection points to create an immediate connection with the viewer.
- For Action: Leave “lead room” or empty space in the direction the subject is moving.
2. Leveraging Leading Lines to Guide the Eye
Leading lines are paths within an image that lead the viewer’s eye toward a specific point of interest or deeper into the frame. These lines can be literal, such as a road or a fence, or implied, such as a row of trees or the direction of a person’s gaze.
When you utilize leading lines, you are essentially providing a roadmap for the viewer. This technique is highly effective for creating a sense of depth and perspective. Common examples of leading lines include railway tracks, shorelines, architectural corridors, and even shadows.
To use this effectively, identify the strongest lines in your environment and position yourself so they point directly toward your main subject. This creates a powerful visual flow that feels intentional and professional.
3. Creating Depth with Framing Within the Frame
One of the best composition tips for professional photos is the use of “internal framing.” This involves using elements within the scene to create a frame around your subject. This could be a window, a doorway, an overhanging tree branch, or even a hole in a wall.
Internal frames serve several purposes. First, they emphasize the subject by isolating it from the rest of the environment. Second, they add a layer of depth, making the image feel three-dimensional. Third, they provide context to the location, helping the viewer understand the setting of the photograph.
When searching for frames, look for both man-made structures and natural elements. Be careful not to let the frame overwhelm the subject; the goal is to enhance the focal point, not distract from it.
4. The Impact of Symmetry and Patterns
The human brain is naturally drawn to symmetry and patterns. Symmetrical compositions—where both halves of the image are identical or near-identical—evoke a sense of harmony, balance, and stability. This is particularly effective in architectural photography and reflections on water.
Patterns, on the other hand, involve the repetition of shapes, colors, or textures. While patterns are visually pleasing, they can sometimes become monotonous. A professional trick is to find a way to break the pattern. Introducing an element that interrupts the repetition creates a powerful focal point that immediately grabs attention.
Pro Tip: When shooting symmetry, ensure your camera is perfectly level. Even a slight tilt can ruin the effect of a perfectly balanced shot.
5. Mastering Negative Space for Minimalist Impact
Negative space refers to the empty or “quiet” areas around your subject. Many beginners feel the need to fill every inch of the frame with detail. However, professional photographers know that what you leave out is just as important as what you include.
By surrounding your subject with a large amount of negative space—such as a clear blue sky or a blank wall—you strip away distractions. This forces the viewer to focus entirely on the subject, creating a minimalist and sophisticated aesthetic. Negative space is excellent for conveying emotions like loneliness, freedom, or serenity.
6. Changing Your Perspective: Angles and Height
Most amateur photos are taken from eye level. While this is comfortable, it rarely produces a unique perspective. To make your photos look professional, you must change your camera angles.
- Low Angle (Worm’s Eye View): Shooting from the ground up makes subjects appear larger, more powerful, and heroic. It is great for street photography and nature.
- High Angle (Bird’s Eye View): Shooting from above looking down can make a subject look small or provide a clear overview of a complex scene.
- Dutch Angle: Tilting the camera slightly can create a sense of unease or dynamic movement, though it should be used sparingly.
Don’t be afraid to get your clothes dirty. Kneel, climb, or lean to find a perspective that people don’t usually see in their daily lives.
7. Balancing Elements in the Frame
While the Rule of Thirds suggests placing subjects off-center, this can sometimes leave the other side of the frame feeling “empty.” To counter this, you can use visual weight to balance the composition. This is known as asymmetrical balance.
If you have a large, heavy subject on one side, try placing a smaller, less significant object on the opposite side to balance the “weight” of the image. This prevents the photo from feeling lopsided while maintaining the dynamic interest of an off-center composition.
8. The Golden Ratio and Fibonacci Spiral
If you want to move beyond the Rule of Thirds, the Golden Ratio (approximately 1.618:1) is a more advanced mathematical principle used by artists for centuries. It is often visualized as the “Fibonacci Spiral.”
This ratio is found throughout nature, from the petals of a flower to the shape of galaxies. Using this composition technique creates a very organic and naturally pleasing flow. While it is harder to visualize than a simple grid, many modern cameras allow you to overlay a Fibonacci spiral on the viewfinder to help you align your subjects.
9. Creating Depth of Field and Layering
A professional photo often feels like you could step right into it. This is achieved through layering and controlling the depth of field. A great composition usually consists of three layers:
- Foreground: Elements closest to the lens that provide a point of entry.
- Midground: Usually where the main subject resides.
- Background: Provides context and completes the scene.
By including something in the foreground—like a rock, a flower, or a blurred object—you create a sense of scale and distance. Using a wide aperture (low f-number) to blur the background (bokeh) further separates the subject and adds a professional “pop.”
10. Color Theory as a Compositional Tool
Composition isn’t just about shapes and lines; it’s also about color. Professional photographers use color theory to create mood and harmony. Complementary colors (colors opposite each other on the color wheel, like blue and orange) create high contrast and excitement.
Alternatively, analogous colors (colors next to each other, like green and yellow) create a calm and soothing effect. Pay attention to the colors in your frame. If a bright red object is in the corner of a landscape, it will pull the viewer’s eye away from your subject. Learn to simplify your color palette for a cleaner, more professional look.
11. The Rule of Odds
The Rule of Odds states that images are more visually appealing when there is an odd number of subjects (e.g., three, five, or seven) rather than an even number. An even number of objects can feel like they are competing with each other or can be easily divided by the brain, leading to a lack of focus.
An odd number of subjects creates a natural “center” or a grouping that feels more organic and less “staged.” This is particularly useful in still-life photography or when photographing groups of people.
12. Capturing Motion and Direction
When photographing moving subjects, composition dictates that you should give the subject space to move into. This is often called “active space.” If a car is driving from left to right, place the car on the left side of the frame so there is open road ahead of it.
If the subject is cut off by the edge of the frame or is moving “out” of the photo, it creates a feeling of claustrophobia or abruptness. Always consider the direction of the action to ensure a natural flow.
Step-by-Step Guide: How to Compose a Professional Photo
Now that you understand the theories, here is a practical workflow you can follow every time you take a photo:
- Identify Your Subject: What is the one thing you want people to look at?
- Scan the Background: Are there any distracting elements like poles growing out of heads or bright trash cans? Move your position to eliminate them.
- Choose a Rule: Decide if this shot would benefit from the Rule of Thirds, Symmetry, or Negative Space.
- Check Your Lines: Look for leading lines that could point toward your subject.
- Experiment with Height: Crouch down or stand on something to see if a different angle improves the story.
- Focus and Frame: Set your focus point, check your edges (don’t accidentally cut off feet or hands), and take the shot.
Expert Tips for Improving Composition Instantly
1. Simplify, then simplify more: The most common mistake beginners make is trying to include too much. If an element doesn’t add to the story, remove it from the frame.
2. Use the “Blink Test”: Close your eyes for three seconds, then open them and look at your photo. Where does your eye land first? If it’s not on your subject, your composition needs adjustment.
3. Shoot Wide and Crop Later: While it’s best to get the composition right in-camera, shooting slightly wider gives you the flexibility to perfect the framing during post-processing.
4. Study the Greats: Look at famous paintings and professional photography portfolios. Analyze why they placed subjects in certain spots. Composition in photography is heavily influenced by classical art.
Frequently Asked Questions (FAQ)
What is the most important rule of composition?
While the Rule of Thirds is the most foundational, the most important “rule” is actually simplicity. A clear focal point without distracting elements is what makes a photo professional.
Can I break the rules of composition?
Absolutely! The “rules” are actually guidelines. Once you understand why they work, you can intentionally break them to create a specific emotional response. However, you must know the rules before you can break them effectively.
How does composition affect the mood of a photo?
Composition directly impacts psychology. Horizontal lines suggest calmness, vertical lines suggest power, and diagonal lines suggest action. Close-up compositions feel intimate, while wide compositions with lots of negative space can feel lonely or grand.
Does equipment matter for good composition?
No. Composition is entirely about your eye and how you position the camera. A professional with a smartphone will always produce a better-composed image than a beginner with a $5,000 camera who doesn’t understand these principles.
Conclusion: Practice Makes Perfect
Mastering composition tips for professional photos is not something that happens overnight. It requires conscious effort and thousands of shutter clicks. The next time you go out to shoot, pick just one technique—like leading lines—and focus on it for the entire day. Over time, these “rules” will become second nature, and you will start seeing the world in frames and lines automatically.
Remember, the goal of composition is to communicate your vision clearly. Use these tools to guide your viewer, tell a story, and transform your photography from ordinary to extraordinary. Happy shooting!