The journey into photography is an exciting one, but the technical jargon and endless camera settings can often feel like trying to decipher an ancient language. Photography, at its heart, is simply the practice of capturing light, and mastering it requires understanding the fundamental tools you have at your disposal. This detailed guide to Basic Photography Techniques for Beginners is designed to demystify your camera and empower you to move beyond the automatic settings, allowing your creative vision to take center stage. We will explore the core concepts, common mistakes, and practical tips that form the bedrock of excellent image-making.
One of the most important steps in learning Basic Photography Techniques for Beginners is shifting your focus from the camera itself to the interaction of light, time, and lens opening. By concentrating on these three pillars, you gain the ability to control not only the brightness of your image but also its creative feel. This foundational knowledge is the true secret behind capturing stunning photographs consistently, whether you are using a state-of-the-art DSLR, a mirrorless body, or even a modern smartphone camera.
Mastering the Exposure Triangle: Your Camera’s Core
The Exposure Triangle is the single most critical concept for anyone starting out. It refers to the three primary settings that control how much light reaches your camera’s sensor: Aperture, Shutter Speed, and ISO. To truly understand Basic Photography Techniques for Beginners, you must first learn how these three elements interact and balance each other. Changing one element requires adjusting one or both of the others to maintain the same overall brightness, which is why it is called a triangle—each point is interconnected and dependent on the others.
Featured Snippet Answer: What are the three core settings of the Exposure Triangle?
The three core settings of the Exposure Triangle are Aperture, Shutter Speed, and ISO.
- Aperture: Controls the size of the lens opening, affecting depth of field (how much of the image is in focus).
- Shutter Speed: Controls the duration the sensor is exposed to light, affecting motion blur.
- ISO: Controls the sensor’s sensitivity to light, affecting image noise (graininess).
Mastering this trio is paramount among Basic Photography Techniques for Beginners, as it grants you full creative authority over the final image, defining its clarity, depth, and how movement is perceived.
Aperture (The Eye’s Iris): Controlling Depth
Aperture is the opening within your lens that allows light to travel through to the camera sensor. It is measured in f-numbers or f-stops, such as f/2.8, f/8, or f/16. Here is the first concept that often confuses new photographers: a smaller f-number (like f/2.8) represents a larger opening, and a larger f-number (like f/16) represents a smaller opening. Think of it like a fraction: 1/2.8 is much larger than 1/16.
The size of the aperture has two crucial effects on your photograph. Firstly, it controls the amount of light entering the camera. A larger aperture (smaller f-number) lets in more light, which is essential for low-light shooting. Secondly, and perhaps more importantly for creative purposes, it controls the Depth of Field (DoF). DoF is the range of distance in a photograph that appears critically sharp.
When developing your Basic Photography Techniques for Beginners, you will quickly find that a large aperture (e.g., f/1.8 to f/4) creates a shallow DoF. This means the subject is sharp, but the background is beautifully blurred, a technique known as bokeh, which is highly desirable for portraits. Conversely, a small aperture (e.g., f/11 to f/22) creates a deep DoF, keeping almost everything in the frame sharp, from the foreground to the horizon. This is why landscape photographers often use smaller apertures. Understanding this dual function—light gathering and depth control—is fundamental to advanced Basic Photography Techniques for Beginners.
Shutter Speed (The Time Gate): Freezing or Blurring Motion
Shutter speed is the length of time your camera’s sensor is exposed to light. It is typically measured in fractions of a second (e.g., 1/1000s, 1/60s) or in whole seconds (e.g., 1 second, 30 seconds). Just as with Aperture, Shutter Speed has two main functions. The first is, of course, exposure: a longer shutter speed lets in more light, resulting in a brighter image.
The second function, motion control, is what truly defines the creative use of shutter speed. For example, if you are photographing a fast-moving object, such as a sports car or a bird in flight, a very fast shutter speed (like 1/1000s or faster) will freeze the action, capturing every detail in sharp clarity. This freezing capability is a key component of the necessary Basic Photography Techniques for Beginners for action photography.
Conversely, a slow shutter speed (e.g., 1/15s to several seconds) will intentionally blur motion. This technique is often used to create silky-smooth water in a waterfall or river, or to transform car headlights into streaks of light on a city street. However, using slow shutter speeds requires that the camera itself remains perfectly still, usually by being mounted on a tripod, otherwise the entire image will suffer from camera shake. This balance between light and motion is a central lesson when learning Basic Photography Techniques for Beginners.
ISO (The Sensor’s Sensitivity): The Trade-Off with Noise
ISO stands for International Organization for Standardization and, in photography, it measures the sensitivity of your camera’s sensor to light. Historically, this number referred to the film’s sensitivity, but today it is a digital gain setting. Typical ISO values start at 100 or 200 (known as the base ISO) and go up to 6400, 12800, or even higher.
The primary function of ISO is to brighten an image when Aperture and Shutter Speed cannot be changed further. For instance, if you are shooting indoors without a flash, you may have your aperture wide open (f/4) and your shutter speed as slow as you can comfortably handhold (say, 1/60s). If the image is still too dark, increasing the ISO (from 100 to 800, for example) will make the sensor more sensitive and brighten the photo.
However, there is a significant trade-off, a critical point in the Basic Photography Techniques for Beginners curriculum: increasing the ISO introduces digital noise or “grain” into the image. This noise appears as speckles or discoloration, especially in the shadow areas. Therefore, the rule of thumb is always to use the lowest ISO possible to achieve the cleanest, highest-quality image. Only increase the ISO when you absolutely cannot collect enough light by adjusting the aperture or shutter speed.
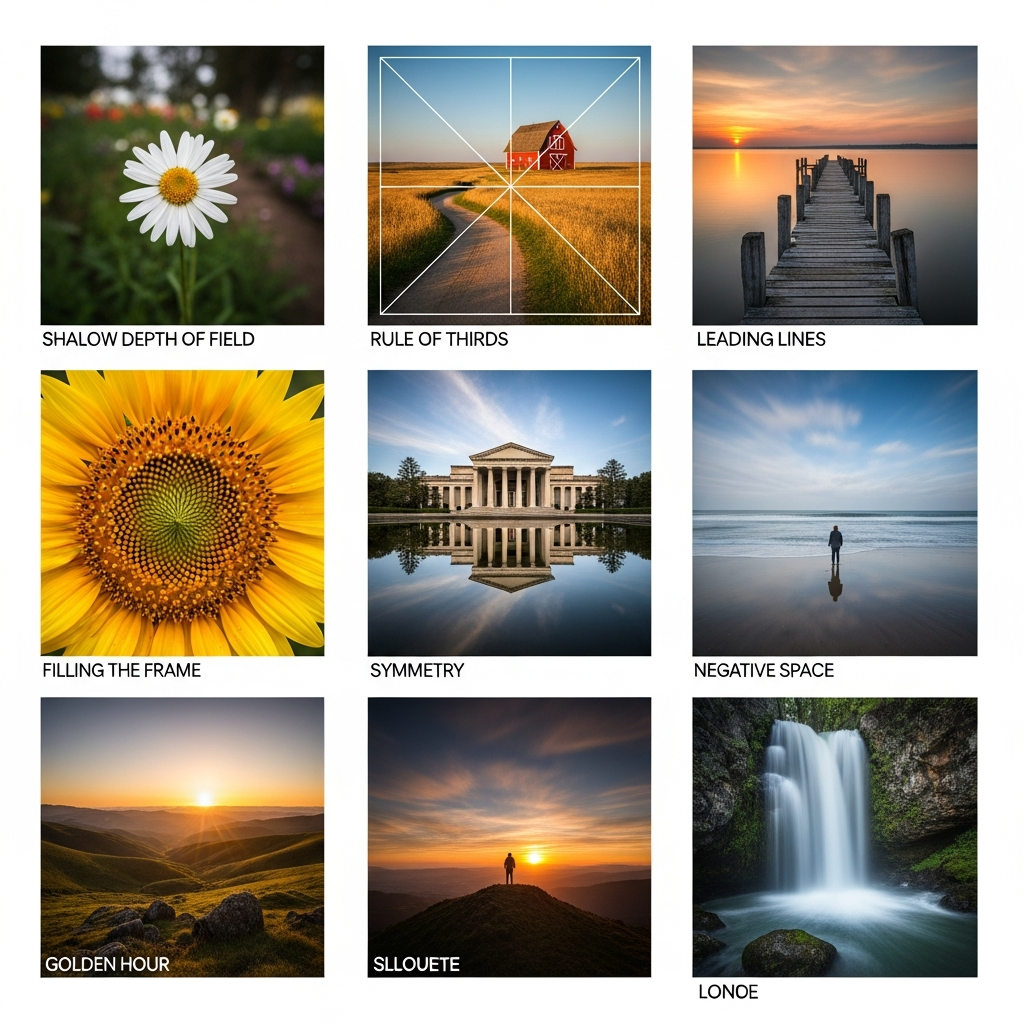
The Timeless Art of Composition: More Than Just Point and Shoot
Once you understand the technical side of exposure, you must turn your attention to the artistic side: composition. Composition is how you arrange the elements within your frame—the subject, the foreground, and the background. Many newcomers focus too much on camera gear, forgetting that composition is arguably the most powerful tool in the arsenal of Basic Photography Techniques for Beginners. Great composition can transform an ordinary scene into a compelling visual narrative.
The Rule of Thirds: The Foundation of Balance
The Rule of Thirds is the most foundational compositional guide taught in Basic Photography Techniques for Beginners. Imagine dividing your frame into nine equal segments by drawing two equally spaced horizontal lines and two equally spaced vertical lines (many modern cameras have an overlay grid for this). This grid creates four intersection points.
The core principle suggests that placing your main subject or points of interest along these lines or, better yet, at the intersection points, creates a more balanced, dynamic, and engaging image than simply centering the subject. For instance, in a landscape photo, placing the horizon line along the top third or the bottom third (instead of exactly in the middle) adds visual interest. This subtle shift in placement is often the difference between a snapshot and a deliberate photograph. While rules are meant to be broken, mastering the Rule of Thirds is a non-negotiable step in building solid Basic Photography Techniques for Beginners.
Leading Lines and Framing: Guiding the Viewer’s Eye
Effective composition is about controlling where the viewer looks. Two highly effective techniques for achieving this are Leading Lines and Framing.
- Leading Lines are actual or implied lines within a scene that draw the viewer’s eye from the foreground, through the image, and ultimately to the main subject. These can be roads, rivers, fences, pathways, or even a row of trees. When successfully integrated, they add depth, perspective, and a sense of journey to the photograph. A winding path, for instance, naturally leads the eye deeper into the scene, enhancing the visual impact and making the composition feel complete. Learning to spot and utilize these lines is an advanced layer to the essential Basic Photography Techniques for Beginners.
- Framing involves using elements within the scene to create a natural border around your main subject. This helps to isolate the subject, eliminating distracting elements and adding context or depth. A frame can be anything from a doorway, a window, tree branches, or an archway. It adds a sense of intimacy and focuses the viewer’s attention directly on the intended point of interest. This technique immediately elevates the artistic quality of the images taken by those learning Basic Photography Techniques for Beginners.
Symmetry, Patterns, and Negative Space
While the Rule of Thirds promotes asymmetry and dynamism, sometimes the strongest compositions rely on Symmetry and Patterns.
- Symmetry is particularly effective in architecture and reflection photography. A perfect reflection in still water, or a photograph of a building taken straight on, utilizes symmetry to create a sense of order, strength, and formality. This works best when the symmetry is nearly perfect, creating a strong visual impact that is instantly recognizable and satisfying to the human eye.
- Patterns are created by repeating shapes, colors, or textures. A field of sunflowers, the repetitive lines of a spiral staircase, or the brickwork on a wall all fall into this category. Disrupting an established pattern with a unique element (like a single red brick in a gray wall) is a powerful compositional tool that immediately draws attention.
- Negative Space is the area surrounding the main subject. Many Basic Photography Techniques for Beginners guides stress filling the frame, but sometimes giving your subject room to breathe is more impactful. Large amounts of empty space (the sky, a plain wall, a vast desert) can emphasize the subject’s isolation, size, or importance, leading to a much cleaner and often more dramatic image.
Light is Your Paintbrush: Understanding Illumination
Light is not just a necessity in photography; it is the subject itself. The quality, direction, and color of light can entirely change the mood, texture, and detail of a photograph. Understanding how to observe and manipulate light is perhaps the single most important skill to master, making it a crucial element in your practice of Basic Photography Techniques for Beginners.
The Quality of Light: Hard vs. Soft
The quality of light refers to how the shadows look and is largely determined by the size of the light source relative to the subject.
- Hard Light comes from a small, concentrated source, like the harsh midday sun or an undiffused camera flash. It creates strong, clearly defined, dark shadows with sharp edges. Hard light emphasizes texture and drama but can be unflattering for portraits, often resulting in squinting subjects and deep eye sockets.
- Soft Light comes from a large, diffused source, like a cloudy sky or light passing through a large window or a professional softbox. It creates gentle, subtle shadows with gradual transitions (low contrast). Soft light is highly flattering for portraits and works well for macro photography because it minimizes unflattering reflections and smooths out skin texture. As you refine your Basic Photography Techniques for Beginners, you will begin to instinctively recognize and seek out soft light for most portraiture.
The Golden Hour and Blue Hour: The Photographer’s Delight
Many photographers talk about the “Golden Hour” and the “Blue Hour”—and for good reason. These periods offer the most flattering, dramatic, and emotionally resonant light available, making them essential knowledge for Basic Photography Techniques for Beginners.
- Golden Hour: This is the period shortly after sunrise and shortly before sunset. The sun is low in the sky, producing a soft, warm, golden glow. The long shadows add texture and depth, and the warmth of the light is universally appealing. Shooting during the Golden Hour makes almost any subject look beautiful and is considered the ideal time for landscape and outdoor portraiture.
- Blue Hour: This is the short period of twilight before sunrise and after sunset, when the sun is below the horizon, but the atmosphere is still illuminated. The light takes on a beautiful, deep blue tone. This is the perfect time for cityscapes, where the deep blue sky contrasts dramatically with the artificial yellow or orange lights of buildings and streetlamps, creating visually striking and moody images. Including these specific times in your shooting schedule is a practical application of advanced Basic Photography Techniques for Beginners.
White Balance: Correcting Color Temperature
Have you ever taken a photo indoors that came out looking too yellow, or a photo in the shade that looked too blue? This is a White Balance issue. Color Temperature refers to the color cast of the light source, measured in Kelvins (K). Sunlight is neutral, incandescent bulbs are yellow/orange (warm), and shade/flash is blue (cool).
White Balance (WB) is your camera’s function to neutralize these color casts, ensuring that white objects in the scene appear genuinely white in the photograph. While the “Auto White Balance” (AWB) setting is usually competent, learning the manual presets or setting a custom white balance is crucial for tricky lighting conditions.
- Manual Presets: Look for icons like a sun (daylight, balances cool), a cloud (cloudy, adds warmth), or a lightbulb (tungsten/incandescent, balances warm light by adding blue).
- Custom WB: This is the most accurate method. You take a picture of a neutral gray or white object under the scene’s light source, and the camera uses that information to neutralize the color perfectly.
Proper white balance ensures that the colors in your photo are accurate and vibrant, a fundamental aspect of mastering Basic Photography Techniques for Beginners for professional results.
Essential Gear and Handling Tips for Better Shots
While the creative mind is the most important piece of equipment, understanding your physical gear and how to handle it properly significantly improves your results. You do not need the most expensive equipment to execute sound Basic Photography Techniques for Beginners, but you do need to know how your existing tools work.
The Power of Focal Length: Perspective and Distortion
Focal length, measured in millimeters (mm), is the distance from the lens’s optical center to the camera sensor. It dictates the angle of view and the magnification of the subject. Different focal lengths are used for different purposes, and recognizing this difference is a key step in mastering the Basic Photography Techniques for Beginners curriculum.
- Wide-Angle Lenses (10mm to 35mm): These lenses have a wide field of view, making them ideal for landscapes, architecture, and interior shots. They exaggerate perspective, making objects closer to the lens look much larger and elements farther away seem more distant. This can sometimes introduce distortion at the edges of the frame.
- Standard Lenses (35mm to 70mm): The 50mm lens, often called a “nifty fifty,” is a favorite because its field of view is very close to that of the human eye. They offer natural perspective and are excellent for street photography and general-purpose shooting.
- Telephoto Lenses (70mm to 300mm+): These lenses have a narrow field of view, magnifying the subject and making it appear closer. They are essential for wildlife, sports, and flattering portraiture. Telephoto lenses also compress perspective, making elements in the foreground and background seem closer together, a unique creative effect highly valued in portraiture.
Experimenting with different focal lengths, even if you only have one zoom lens, is vital for expanding your knowledge of Basic Photography Techniques for Beginners.
Tripods and Stability: Sharpness is Non-Negotiable
Sharpness is the benchmark of technical quality in any photograph, and a tripod is often the key to achieving it. While it may seem like an overly simple piece of gear, the impact of a tripod when implementing Basic Photography Techniques for Beginners is enormous.
A tripod is not just for extremely long exposures. It is essential any time your shutter speed falls below what you can reliably hand-hold without camera shake. A good general guideline is the reciprocal rule: your shutter speed should be no slower than 1/focal length (e.g., if shooting at 100mm, use 1/100 second or faster). If you must go slower, or if you are focusing on high-detail subjects, a tripod is your best friend.
Using a tripod forces you to slow down, consider your composition more carefully, and eliminates the risk of movement blur. Furthermore, it is indispensable for certain advanced Basic Photography Techniques for Beginners like long-exposure landscape shots, bracketing for High Dynamic Range (HDR) images, and macro photography, where even the slightest movement can ruin the shot.
RAW vs. JPEG: The Choice of Quality and Flexibility
Every digital camera offers the choice between saving images in JPEG format or RAW format. Understanding this fundamental difference is crucial for anyone dedicated to learning Basic Photography Techniques for Beginners.
- JPEG (Joint Photographic Experts Group): This is a compressed image file. When you press the shutter, the camera processes the image using your selected settings (White Balance, sharpness, contrast, color saturation), compresses it by discarding some data, and saves it as a JPEG. JPEGs are small, instantly usable, and ready to share, but they offer very little flexibility for post-processing edits.
- RAW: This format is an uncompressed file containing all the image data captured by the camera sensor. Think of it as the digital negative. The image will look flat and unprocessed right out of the camera, but it holds an enormous amount of information in the highlights and shadows. This gives you maximum flexibility to adjust exposure, white balance, and colors non-destructively in editing software.
While JPEGs are convenient, serious photographers and those wanting to truly advance their Basic Photography Techniques for Beginners should always shoot in RAW, or at least RAW+JPEG, to retain the ultimate control over their images during the editing phase.
Moving Beyond ‘Auto’ for Better Results
Many new photographers stick to the ‘Auto’ mode because it guarantees a technically adequate exposure. However, ‘Auto’ mode sacrifices all creative control, deciding on the depth of field and motion blur for you. To truly master Basic Photography Techniques for Beginners, you must take back that control using the Priority Modes. These modes allow you to control one critical setting while letting the camera handle the rest.
Aperture Priority (A or Av): Controlling Depth of Field
Aperture Priority (labeled ‘A’ or ‘Av’ on most cameras) is arguably the best mode for new photographers to start with. In this mode, you set the aperture (f-number), and the camera automatically calculates the correct shutter speed to achieve proper exposure.
This mode allows you to consciously decide on your Depth of Field:
- For a portrait where you want a blurred background, you set a large aperture (e.g., f/2.8), and the camera adjusts the shutter speed.
- For a landscape where you want everything sharp, you set a small aperture (e.g., f/11), and the camera adjusts the shutter speed.
Using Aperture Priority is a focused, practical application of the first pillar of the Exposure Triangle, making it an essential stepping stone in learning Basic Photography Techniques for Beginners. It allows you to concentrate purely on composition and DoF without worrying about manual settings.
Shutter Priority (S or Tv): Controlling Motion
Shutter Priority (labeled ‘S’ or ‘Tv’ on most cameras) is the opposite of Aperture Priority. In this mode, you set the shutter speed, and the camera automatically selects the aperture to achieve correct exposure.
This mode is used when motion control is the most important creative element:
- To freeze fast action (sports, splashing water), you set a fast shutter speed (e.g., 1/500s or 1/1000s).
- To create motion blur (waterfalls, light trails), you set a slow shutter speed (e.g., 1/4s or longer).
This is a powerful tool in the repertoire of Basic Photography Techniques for Beginners for capturing dynamic images. By controlling the shutter speed, you dictate how the dimension of time is represented in your final image, adding creative flair that is impossible to achieve in ‘Auto’ mode.
Mastering Focus: Single Point vs. Zone
A common mistake for those first learning Basic Photography Techniques for Beginners is relying on the camera’s default autofocus settings, which often pick the closest or most contrasty object in the center. Modern cameras offer highly sophisticated autofocus systems, but you must take control of them.
- Single-Point Focus: This allows you to select a specific, small point in the frame for your camera to lock focus onto. This is essential for precise focusing, especially when shooting portraits with a shallow Depth of Field. You focus on the subject’s eye, lock the focus, and then recompose the shot. This ensures that the most critical part of your image is perfectly sharp.
- Continuous Autofocus (AF-C or Servo): This mode constantly adjusts focus as long as the shutter button is half-pressed. It is indispensable for tracking moving subjects like pets, children, or athletes. Learning to use AF-C with single-point focus is one of the more advanced Basic Photography Techniques for Beginners for action photographers.
Taking deliberate control over your focus point is a simple but massive leap in quality for your images, ensuring that your intended subject, and not the background, is the star of the show.
Common Pitfalls and Troubleshooting for Beginners
Even with a grasp of the fundamental Basic Photography Techniques for Beginners, errors are inevitable. Recognizing common mistakes and knowing how to correct them is part of the learning process. Fixing these simple errors can instantly and dramatically improve your photographic output.
Shooting at the Wrong Time of Day
One of the most frequent mistakes made by those newly practicing Basic Photography Techniques for Beginners is shooting outside during the harsh midday sun (around 10 AM to 3 PM). The high sun creates:
- Harsh Light: Overly bright highlights and deep, unflattering shadows, especially on faces.
- Low Contrast: The bright light washes out colors and details.
The Fix: Simply change your shooting time. Prioritize the Golden Hour (early morning or late afternoon). If you must shoot midday, find deep, open shade (under an awning, or a large tree canopy). This turns the vast open shade into a giant softbox, providing soft, diffused light that is much more flattering and manageable.
Failing to Check the Background and Edges
Many beginners focus entirely on the subject, forgetting that everything else in the frame matters. A distracting background element—a bright red trash can, a tree branch appearing to sprout from the subject’s head, or clutter—can ruin an otherwise perfect composition.
The Fix: Before pressing the shutter, perform the “Four Corners Check.” Quickly scan the four corners of your frame for any distracting elements. Take a step left, a step right, or change your perspective (get lower or higher) to eliminate the clutter. Remember, the goal of Basic Photography Techniques for Beginners is control, and that includes controlling what is left out of the frame.
Not Taking Enough Photos (Hesitation)
A survey of common beginner mistakes highlights the issue of not taking enough photos. In the age of film, every shot cost money, but with digital cameras, storage is cheap. New photographers often hesitate, only taking one or two shots of a scene, especially when trying to implement complex Basic Photography Techniques for Beginners.
The Fix: Embrace the “spray and pray” mindset, with a thoughtful twist. Take a burst of photos!
- Bracket your exposure: Take one shot at the correct exposure, one shot slightly underexposed, and one shot slightly overexposed.
- Vary your composition: Take the main shot, then move in closer, step back, change the focal length, and get low.
- Capture the moment: Take multiple shots of moving subjects to ensure you capture the peak moment of the action.
The more you shoot, the better your chances are of capturing that perfect, unrepeatable moment.
Conclusion: Practice and Persistence
The journey to mastering Basic Photography Techniques for Beginners is ongoing and deeply rewarding. Photography is a craft that beautifully intersects technology, physics, and creative expression. By internalizing the principles of the Exposure Triangle—Aperture, Shutter Speed, and ISO—you gain the power to determine the look and feel of your images, moving from simply recording a scene to actively creating one.
Remember to prioritize light, the single most critical element, and to use compositional rules like the Rule of Thirds to guide the viewer’s eye. The goal for every aspiring photographer is not to acquire the most expensive camera but to develop a deep, intuitive understanding of these core principles. By deliberately practicing these Basic Photography Techniques for Beginners and constantly experimenting with light and composition, you will find that your confidence grows, and your photographs will evolve from simple snapshots into compelling works of visual art. Keep shooting, stay curious, and continue learning these foundational Basic Photography Techniques for Beginners.
*
FAQ (Frequently Asked Questions)
How do I stop my photos from being blurry?
Blurry photos are usually caused by either movement (camera shake or subject movement) or incorrect focus. To fix this, first, increase your Shutter Speed (to at least 1/125th of a second, or faster for action). If the light is too low, raise your ISO or open your Aperture to compensate. Secondly, ensure you are using Single-Point Autofocus and aiming it directly at your intended subject. If shooting at very slow speeds (below 1/60s), use a tripod, which is one of the crucial Basic Photography Techniques for Beginners for achieving perfect sharpness.
What is the best camera setting to start with?
The best setting to begin with is Aperture Priority Mode (A or Av). This mode allows you to consciously control the Depth of Field (how much is in focus) using the aperture (f-number), which is the most significant creative choice after composition. The camera will automatically manage the shutter speed to ensure the image is correctly exposed. Once you are comfortable with Av mode, you can move on to Shutter Priority (S or Tv), and finally, to full Manual (M) mode.
What is the “Rule of Thirds” and why is it important?
The Rule of Thirds is a compositional guideline that suggests dividing your image into nine equal parts using two horizontal and two vertical lines. The key points of interest, like a subject’s eyes or a horizon line, should be placed along these lines or, ideally, at their intersection points. It is important because it creates visual balance, energy, and interest in an image, preventing the static, often boring results of placing the subject dead center. Implementing this rule is a fundamental pillar of effective Basic Photography Techniques for Beginners.
Should I shoot in RAW or JPEG?
For beginners who want the highest quality and maximum editing flexibility, you should shoot in RAW. RAW files are uncompressed digital negatives that retain all the data captured by your camera’s sensor, allowing you to easily correct exposure, white balance, and color after the fact. While JPEG files are smaller and immediately shareable, they discard much of that crucial information. By committing to RAW, you follow one of the most important Basic Photography Techniques for Beginners for post-processing quality.
What is the “Golden Hour”?
The Golden Hour refers to the period of time shortly after sunrise and shortly before sunset. During this time, the sun is low on the horizon, producing a soft, warm, diffused light that casts long, appealing shadows. This light is considered the most flattering and desirable for almost all forms of outdoor photography, including landscapes and portraits, as it naturally adds a rich color and texture to the scene. Mastering shooting during this time is a significant step in the application of advanced Basic Photography Techniques for Beginners.