Aesthetic Pencil Sketch Inspiration: The Ultimate Beginner’s Guide to Creative Mastery
The world of art often feels intimidating to those standing on the outside, but aesthetic pencil sketching offers a gentle, accessible, and deeply rewarding entry point. Unlike complex oil paintings or digital illustrations that require expensive equipment, a pencil and a piece of paper are all you need to begin expressing your inner vision. This guide is designed to provide you with comprehensive aesthetic pencil sketch inspiration, technical foundations, and the creative confidence to start your artistic journey.
In recent years, the term “aesthetic” has evolved into a specific visual culture—emphasizing mood, harmony, and a certain “vibe” that resonates with the viewer. Whether you are drawn to minimalist line art, soft botanical illustrations, or moody portraits, this pillar guide will walk you through everything you need to know.
Understanding the “Aesthetic” in Pencil Sketching
Before you sharpen your pencil, it is essential to understand what makes a sketch “aesthetic.” In the context of modern art and social media, an aesthetic sketch often focuses on:
- Atmosphere: Creating a feeling rather than just a literal representation.
- Simplicity: Using negative space effectively to let the subject breathe.
- Texture: Utilizing the unique grain of the paper and the softness of lead to create tactile depth.
- Subject Matter: Often leaning towards nature, the human form, or nostalgic everyday objects.
By focusing on these elements, you can transform a simple drawing into a piece of art that evokes emotion and captures attention.
Essential Tools: Setting Up Your Creative Workspace
While you can start with a standard yellow school pencil, investing in a few specific tools will significantly enhance your ability to follow this aesthetic pencil sketch inspiration guide.
1. Graphite Pencil Grades
Pencils are categorized by their hardness (H) and blackness (B).
- H Grades (9H to H): Harder lead, produces lighter and crisper lines. Ideal for initial outlines and technical details.
- B Grades (B to 9B): Softer lead, produces darker and smoother tones. These are essential for deep shadows and “aesthetic” blending.
- HB Pencil: The middle ground, perfect for general sketching.
2. Paper Quality
The “tooth” or texture of your paper matters. For aesthetic sketches, look for acid-free sketchbook paper with a slight grain. This allows the graphite to cling to the surface, creating those beautiful gradients that define the style.
3. Erasers and Blending Tools
- Kneaded Eraser: This is a pliable eraser that you can mold into any shape. It is perfect for lifting highlights without damaging the paper.
- Blending Stumps (Tortillons): These paper tools allow you to smudge graphite smoothly, creating a soft, dreamy look.
- Vinyl Eraser: For clean, sharp highlights or erasing heavy marks.
Fundamental Techniques Every Beginner Must Master
Before diving into complex subjects, you must build a foundation. These techniques are the building blocks of every aesthetic pencil sketch.
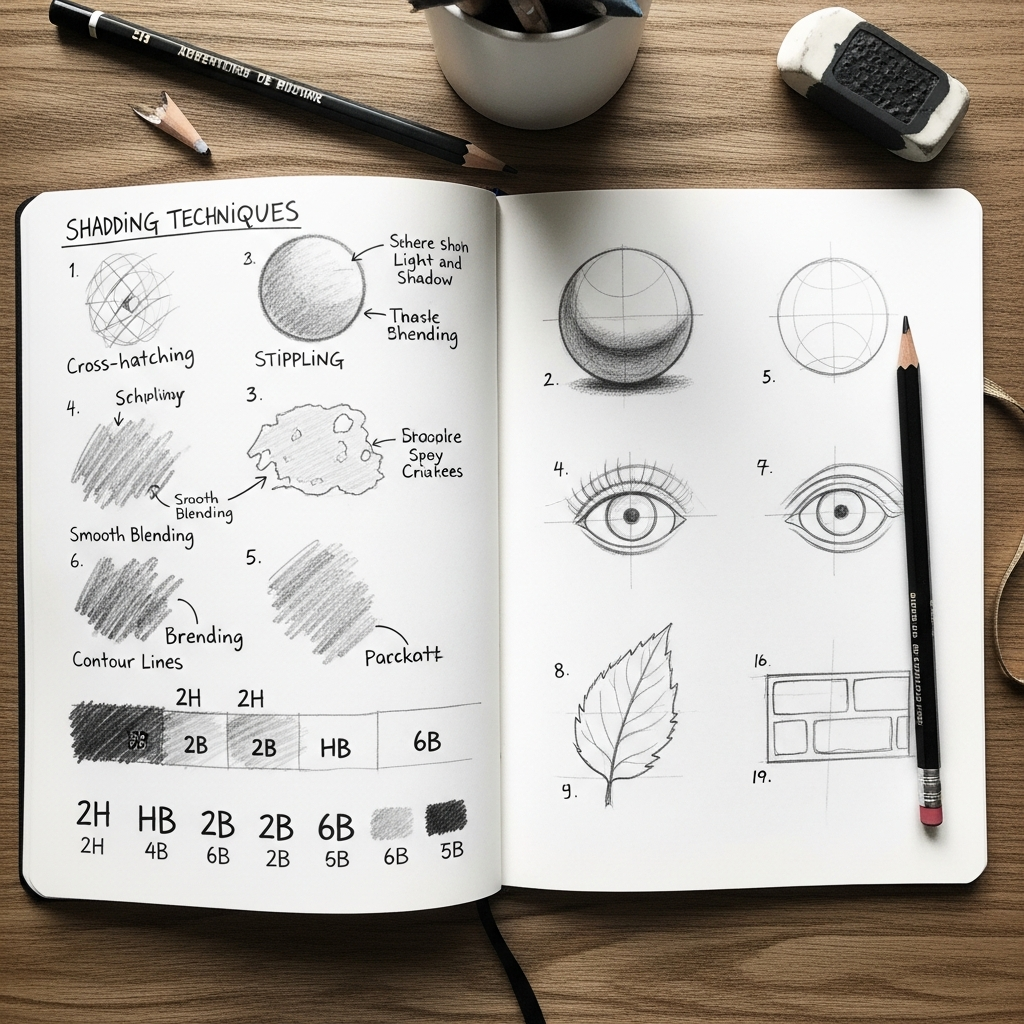
Shading and Value Scales
The key to an aesthetic look is the transition between light and dark. Practice creating a value scale—a series of boxes ranging from the absolute white of the paper to the darkest black your pencil can produce.
- Hatching: Drawing parallel lines to create tone.
- Cross-Hatching: Layering parallel lines at different angles for deeper shadows.
- Stippling: Using small dots to create texture and depth.
- Scumbling: Moving the pencil in small, circular motions to create a soft, textured finish.
Line Weight and Pressure Control
An aesthetic sketch often relies on varied line weights. A single line that starts thick and tapers off into a fine point adds life and movement to your drawing. Experiment with how much pressure you apply to the paper to discover how your tools respond.
Aesthetic Pencil Sketch Inspiration: Themes to Explore
If you are staring at a blank page and wondering what to draw, here are several curated themes designed to trigger your creativity.
1. Botanical and Floral Elements
Flowers are a staple of aesthetic art. They offer organic shapes that are forgiving for beginners.
- Inspiration Idea: A single, wilted rose in a thin glass vase. Focus on the delicate curves of the petals and the transparency of the water.
- Technique Tip: Use very light H-grade pencils for the initial outline, then use a soft B-grade pencil to add depth to the folds of the petals.
2. Minimalist Portraits and Features
You don’t need to draw a full, hyper-realistic face to create a stunning portrait. Aesthetic art often focuses on a single feature or a “line-art” style silhouette.
- Inspiration Idea: A close-up of an eye with a reflection of a landscape in the pupil, or a simple profile view of a face with flowers growing from the hair.
- Technique Tip: Focus on the “negative space”—the areas where you don’t draw. Let the viewer’s mind fill in the gaps.
3. Celestial and Dreamy Concepts
Moons, stars, and clouds are perfect for practicing your blending skills.
- Inspiration Idea: A crescent moon cradling a small cottage, or clouds that look like they are spilling out of a coffee cup.
- Technique Tip: Use a blending stump to create soft, ethereal edges for clouds, making them look weightless.
4. Hands and Gestures
Hands are notoriously difficult, but they are incredibly expressive. In the aesthetic style, hands often interact with delicate objects like butterflies or jewelry.
- Inspiration Idea: Two hands reaching for each other, with a spark of light (left as white paper) between the fingertips.
- Technique Tip: Break the hand down into simple geometric shapes (rectangles for the palm, cylinders for fingers) before adding detail.
Step-by-Step Guide: Creating Your First Aesthetic Sketch
Let’s put theory into practice. Follow these steps to create a simple, aesthetic botanical sketch.
Step 1: Light Sketching (The Ghost Outline)
Using a 2H or HB pencil, lightly map out the basic shapes of your subject. If you are drawing a leaf, draw a central line for the stem and a light oval for the overall shape. Do not press hard; these lines should be easy to erase.
Step 2: Refining the Silhouette
Observe the organic imperfections. Real leaves aren’t perfect ovals. Add small notches, curves, and veins. This “imperfection” is what adds to the aesthetic appeal.
Step 3: Establishing the Light Source
Decide where your light is coming from (e.g., the top-left corner). This will dictate where your shadows fall. Mark the brightest spots (highlights) and keep them completely white.
Step 4: Layering the Shading
Start with your lighter B pencils. Apply a base layer of shadow. Gradually move to darker pencils (4B or 6B) for the deepest crevices. Use your blending stump to soften the transitions.
Step 5: Adding the Final Details and Highlights
Use a sharp pencil to add fine veins or tiny droplets of water. Use your kneaded eraser to “dab” away a bit of graphite on the edges to create a glowing highlight effect.
Advanced Tips to Elevate Your Art Style
Once you are comfortable with the basics, use these expert tips to give your work a professional edge:
- Incorporate Mixed Media: Try adding a touch of white charcoal or a white gel pen for extreme highlights. It makes the pencil sketch “pop.”
- Focus on Composition: Use the Rule of Thirds. Don’t always place your subject in the dead center. Placing it slightly to the side creates a more dynamic and “aesthetic” feel.
- Keep a “Messy” Sketchbook: Not every drawing has to be a masterpiece. Use a sketchbook to practice individual elements—just eyes, just leaves, or just shading gradients.
- Limit Your Details: Sometimes, knowing what not to draw is more important than the drawing itself. Over-detailing can make a sketch look cluttered rather than aesthetic.
Overcoming Creative Blocks
Every artist faces the “blank page syndrome.” To keep your inspiration flowing:
- Curate a Mood Board: Use platforms like Pinterest or Instagram to save images that evoke the feeling you want to capture.
- The 10-Minute Challenge: Commit to sketching for just 10 minutes. Often, the hardest part is starting.
- Draw from Life: Look at the objects on your desk. A simple pair of glasses or a stack of books can be incredibly aesthetic if drawn with the right lighting and shadow.
Frequently Asked Questions (FAQ)
What is the best pencil for beginners?
For beginners, a set containing HB, 2B, 4B, and 6B is ideal. The HB is great for outlines, while the B grades allow for a wide range of shading.
How do I stop my pencil sketches from smudging?
Pencil graphite smudges easily. To prevent this, place a clean piece of paper under your hand while you draw. Once finished, you can use a fixative spray to seal the graphite to the paper.
Can I learn to sketch if I have no “natural talent”?
Absolutely. Drawing is a mechanical skill that improves with muscle memory and observation. Like any other craft, consistent practice is more important than innate talent.
How do I find my own “aesthetic” style?
Your style will emerge naturally over time. Start by imitating the artists you admire. Eventually, you will find yourself combining different techniques and subjects in a way that feels unique to you.
Conclusion
Aesthetic pencil sketching is more than just a hobby; it is a form of visual meditation. By focusing on the interplay of light and shadow, the grace of a simple line, and the mood of your subject, you can create works of art that resonate deeply.
Remember, the journey of a thousand sketches begins with a single stroke. Don’t be afraid to make mistakes—every “bad” drawing is a stepping stone toward your masterpiece. Grab your pencil, find your inspiration, and start creating today.