How to Use ISO Settings Correctly: The Ultimate Guide for Beginners
In the world of digital photography, mastering your camera settings is the bridge between taking “snapshots” and creating “photographs.” Among the three pillars of exposure, ISO is often the most misunderstood. While aperture controls depth of field and shutter speed controls motion, ISO is the silent partner that determines how your camera’s sensor reacts to light.
If you have ever wondered why your night photos look “grainy” or why your indoor shots are blurry, the answer almost always lies in your ISO settings. This comprehensive guide will teach you exactly how to use ISO settings correctly, ensuring you achieve the highest possible image quality in every lighting condition.
What is ISO in Photography?
To understand how to use ISO settings correctly, we must first define what it is. In technical terms, ISO (International Organization for Standardization) refers to the sensitivity of your camera’s digital sensor to light.
In the days of film photography, ISO (or ASA) was determined by the chemical composition of the film roll you purchased. If you were shooting in bright sunlight, you bought ISO 100 film. If you were shooting in a dark theater, you bought ISO 1600 film. In the digital age, you have the luxury of changing this sensitivity for every single frame with the press of a button.
The Exposure Triangle Connection
ISO does not work in isolation. It is part of the Exposure Triangle, alongside:
- Aperture: The size of the opening in the lens.
- Shutter Speed: The duration the sensor is exposed to light.
- ISO: The sensor’s sensitivity to that light.
Think of it like this: If Aperture and Shutter Speed cannot bring in enough physical light to create a visible image, ISO acts as an “amplifier” to boost the signal.
How ISO Affects Your Image Quality
Every choice in photography involves a trade-off. When you increase your ISO, you make the sensor more sensitive, allowing you to shoot in darker environments. However, the cost of this sensitivity is Image Noise.
1. The Relationship Between ISO and Light
Lower ISO values (e.g., 100 or 200) mean the sensor is less sensitive. You need a lot of ambient light to get a good exposure. Higher ISO values (e.g., 3200 or 6400) mean the sensor is highly sensitive, allowing you to capture images in near-darkness.
2. Understanding Digital Noise (Grain)
As you “crank up” the ISO, you are essentially applying digital gain to the sensor’s signal. This process introduces artifacts known as Digital Noise.
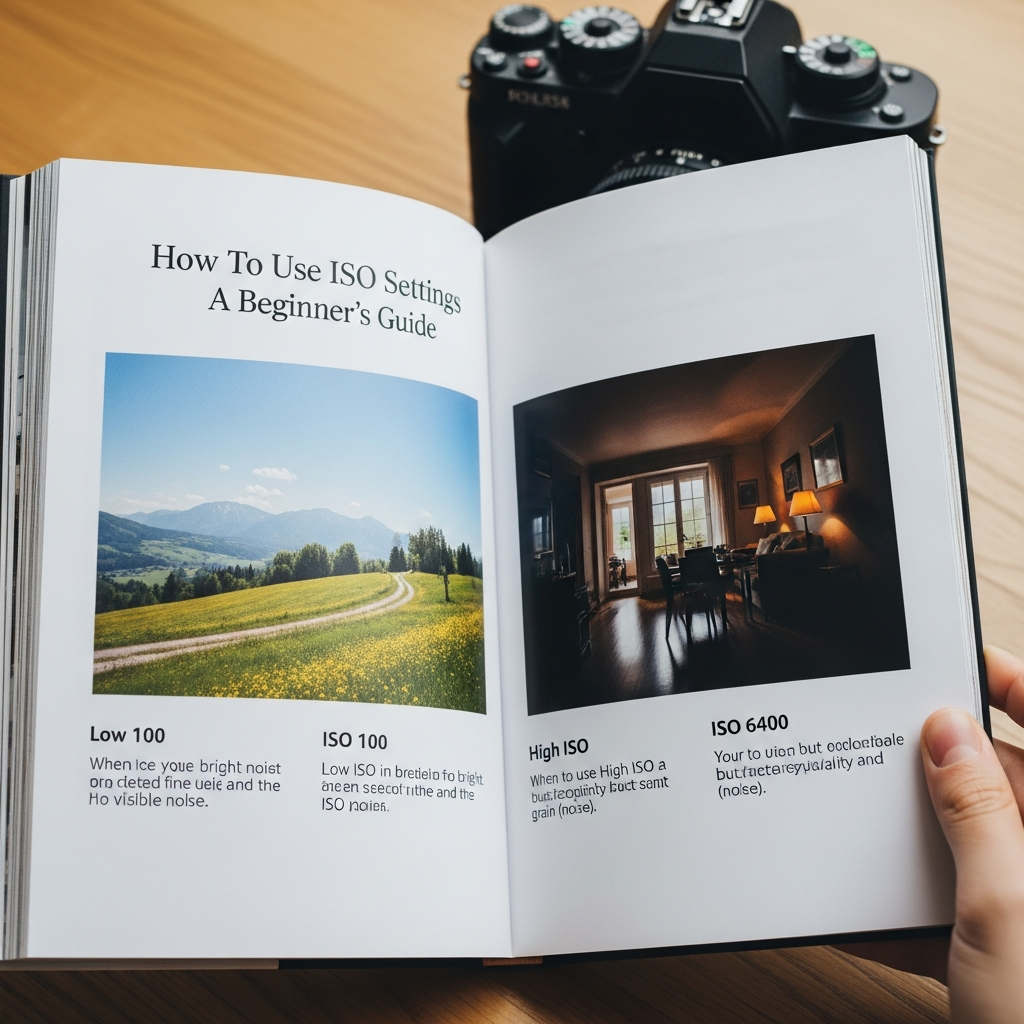
- Low ISO: Produces clean, sharp, and smooth images with vibrant colors.
- High ISO: Produces “grainy” images with speckles of random color and loss of fine detail.
The ISO Scale: Common Values and When to Use Them
Most modern cameras offer an ISO range from 100 to 51,200 (or even higher). Here is a breakdown of how to choose the right setting:
ISO 100 – 200 (The Base ISO)
This is the Base ISO of most cameras. It provides the highest dynamic range and the cleanest image quality.
- Best for: Bright sunny days, landscape photography on a tripod, and studio photography with powerful flashes.
- Goal: Use this whenever possible to ensure maximum clarity.
ISO 400 – 800
This is a moderate sensitivity level.
- Best for: Overcast days, shaded areas, or indoor rooms with plenty of window light.
- Goal: Use this when you need a slightly faster shutter speed to avoid camera shake but still want to maintain high image quality.
ISO 1600 – 3200
Now we are entering high-sensitivity territory.
- Best for: Indoor events, weddings, or street photography at dusk.
- Goal: Use this when you cannot use a flash and need to freeze movement in low-light conditions.
ISO 6400 and Above
This is extreme sensitivity.
- Best for: Night sky photography (astrophotography), dark concerts, or emergency situations where getting “the shot” is more important than image quality.
- Goal: Only use this when absolutely necessary.
Step-by-Step Guide: How to Adjust ISO Settings Correctly
Follow these steps to ensure you are selecting the optimal ISO for your specific scene.
Step 1: Start at the Base ISO
Always begin by setting your camera to ISO 100. This should be your default starting point for every shoot.
Step 2: Evaluate Your Light Source
Look at your environment. Are you outdoors? Is the sun out? If yes, stay at ISO 100. If you are moving indoors or the sun is setting, you will likely need to increase the value.
Step 3: Prioritize Aperture and Shutter Speed
Before touching the ISO, ask yourself:
- Can I open my Aperture wider (lower f-number) to let in more light?
- Can I use a slower Shutter Speed (if the subject is stationary and I have a tripod)?
If you have reached the limits of your aperture and shutter speed and the photo is still too dark, it is time to raise the ISO.
Step 4: Increase ISO Incrementally
Don’t jump straight to ISO 6400. Increase it in small steps (100 to 200, then 400, then 800) until your Light Meter indicates a balanced exposure.
Step 5: Check for Noise
Periodically review your shots on the camera screen. Zoom in to 100% to see if the grain is becoming too distracting. If the noise is ruining the details, you may need to find an external light source or use a tripod.
When Should You Use High ISO?
Many beginners are afraid of high ISO because of noise. However, there are specific scenarios where using a high ISO is the “correct” way to shoot:
- Wildlife Photography: Animals move fast. To freeze a bird in flight, you need a very fast shutter speed (e.g., 1/2000s). Even in daylight, you might need ISO 800 or 1600 to support that speed.
- Indoor Sports: Gymnasiums are notoriously dark. To capture a basketball player jumping, you need a high ISO to maintain a fast shutter speed.
- Astrophotography: Capturing the Milky Way requires the sensor to be extremely sensitive to pick up faint starlight. ISO 3200 is standard here.
- Handheld Low Light: If you are at a dinner party and don’t have a tripod, you must raise the ISO to prevent Motion Blur caused by shaky hands.
Common ISO Mistakes to Avoid
1. Leaving ISO on “Auto” in Tricky Light
While Auto ISO is a great tool, it can sometimes overcompensate. In a dark room with a single candle, Auto ISO might jump to 12,800, making the photo look like static. Learning to set it manually gives you creative control.
2. Forgetting to Reset ISO
This is a classic beginner mistake. You shoot at ISO 3200 indoors, then go outside into the bright sun and forget to change it back. Your photos will be completely “blown out” (overexposed). Always check your settings when the light changes.
3. Fearing Noise More Than Blur
A grainy photo is often better than a blurry photo. You can fix noise to some extent in post-processing (like Lightroom or Topaz Photo AI), but you cannot fix a photo that is blurry because the shutter speed was too slow. Don’t be afraid to push the ISO if it means getting a sharp image.
Hardware Matters: Sensor Size and ISO Performance
Not all cameras handle ISO the same way. The physical size of the sensor plays a massive role in how much noise is produced:
- Full-Frame Sensors: These have larger pixels that can “collect” more light. They generally produce very clean images even at ISO 3200 or 6400.
- Crop Sensors (APS-C / Micro Four Thirds): Because the sensor is smaller, the pixels are packed tighter. These cameras usually start showing significant noise around ISO 1600.
- Smartphones: Despite advanced software, smartphone sensors are tiny. They rely heavily on computational photography to hide the noise generated by high ISO.
Expert Tips for Managing ISO
Use “Native ISO”
Every camera has a Native ISO range. Avoid “Extended ISO” settings (often labeled as H1 or L) unless absolutely necessary, as these are software-simulated and often result in poor dynamic range.
Expose to the Right (ETTR)
In digital photography, noise is most visible in the shadows. Some pros use a technique called ETTR, where they slightly overexpose the image (without clipping highlights) and then bring the exposure down in editing. This results in a much cleaner image than trying to “brighten” a dark, underexposed photo.
Invest in “Fast” Lenses
If you find yourself constantly struggling with high ISO noise, consider a lens with a wider maximum aperture (e.g., f/1.8 or f/2.8). These are called “fast lenses” because they let in so much light that you can keep your ISO lower.
Summary Checklist for Beginners
To use ISO settings correctly, keep this mental checklist:
- Is there plenty of light? Stay at ISO 100-200.
- Is the subject moving fast? Raise ISO to allow for a faster shutter speed.
- Am I using a tripod? Keep ISO at 100, even in the dark (use long exposure instead).
- Is the photo too dark? Raise ISO as a last resort after adjusting Aperture and Shutter Speed.
- Is the grain too much? Lower the ISO and find a way to add physical light (flash, reflectors).
Frequently Asked Questions (FAQ)
Q: Does ISO affect the color of my photos?
A: Yes, extremely high ISO levels can lead to “chroma noise,” which appears as random purple or green splotches, and can make colors look desaturated.
Q: What is the best ISO for night photography?
A: It depends. If you have a tripod, use ISO 100 for long exposures. If you are shooting handheld, you will likely need ISO 3200 or higher.
Q: Is Auto ISO a bad thing?
A: Not at all! Modern Auto ISO is very smart. Most professional cameras allow you to set a “Maximum ISO” limit (e.g., don’t go above 6400), which is a great way to balance convenience and quality.
Q: Can I remove ISO noise in Photoshop?
A: Yes, there are many “Noise Reduction” tools. However, they work by slightly blurring the image to hide the grain, which can lead to a loss of sharpness or a “waxy” look if overdone.
Conclusion
Learning how to use ISO settings correctly is one of the most empowering steps you can take in your photography journey. It transforms the way you see light and gives you the confidence to shoot in challenging conditions.
Remember: ISO 100 for quality, high ISO for necessity. Balance your exposure triangle, understand your camera’s limits, and don’t be afraid to experiment. With practice, choosing the right ISO will become second nature, allowing you to focus on what truly matters—capturing the perfect moment.