Aesthetic Pencil Sketch Inspiration Guide for Beginners: Master the Art of Graphite
The world of art often feels intimidating to those standing on the outside looking in. However, pencil sketching remains one of the most accessible, intimate, and profoundly expressive mediums available to any aspiring artist. Whether you are looking to capture the delicate veins of a leaf or the soulful depth of a human eye, aesthetic pencil sketch inspiration provides the perfect gateway into the realm of visual storytelling.
In this comprehensive pillar guide, you will discover everything you need to transition from a curious observer to a confident sketch artist. We will explore essential tools, fundamental techniques, and a curated list of inspirations designed to spark your creativity.
The Timeless Appeal of Aesthetic Pencil Sketching
There is a unique quality to a pencil sketch that digital art or oil painting cannot quite replicate. The raw texture of graphite on paper creates a nostalgic, “aesthetic” vibe that resonates with modern sensibilities. For a beginner, the beauty of sketching lies in its simplicity. You do not need an expensive studio or complex chemicals; a single pencil and a piece of paper are enough to begin your journey.
Sketching serves as the foundation for almost all other visual arts. By mastering the light and shadow of pencil work, you develop a “painterly eye” that understands form, volume, and composition. Moreover, the meditative nature of sketching has been proven to reduce stress and improve focus, making it a perfect hobby for the modern age.
Essential Tools: Building Your Beginner Art Kit
Before diving into aesthetic drawing ideas, you must understand the instruments of your craft. Not all pencils are created equal, and choosing the right ones will significantly impact your progress.
1. Understanding Graphite Grades
Pencils are categorized by their hardness and blackness. You will notice letters like H, B, and HB on the casing:
- H (Hard): These pencils produce light, fine lines. They are ideal for technical drawings and initial light outlines. The higher the number (e.g., 4H, 6H), the harder the lead and the lighter the mark.
- B (Black): These are softer pencils that produce dark, rich strokes. They are essential for shading and depth. A 2B or 4B is a staple for any aesthetic sketch.
- HB: The middle ground, similar to a standard school pencil. It is versatile for both writing and basic sketching.
2. Selecting the Right Paper
The surface you draw on—often called the “support”—matters. For aesthetic sketches, look for acid-free paper with a slight “tooth” or texture. This texture helps the graphite particles grip the surface, allowing for smoother gradients and richer blacks. A sketchbook with a weight of at least 100gsm is recommended for beginners.
3. Erasers and Blending Tools
Forget the pink erasers from grade school. For professional-looking sketches, you need:
- Kneaded Erasers: These look like putty and can be molded into any shape to “lift” graphite without damaging the paper.
- Tombow Mono Zero: A precision eraser for highlights in hair or eyes.
- Tortillons or Blending Stumps: Rolled paper tools used to smudge graphite for a soft, ethereal aesthetic.
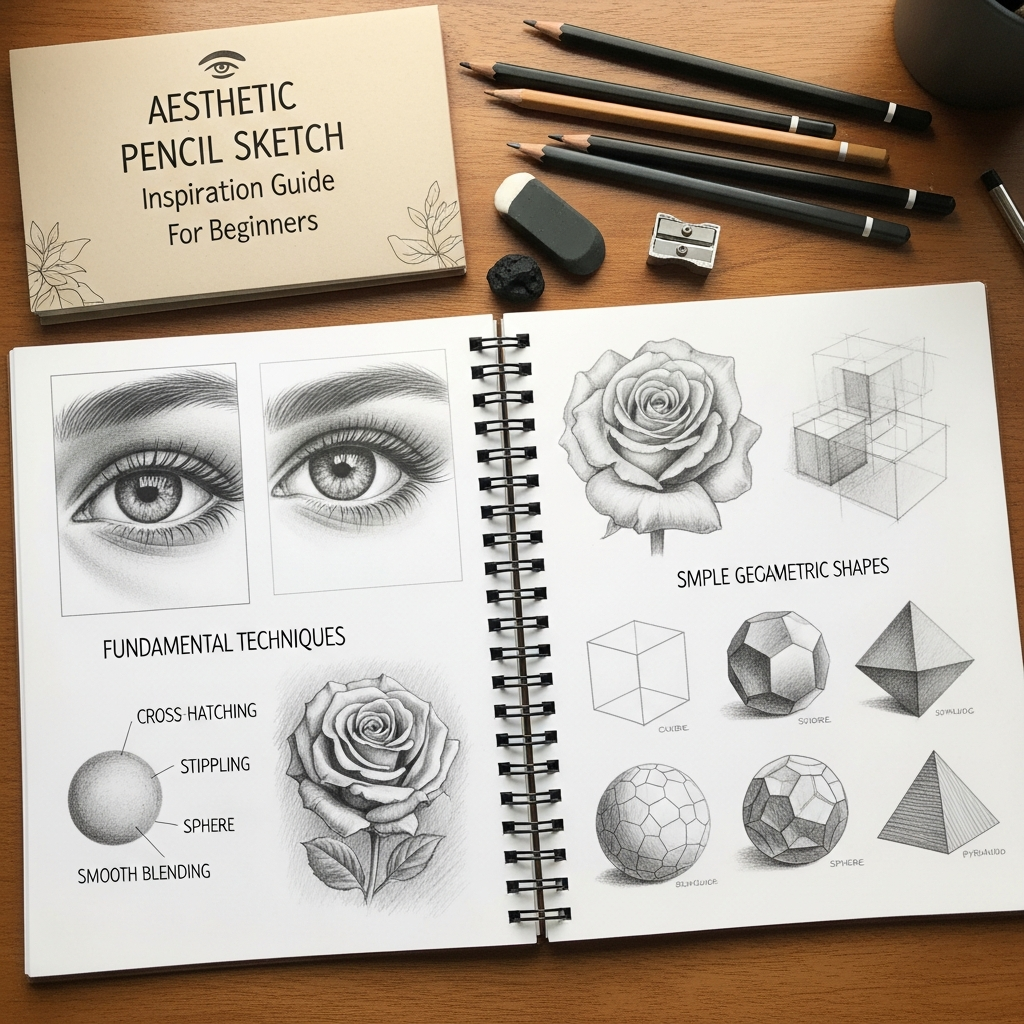
Fundamental Techniques Every Beginner Must Master
To transform a simple doodle into a piece of pencil art inspiration, you must practice specific techniques that create the illusion of three-dimensionality.
Line Quality and Pressure Control
The most common mistake beginners make is using the same pressure for every line. Varying your line weight adds immediate visual interest. A thick, dark line can indicate shadow or weight, while a thin, faint line can suggest light hitting an object. Practice drawing long, steady lines while gradually increasing and decreasing pressure.
Mastering Shading Methods
Shading is what gives your sketch its “aesthetic” soul. There are four primary methods to master:
- Hatching: Drawing parallel lines close together.
- Cross-Hatching: Overlapping parallel lines at different angles to create darker values.
- Stippling: Using dots to create value. The closer the dots, the darker the area.
- Scumbling: Making small, circular scribbles. This is excellent for creating textures like skin or clouds.
The Concept of Value Scale
Value refers to the lightness or darkness of a color. In pencil sketching, your value scale ranges from the white of the paper to the deepest black your 8B pencil can produce. A successful aesthetic sketch usually contains a full range of values, providing contrast and drama.
Finding Your Aesthetic: Popular Sketching Styles
“Aesthetic” is a broad term. Finding a specific style that resonates with you will help keep your practice consistent.
Minimalist Line Art
This style focuses on simplicity. Using a single, continuous line to define a face or a botanical form is a hallmark of modern aesthetic art. It requires confidence and a “less is more” mindset.
Soft Realism and Portraits
Many beginners are drawn to portraits. The aesthetic here often involves soft shading, dreamy eyes, and a focus on emotional expression. Instead of aiming for photographic perfection, focus on capturing the mood and character of the subject.
Botanical and Nature-Inspired Sketches
Flowers, leaves, and trees are perfect subjects because their organic shapes are forgiving. A single rose petal with delicate shading can look incredibly sophisticated and is a great way to practice texture rendering.
Step-by-Step: Creating Your First Aesthetic Pencil Sketch
Let us walk through the process of creating a simple yet beautiful sketch of a botanical leaf.
Step 1: Observation and Light Sketching
Do not rush to draw. Look at your subject. Where is the light coming from? Identify the basic geometric shapes. Use a 2H pencil to very lightly map out the general shape of the leaf. Keep your hand loose and your lines faint.
Step 2: Refining the Outline
Once you are happy with the proportions, switch to an HB pencil. Refine the edges, adding the small imperfections that make the leaf look natural. Avoid perfectly straight lines; nature is full of curves and jagged edges.
Step 3: Establishing the Shadows
Identify the darkest areas—usually where the leaf folds or where it meets the stem. Use a 2B pencil to lay down your first layer of shading. Remember to shade in the direction of the leaf’s growth or its veins to add realism.
Step 4: Blending and Highlights
Use a blending stump to soften the transitions between light and dark. Finally, take your kneaded eraser and dab away some graphite on the areas where light hits directly. These highlights will make your sketch “pop” and give it that professional aesthetic finish.
Curated Aesthetic Pencil Sketch Inspiration Ideas
If you are staring at a blank page, here are several prompts to get your creative juices flowing:
- The “Window to the Soul”: Focus exclusively on drawing a single eye. Experiment with the reflection in the pupil and the intricate texture of the iris.
- Hands in Motion: Hands are notoriously difficult but incredibly expressive. Try sketching hands holding a cup of coffee or a delicate flower.
- Architectural Details: Instead of a whole building, sketch a vintage doorway, a wrought-iron balcony, or a single streetlamp.
- Celestial Themes: Combine realism with fantasy by sketching a moon surrounded by soft, wispy clouds and sparkling stars.
- Fabric and Drapery: Throw a piece of cloth over a chair and try to capture the complex folds and shadows. This is a masterclass in value and form.
Overcoming Creative Blocks: How to Stay Inspired
Every artist, from beginner to professional, faces the dreaded “artist’s block.” Here is how you can maintain your momentum:
- Carry a Pocket Sketchbook: Inspiration can strike anywhere—at a cafe, in a park, or on a train. Having a small book ready allows you to capture quick gesture drawings.
- Limit Your Time: Sometimes, a blank page is scary because we expect perfection. Set a timer for 10 minutes and force yourself to finish a sketch. This removes the pressure and focuses on the process.
- Study the Masters: Look at the sketches of Leonardo da Vinci or Michelangelo. Observe how they used lines to define muscles and movement.
- Join an Online Community: Platforms like Pinterest and Instagram are goldmines for aesthetic pencil sketch inspiration. Engaging with other artists can provide much-needed encouragement.
Common Mistakes to Avoid as a Beginner
To accelerate your learning curve, be mindful of these frequent pitfalls:
- Over-Blending: While soft shadows are nice, over-blending can make a drawing look “muddy.” Ensure you keep some crisp lines for definition.
- Ignoring the Background: You don’t always need a full background, but a bit of shading behind your subject can help it stand out.
- Resting Your Hand on the Paper: This leads to smudging. Place a clean piece of paper under your hand to protect your work.
- Fear of Dark Values: Many beginners are afraid to go truly dark. Don’t be! Deep blacks provide the contrast that makes a sketch look three-dimensional.
Conclusion: Your Artistic Journey Starts Now
Aesthetic pencil sketching is more than just a hobby; it is a way of seeing the world with more clarity and appreciation. By understanding your tools, practicing fundamental techniques, and seeking out daily inspiration, you will find that your skills improve faster than you ever imagined.
Remember, every master was once a beginner who refused to give up. Do not worry about making mistakes—every “bad” sketch is simply a stepping stone toward your first masterpiece. Grab your pencil, find a quiet corner, and let your creativity flow onto the paper.
Frequently Asked Questions (FAQ)
1. What is the best pencil for a beginner to start with?
For a beginner, a 2B pencil is the most versatile. it is soft enough for dark shading but can still be used for lighter lines if you apply less pressure.
2. How can I make my sketches look more “aesthetic”?
Focus on composition, soft lighting, and emotional subjects. Incorporating elements of nature, minimalist lines, and high contrast between light and shadow often creates that sought-after aesthetic look.
3. Do I need to learn anatomy to draw people?
While a deep understanding of anatomy helps, beginners can start by observing basic shapes and proportions. As you progress, studying the skeletal and muscular structure will significantly improve your realism.
4. How do I prevent my pencil sketches from smudging?
Use a fixative spray once your drawing is finished. During the drawing process, keep a spare piece of paper under your drawing hand to avoid direct contact with the graphite.
5. Is it better to draw from a photo or real life?
Both have benefits. Drawing from real life improves your 3D perception, while drawing from photos allows you to take your time and study fine details without the subject moving.