Shading Techniques for Drawing: The Ultimate Comprehensive Guide for Beginners
Shading is the transformative element that bridges the gap between a flat, two-dimensional sketch and a realistic, three-dimensional masterpiece. When you first pick up a pencil, you might focus primarily on outlines. However, it is the mastery of shading techniques for drawing that allows you to breathe life into your subjects, creating the illusion of depth, form, and volume.
In this extensive guide, you will learn the foundational principles of light and shadow, the essential tools required for success, and a detailed breakdown of various shading methods. Whether you aspire to draw realistic portraits or intricate still-life compositions, this shading techniques for drawing guide for beginners is designed to provide you with the professional knowledge needed to elevate your artistic journey.
Understanding the Science of Light and Shadow
Before you apply graphite to paper, you must understand how light interacts with physical objects. Shading is not merely about making parts of a drawing darker; it is about representing the behavior of light.
The Light Source
The light source is the most critical factor in any drawing. It determines where your highlights will sit and where your shadows will fall. When you begin a drawing, you should always decide on a fixed light source—whether it is the sun, a lamp, or a window.
The Five Elements of Shading
To create a realistic three-dimensional effect, you must incorporate these five elements:
- Highlight: The brightest area where the light hits the object directly.
- Midtone: The actual color or value of the object, located between the highlight and the shadow.
- Core Shadow: The darkest part of the object itself, where the light cannot reach.
- Reflected Light: A small strip of light on the edge of the shadow side, caused by light bouncing off the surface the object is sitting on.
- Cast Shadow: The shadow thrown by the object onto the surrounding surface.
Essential Tools for Pencil Shading Techniques
To achieve professional results, you must use the right materials. While a standard school pencil can work, specialized graphite pencils offer a much wider range of values.
The Graphite Scale (H vs. B)
Pencils are categorized by their hardness and blackness:
- H Pencils (Hard): These produce light, thin lines. They contain more clay and less graphite. They are excellent for initial sketches and very light highlights.
- B Pencils (Black/Soft): These produce dark, rich tones. The higher the number (e.g., 4B, 6B, 8B), the softer and darker the pencil.
- HB Pencil: The middle ground, similar to a standard #2 pencil.
Paper Texture (The “Tooth”)
The surface you draw on matters. Paper with a “fine tooth” is smooth and good for detailed work, while paper with a “medium tooth” or “rough” surface allows for better layering of graphite, which is essential for deep shadows.
Erasers and Blending Tools
- Kneaded Eraser: This is a putty-like eraser that you can mold into points to “lift” graphite for highlights.
- Blending Stumps (Tortillions): Cylinders of rolled paper used to smudge and blend graphite smoothly.
- Tissue or Cotton Swabs: Useful for softening large areas of shading.
Core Shading Techniques for Drawing Guide for Beginners
There are several distinct methods to apply graphite to create value. Each technique offers a different texture and visual “feel.”
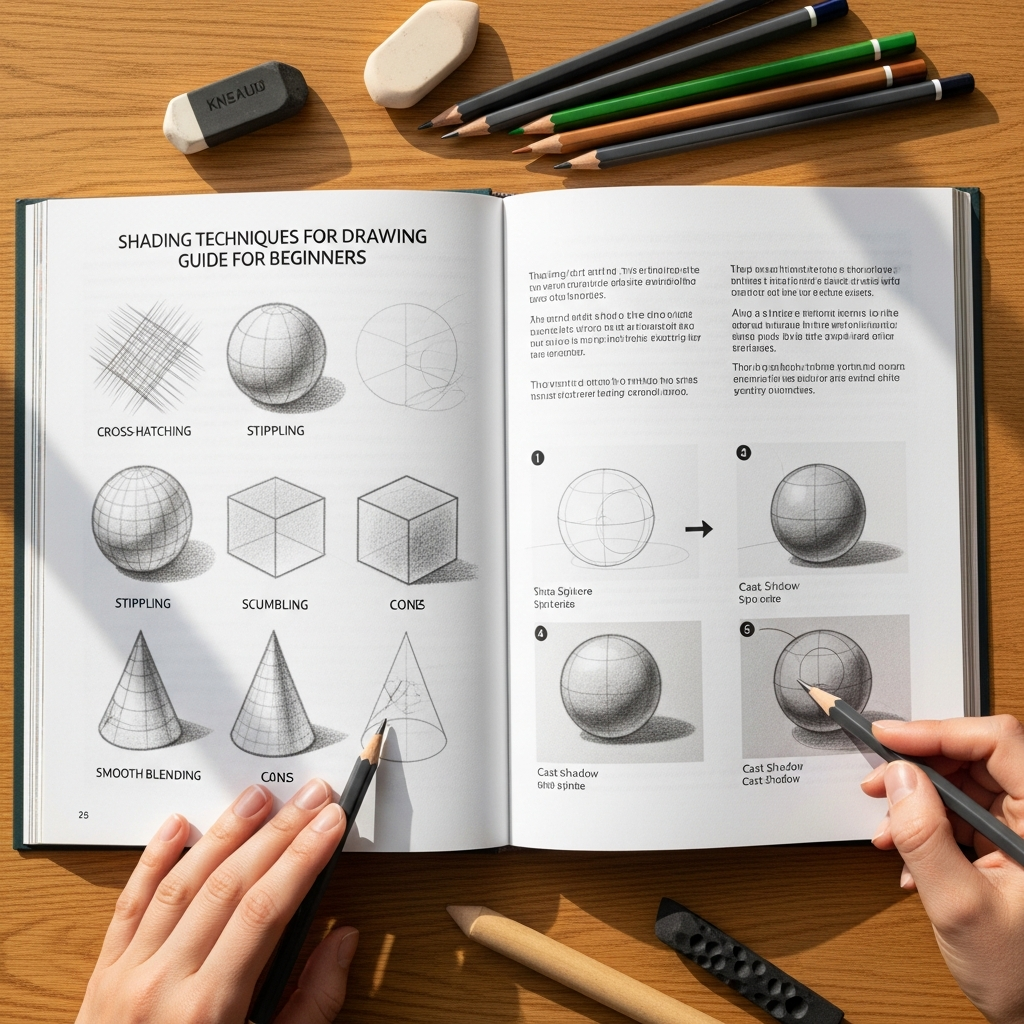
1. Hatching
Hatching is the most basic shading technique. It involves drawing a series of parallel lines close together.
- How to do it: Draw lines in the same direction. To make an area darker, place the lines closer together. To make it lighter, space them further apart.
- Best for: Creating quick value studies and adding a sense of direction to a surface.
2. Cross-Hatching
Cross-hatching takes hatching a step further by layering a second set of lines over the first at an angle.
- How to do it: Draw your first layer of hatching, then draw another layer crossing over it (usually at a perpendicular or diagonal angle).
- Best for: Building deep, rich shadows and adding structural integrity to your drawing.
3. Stippling
Stippling is the process of creating value through a series of small dots.
- How to do it: Apply dots to the paper. The denser the dots, the darker the area appears. This technique requires significant patience.
- Best for: Creating unique textures and achieving very subtle gradations without the “directional” look of lines.
4. Scumbling (Circulism)
Scumbling involves drawing tiny, overlapping circles or “scribbles” to build up value.
- How to do it: Use a blunt pencil and move it in small, controlled circular motions. Layer the circles to darken the tone.
- Best for: Drawing skin textures, fabrics, and achieving a smooth, non-linear look.
5. Blending (Smooth Shading)
This is perhaps the most popular technique for realistic drawing. It involves applying graphite and then using a tool to smooth it out.
- How to do it: Apply a layer of soft graphite (like a 2B or 4B). Use a blending stump or tissue to rub the graphite into the paper’s grain.
- Best for: Photorealistic portraits, soft clouds, and smooth metallic surfaces.
The Importance of the Value Scale
A value scale is a tool used by artists to measure the range of lightness to darkness. Usually, a scale consists of 9 to 12 steps, ranging from pure white (the paper) to the darkest black your pencil can produce.
As a beginner, you should practice creating a value scale. If your drawing lacks contrast—meaning you only use mid-range grays—your work will look “flat” or “muddy.” Successful drawing shading for beginners relies on having a full range of values, from the brightest highlights to the deepest blacks.
Step-by-Step Guide: Shading a Sphere
To put these shading techniques into practice, let us walk through the classic exercise of shading a sphere. This exercise teaches you how to turn a circle into a 3D ball.
Step 1: Draw the Outline and Identify the Light Source
Draw a perfect circle using a compass or by hand. Decide where your light is coming from (e.g., the top-right corner). Lightly mark where the highlight will be.
Step 2: Block in the Core Shadow
Using a 2B pencil, lightly shade the side of the circle furthest from the light source. Follow the curve of the sphere; do not use straight lines. This area is your core shadow.
Step 3: Add the Midtones
Transition from the core shadow toward the highlight using lighter pressure. This is where you practice your “gradation”—the smooth transition from dark to light.
Step 4: Define the Reflected Light
Leave a very thin, slightly lighter strip at the very edge of the shadow side. This represents light bouncing back from the table onto the sphere. This small detail is what makes an object look truly 3D.
Step 5: Draw the Cast Shadow
On the surface where the sphere sits, draw a dark shadow extending away from the light source. The cast shadow is usually darkest right where the object touches the ground (the occlusion shadow).
Step 6: Refine and Blend
Use your blending stump to smooth out the transitions if you prefer a realistic look. Use your kneaded eraser to “pop” the highlight back to pure white if it got too dark.
Expert Tips for Mastering Shading
To move from a beginner to an intermediate artist, consider these professional tips:
- Avoid Using Your Fingers: The natural oils on your skin can smudge the graphite in a way that makes it difficult to erase or layer later. Always use a blending stump or tissue.
- Sharpen Your Pencils Frequently: Even for shading, a sharp point allows you to get graphite into the “valleys” of the paper texture, resulting in a more solid and professional look.
- Shade in Layers: Do not try to get the darkest black immediately. Build up your values slowly. This allows for more control and prevents the graphite from becoming “shiny” or “waxy.”
- Observe Real Life: Look at how shadows fall on objects in your room. Notice that shadows are rarely just one solid block of color; they have variations.
- Check Your Contrast: Periodically squint your eyes at your drawing. This blurs the detail and allows you to see if the overall values are correct. If the whole drawing looks like the same shade of gray, you need more contrast.
Common Mistakes Beginners Make
Even with a shading techniques for drawing guide for beginners, certain pitfalls are common:
- Fear of the Dark: Many beginners are afraid to make their shadows dark enough. This results in a “washed-out” look. Don’t be afraid to use your 6B or 8B pencils.
- Outlining Everything: In reality, objects are defined by changes in value, not by hard black outlines. Try to define the edge of an object by shading the background darker or the object itself darker, rather than drawing a thick line around it.
- Ignoring the Background: A subject often looks more realistic when it exists within a shaded environment rather than floating on a white page.
Conclusion
Mastering shading techniques for drawing is a journey of patience and observation. By understanding the behavior of light, choosing the right tools, and practicing methods like hatching, scumbling, and blending, you will gain the ability to create stunningly realistic artwork.
Remember that every professional artist started where you are now. The key to success is consistent practice. Start with simple shapes like spheres and cubes, and gradually move toward more complex subjects like the human face or natural landscapes. With time and dedication, the pencil will become an extension of your vision, allowing you to render the world in all its three-dimensional glory.
Frequently Asked Questions (FAQ)
What is the best pencil for shading for beginners?
For beginners, a set containing an HB, 2B, 4B, and 6B pencil is ideal. The 2B is great for general shading, while the 6B allows you to reach the deep blacks necessary for high contrast.
How do I stop my shading from looking messy?
To keep your drawings clean, place a piece of scrap paper under your hand while you work. This prevents your palm from smudging the areas you have already shaded. Also, avoid using your fingers to blend.
Is blending better than hatching?
Neither is “better”; it depends on the style you want. Blending creates a smooth, photographic look, while hatching and cross-hatching provide a more classical, “artistic” or etched appearance.
Why does my shading look flat?
Flat shading usually occurs due to a lack of “value range.” Ensure you have a clear highlight, a distinct core shadow, and a cast shadow. Increasing the contrast between your lightest and darkest areas will add depth.
How do I shade skin texture?
For skin, the scumbling (circular) technique combined with light blending is often best. It mimics the subtle pores and irregularities of human skin without creating harsh lines.