Affordable Studio Lighting Kits Guide: The Ultimate Roadmap for Beginners
Lighting is the fundamental element that distinguishes a professional photograph from a mediocre snapshot. For many aspiring photographers and content creators, the transition from natural light to a controlled studio environment can feel intimidating and expensive. However, achieving high-quality results does not require a Hollywood-sized budget.
In this comprehensive guide, you will discover everything you need to know about affordable studio lighting kits. We will explore the technical nuances, the essential components, and the strategic setups that will elevate your visual work without draining your bank account.
Why Investing in a Studio Lighting Kit is Essential
When you rely solely on natural light, you are at the mercy of the weather, the time of day, and the architectural layout of your room. Studio lighting kits provide you with the most valuable asset in photography: consistency.
By using artificial light, you gain full control over the mood, depth, and clarity of your images. Whether you are shooting professional portraits, product photography for e-commerce, or high-quality video content for YouTube, a dedicated lighting setup ensures that your “look” remains uniform across every frame.
Understanding the Different Types of Studio Lighting
Before you click “buy” on the first kit you see online, it is crucial to understand the two primary categories of lighting. Each has its own strengths, weaknesses, and ideal use cases.
1. Continuous Lighting
Continuous lighting stays on once you flip the switch. What you see in real life is exactly what the camera sensor captures.
- LED Panels: These are the modern standard for affordable studio lighting. They are energy-efficient, stay cool to the touch, and often allow you to adjust color temperature.
- Fluorescent Bulbs: Often found in entry-level softbox kits, these are budget-friendly but can be fragile and lack the power of LEDs.
- Tungsten: These produce a warm light but generate significant heat and consume a lot of power. They are less common in modern beginner kits.
Best for: Beginners, videographers, and product photographers who want a “what you see is what you get” experience.
2. Strobe Lighting (Flash)
Strobes emit a powerful burst of light triggered by your camera’s shutter.
- Monolights: Self-contained units that plug into a wall outlet or run on batteries.
- Speedlights: Small, portable flashes that can be used on or off-camera.
Best for: Portrait photographers and those who need to “freeze” motion or overpower the sun. Strobes generally offer more power than continuous lights but have a steeper learning curve because you cannot see the effect until the photo is taken.
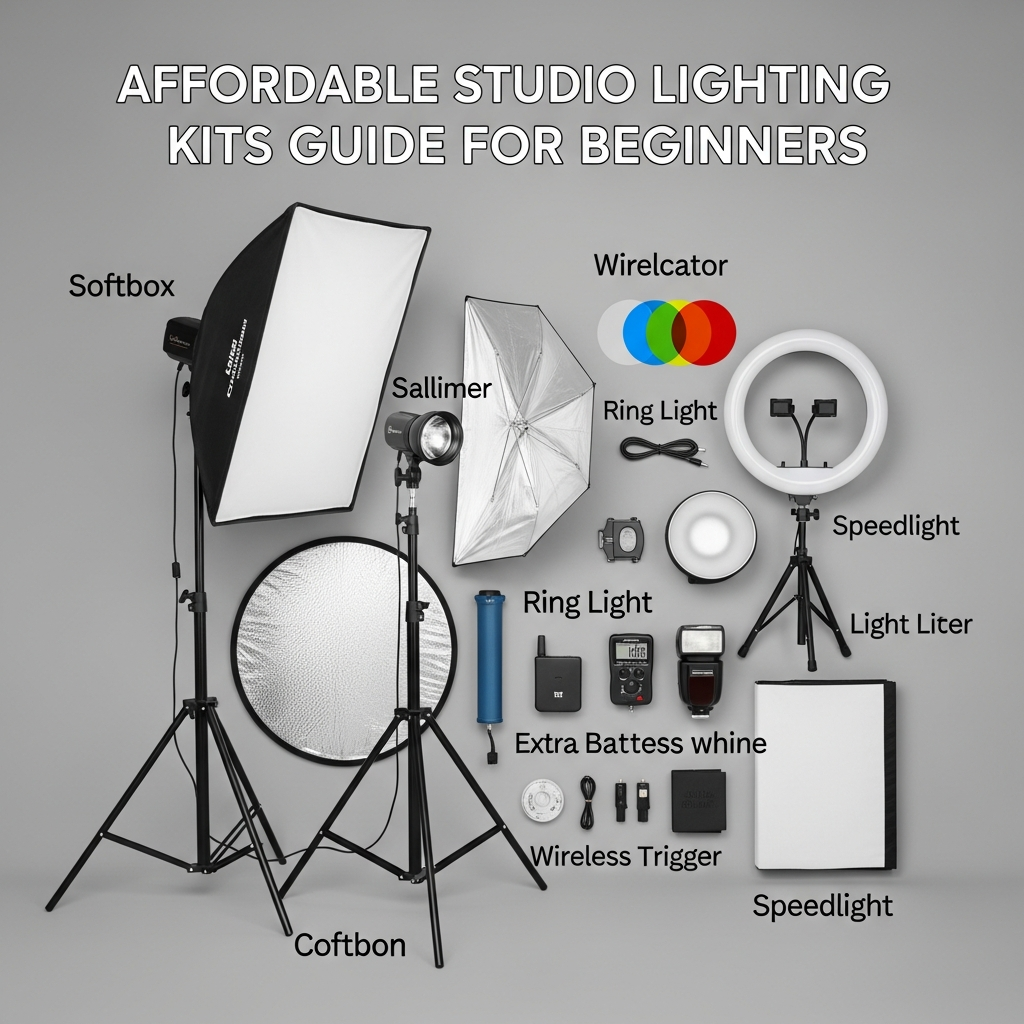
Essential Components of a Beginner Lighting Kit
A complete affordable studio lighting kit is more than just a bulb. To achieve professional results, you need a system of components working in harmony.
The Light Source
This is the heart of your kit. For beginners, we recommend starting with at least two light sources to allow for more complex setups like the 3-point lighting technique.
Light Modifiers
Raw light is often “harsh,” creating deep shadows and unflattering highlights. Modifiers change the quality of the light.
- Softboxes: These rectangular or octagonal covers diffuse light, creating a soft, window-like glow. They are essential for flattering skin tones in portraiture.
- Umbrellas: These are the most portable and affordable modifiers. Shoot-through umbrellas spread light widely, while reflective umbrellas focus it back toward the subject.
- Reflectors: Often a 5-in-1 tool (Gold, Silver, White, Black, Translucent), these help bounce light into shadow areas without needing an additional powered light source.
Light Stands
Do not overlook the importance of a sturdy stand. Your lights are an investment; you do not want them toppling over. Look for stands with a wide base and secure locking mechanisms.
Triggers and Cables
If you choose a strobe-based kit, you will need a wireless trigger that sits on your camera’s hot shoe to tell the lights when to fire. For continuous lights, ensure the power cables are long enough for your workspace.
Top Features to Look for in a Budget Lighting Kit
When browsing for affordable studio lighting, use these criteria to evaluate the value of a kit:
- CRI (Color Rendering Index): Look for a CRI of 95 or higher. This ensures that colors (especially skin tones) look natural and accurate.
- Adjustability: Can you dim the light? Can you change the color temperature from warm (3200K) to cool (5600K)?
- Portability: If you plan to shoot on location, look for kits that include a carrying bag and have the option for battery power.
- Build Quality: While “affordable” often means plastic, ensure the mounting brackets are reinforced.
Step-by-Step: How to Set Up Your First Studio Light
Setting up your gear for the first time can be overwhelming. Follow this logical flow to ensure a safe and effective setup:
Step 1: Clear Your Space
Ensure you have enough room to move around your subject. Trip hazards are common in small studios, so use gaffer tape to secure cables to the floor.
Step 2: Assemble the Stands
Extend the legs of your light stand fully to create a stable base. Tighten the knobs firmly but do not over-tighten, as this can strip the threads.
Step 3: Mount the Light and Modifier
Attach your light head to the stand before adding the modifier (softbox or umbrella). This prevents the setup from becoming top-heavy and falling during assembly.
Step 4: Position the Key Light
The Key Light is your primary light source. Place it at a 45-degree angle from your subject and slightly above eye level, pointing downward. This mimics the natural angle of the sun and creates flattering shadows.
Step 5: Test and Adjust
Turn on your camera. If the image is too bright, dim the light or move the stand further back. If the shadows are too dark, it is time to introduce a second light or a reflector.
Mastering the 3-Point Lighting Technique
This is the “gold standard” of studio lighting. Even with an affordable studio lighting kit, mastering this technique will make your work look like it was shot in a high-end studio.
- The Key Light: As mentioned, this provides the main illumination and sets the mood.
- The Fill Light: Placed on the opposite side of the Key Light, usually at a lower intensity. Its job is to “fill” in the shadows created by the Key Light, ensuring detail is not lost.
- The Back Light (Rim Light): Placed behind the subject, pointing at the back of their head or shoulders. This creates a “halo” effect that separates the subject from the background, adding 3D depth to a 2D image.
How to Save Money Without Sacrificing Quality
Being on a budget requires creativity. Here are professional tips for stretching your dollars:
- Buy Bundles: Manufacturers often offer significant discounts when you buy a “2-light kit” versus buying components individually.
- Utilize Reflectors: A $20 reflector can often do the job of a $150 second light. Use it to bounce your Key Light back onto the subject’s face.
- Look for Versatility: Choose LED panels that can be powered by both AC (wall outlet) and NP-F batteries. This saves you from buying two different sets of lights for indoor and outdoor use.
- The “Used” Market: Many photographers upgrade their gear frequently. You can often find high-quality studio lighting on secondary markets for 50% of the retail price.
Common Mistakes Beginners Make with Studio Lighting
Avoid these pitfalls to ensure your journey into studio photography is successful:
- Mixing Color Temperatures: Do not mix “warm” household bulbs with “cool” daylight studio lights. This creates “color pollution” that is nearly impossible to fix in post-processing.
- Placing Lights Too Close: While moving a light closer makes it softer, it also increases the “fall-off” rate, meaning the background will go dark very quickly.
- Ignoring the Background: If your subject is well-lit but the background is messy or poorly illuminated, the photo will still look amateur. Use a dedicated “Background Light” if your kit allows.
- Over-complicating the Setup: Start with one light. Master it. Then add a second. Many of the most iconic portraits in history were taken with a single light source.
Recommended Affordable Kits for Different Needs
Best for YouTubers and Streamers
Look for Bi-color LED Ring Lights or small LED panels. These provide a soft, even glow that hides skin imperfections and fits easily behind a desk.
Best for Portrait Photographers
A Softbox Kit with Continuous LEDs is the best starting point. It allows you to see the shadows on the face in real-time, making it easier to learn facial modeling.
Best for Product Photography
Small Tabletop Light Tents or “Light Boxes” are incredibly affordable. They provide 360-degree diffusion, which is essential for removing distracting reflections from shiny objects like jewelry or electronics.
Frequently Asked Questions (FAQ)
What is the best lighting kit for a complete beginner?
For most beginners, a Continuous LED Softbox Kit is the best choice. It is affordable, easy to understand, and works for both photography and video.
Can I use regular household bulbs for studio lighting?
While possible, it is not recommended. Household bulbs often have a low CRI, meaning colors will look “muddy,” and they lack the brightness needed for professional camera settings.
How much should I spend on my first lighting kit?
You can find decent entry-level kits between $80 and $200. In this price range, you can expect two lights, stands, and basic modifiers like umbrellas or softboxes.
Do I need a big space for a studio lighting setup?
Not necessarily. Many affordable studio lighting kits are designed for “home studios.” A space as small as 8×8 feet is sufficient for headshots and small product photography.
Is LED better than Fluorescent for studio lights?
Yes. LEDs are more durable, generate less heat, are dimmable, and often allow for color temperature adjustments, making them far superior for modern creators.
Conclusion
Stepping into the world of studio lighting is a pivotal moment in any creator’s journey. By choosing the right affordable studio lighting kit, you are not just buying gear; you are buying the ability to create art on your own terms, regardless of the sun’s position.
Start simple, focus on mastering the 3-point lighting technique, and always prioritize the quality of light over the quantity of gear. With the foundations laid out in this guide, you are now ready to transform your creative vision into a well-lit reality.