How to Draw Realistic Faces: The Ultimate Step-by-Step Guide for Beginners
Drawing a realistic human face is often considered the “Holy Grail” for aspiring artists. You may have experienced the frustration of drawing a portrait that looks “almost” right, yet something feels off—perhaps the eyes are too high, or the nose looks flat. This phenomenon is often due to a misunderstanding of facial proportions and the underlying anatomy of the human face.
In this comprehensive guide, you will learn the professional techniques used by master artists to translate three-dimensional features onto a two-dimensional surface. Whether you are picking up a pencil for the first time or looking to refine your realistic portrait drawing skills, this guide provides a structured, scientific approach to art.
1. The Mindset of Observation: Seeing Like an Artist
Before you touch your pencil to paper, you must understand that realistic pencil drawing is 10% execution and 90% observation. Most beginners draw what they think they see (a symbol of an eye) rather than what is actually there (a series of shapes, shadows, and highlights).
To achieve realism, you must bypass your brain’s symbolic language. Instead of drawing “an eye,” look for the curve of the eyelid, the shadow cast by the brow bone, and the sharp highlight on the cornea. This shift in perspective is the first step toward mastering sketching techniques that produce lifelike results.
2. Essential Tools for Realistic Portrait Drawing
You do not need expensive equipment to start, but using the right graphite pencils and blending tools will significantly impact your ability to create depth.
Graphite Pencil Grades
Pencils are categorized by their hardness (H) and blackness (B).
- H Pencils (Hard): Ideal for initial guidelines and light sketching (e.g., 2H or 4H).
- HB Pencil: The middle ground, great for basic outlines.
- B Pencils (Soft/Black): Essential for shading techniques. Use 2B for mid-tones and 6B or 8B for the deepest shadows.
Paper and Erasers
- Smooth Bristol Board or Acid-Free Paper: A smooth surface allows for finer detail and easier blending.
- Kneaded Eraser: This is a versatile tool that can be molded into points to lift highlights or soften shadows without damaging the paper.
- Mono Zero Eraser: A tiny, pen-like eraser used for hair strands and crisp highlights in the eyes.
Blending Tools
- Tortillions (Blending Stumps): Used for smudging graphite into the paper grain.
- Soft Brushes: Many professional artists use clean makeup brushes to create incredibly smooth skin textures.
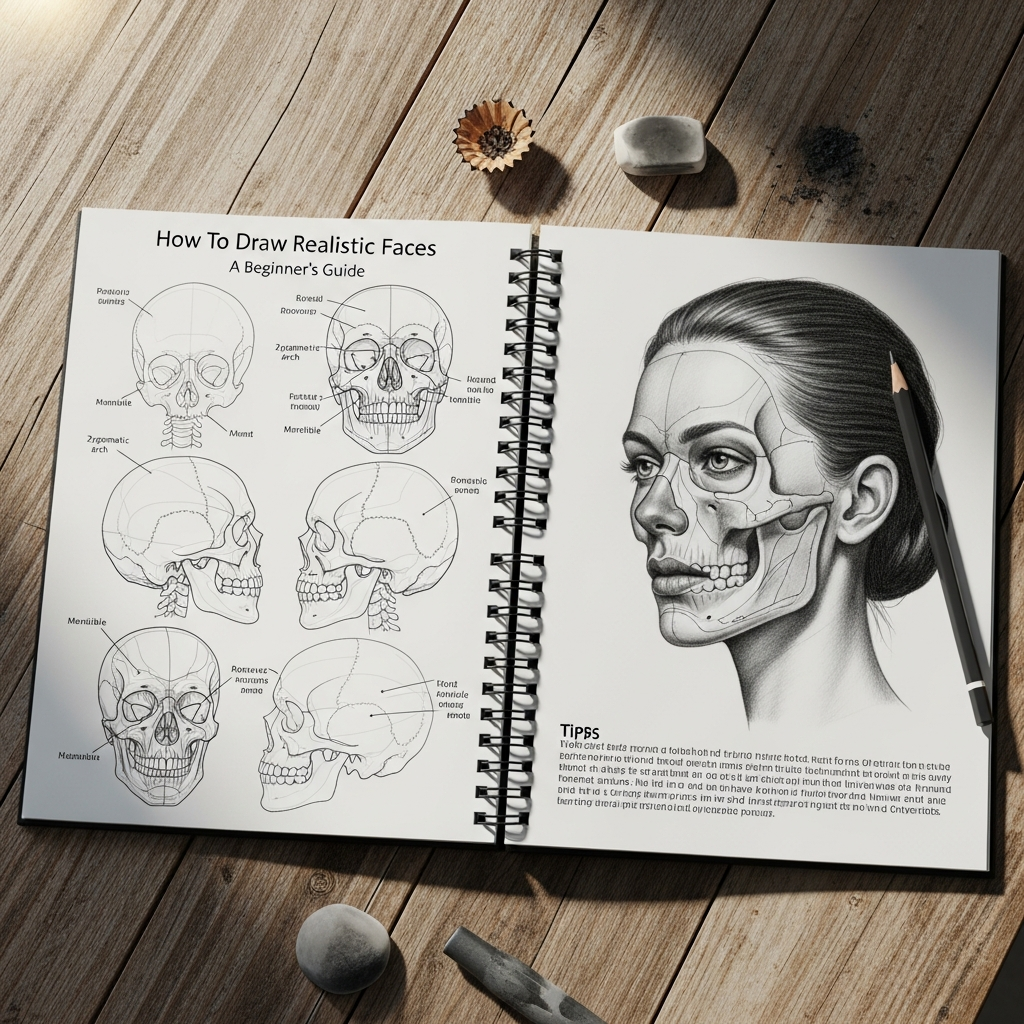
3. Mastering Facial Proportions: The Loomis Method
The most common mistake beginners make is placing the eyes too high on the head. In reality, the eyes are located almost exactly in the vertical center of the skull. To avoid distorted portraits, we use the Loomis Method, a technique developed by Andrew Loomis that uses a sphere and a cross-section to represent the three-dimensional form of the head.
The Basic Construction
- The Sphere: Draw a circle. This represents the cranium (the top part of the skull).
- The Side Plane: Flatten the sides of the sphere. Human heads are not perfect balls; they are narrower at the temples.
- The Brow Line: Draw a horizontal line through the center of the sphere. This is where the eyebrows will sit.
- The Middle Line: Draw a vertical line down the center of the face to establish symmetry.
- The Jawline: Extend the vertical line down and connect it to the sides of the sphere to create the chin and jaw.
The Rule of Thirds in Portraits
A standard realistic face can be divided into three equal vertical sections:
- Top Third: From the hairline to the eyebrows.
- Middle Third: From the eyebrows to the bottom of the nose.
- Bottom Third: From the bottom of the nose to the bottom of the chin.
4. Step-by-Step Guide to Drawing Realistic Features
Once your proportions are mapped out, you can begin focusing on the individual features. Each feature requires a balance of graphite pencils work and careful observation of light.
How to Draw Realistic Eyes
The eyes are the “windows to the soul,” and they require the most detail.
- The Shape: Do not draw a simple almond shape. Remember that the eye is a sphere tucked into a socket.
- The Eyelids: Give the eyelids thickness. There is a visible “shelf” on the lower lid where light often hits.
- The Iris and Pupil: The pupil is a hole, not a flat dot. Ensure the iris has a variety of values (lines radiating from the center) and a sharp “catchlight” (white reflection) to make it look wet and alive.
Shaping the Realistic Nose
The nose is often the most difficult feature because it lacks hard outlines.
- Think in Planes: Instead of lines, think of the bridge, the tip (ball), and the nostrils as planes that catch light or fall into shadow.
- The Under-Shadow: The most defined part of the nose is usually the shadow cast underneath it. Focus on the “septum” and the wings (alae) of the nostrils.
Defining the Mouth and Lips
- The M-Shape: The upper lip usually resembles a stretched “M” (the Cupid’s bow).
- Value Contrast: Typically, the upper lip is darker because it angles away from the light, while the lower lip is lighter because it catches the overhead light.
- Skin Folds: Add vertical cracks and folds to the lips to give them a realistic texture.
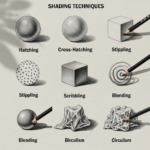
5. Advanced Shading Techniques for Depth
Shading is what transforms a flat sketch into a realistic portrait drawing. Without proper value (the lightness or darkness of a color), your drawing will remain a “cartoon.”
The 5 Elements of Shading
To create a 3D effect, you must include:
- Highlight: The brightest point where light hits directly.
- Mid-Tone: The actual color/value of the skin.
- Core Shadow: The darkest part of the object itself.
- Reflected Light: Light bouncing back from the environment into the shadow area (crucial for realism).
- Cast Shadow: The shadow the face throws onto the neck or clothing.
Creating Skin Texture
To avoid a “dirty” look when shading:
- Layer your graphite slowly. Start with a light H pencil and gradually move to B pencils.
- Use a circular motion (circularism) to blend, which mimics the natural pores of the skin.
- Use a soft tissue or blending stump to smooth out transitions between light and shadow.
6. How to Draw Realistic Hair
Beginners often try to draw every single strand of hair, which results in a messy, “spaghetti-like” appearance. Instead, treat hair as a collection of large shapes or “clumps.”
- Identify the Volume: Hair sits on top of the skull. Add volume above the top of your initial sphere.
- Find the Light Source: Determine where the light hits the hair. These areas will be your highlights.
- Draw the Flow: Use long, confident strokes that follow the direction of the hair’s growth.
- Add Flyaways: At the very end, add a few stray hairs crossing over the main shapes to create a natural, un-manicured look.
7. Common Mistakes and How to Fix Them
Mistake 1: Hard Outlines
Real faces do not have black lines around the chin or nose. They have transitions between different values.
- Fix: Use shading to define edges rather than drawing a hard line.
Mistake 2: Making the Eyes Too White
The “whites” of the eyes (sclera) are rarely pure white. They are spheres and should have shadows in the corners and under the upper eyelid.
- Fix: Shade the sclera with a light grey (2H or HB) to give the eyeball volume.
Mistake 3: Neglecting the Neck
A beautifully drawn face on a thin, unshaded neck looks like a floating mask.
- Fix: Ensure the neck is wide enough to support the head and add the “sternocleidomastoid” muscles for anatomical accuracy.
8. Practicing for Mastery
Learning how to draw realistic faces is a marathon, not a sprint. Here are a few tips for your daily practice:
- Use Reference Photos: Never draw from memory if you want realism. Use high-quality, high-contrast photos where the light source is clear.
- Upside-Down Drawing: If you find yourself struggling with proportions, try drawing your reference photo upside down. This forces your brain to see shapes and lines rather than a “face.”
- Value Scales: Practice creating a gradient from the darkest black to the whitest white to improve your pressure control.
Conclusion
Mastering realistic portrait drawing requires patience, the right graphite pencils, and a deep understanding of facial proportions. By using the Loomis Method and focusing on the nuances of shading techniques, you can move beyond simple sketches and create professional-grade art.
Remember, every master artist started exactly where you are today. The key to success is consistent practice and the willingness to observe the world with a critical, artistic eye. Grab your sketchbook, find a compelling reference, and start your journey into the world of realistic art today.