Embarking on the artistic journey to learn how to draw realistic faces is an incredibly rewarding experience. It’s a skill that allows you to capture the depth of human emotion and the unique beauty of individual features on paper. For those just starting out, the process might seem daunting, but with a structured approach and consistent practice, anyone can master the fundamental techniques involved. This comprehensive guide is specifically designed to help beginners navigate the complexities of portraiture, offering clear, actionable steps and insights into creating lifelike depictions.

To truly understand how to draw realistic faces, beginners should focus on foundational steps such as constructing the basic head shape using geometric forms, meticulously mapping out crucial facial features like eyes, nose, and mouth with precise guidelines, and then developing convincing three-dimensional depth through careful shading and an acute understanding of light sources. Practice and patience are paramount to mastering the art of drawing realistic faces, transforming initial sketches into captivating portraits.
This article will delve into the essential principles, materials, and techniques you need to start your journey in creating stunningly realistic portraits. We will break down each component, ensuring you have a solid understanding of how to draw realistic faces, allowing your artistic skills to flourish.
The Foundation: Understanding Basic Shapes and Proportions
Every complex drawing, especially when learning how to draw realistic faces, begins with simplification. The human head, despite its intricate appearance, can be initially understood through basic geometric shapes. Think of the skull not as a solid block, but as a sphere to represent the cranium, with a tapering oval or jawline attached below. This initial simplification provides a foundational structure upon which all other features will be built. Many artists, for example, begin by sketching a large circle, then adding a horizontal line beneath it to establish the chin, and subsequently defining the jawline. This method simplifies the complex curves of the head into manageable forms.
Once the basic head shape is established, the next crucial step in learning how to draw realistic faces is to introduce a system of guidelines. These are light, preliminary lines that act as a map, ensuring symmetry and accurate placement of facial features. A central vertical line helps maintain symmetry, while horizontal lines divide the face into key sections. These guidelines are not meant to be permanent features of your drawing, but rather temporary tools that will be erased later, allowing you to maintain proportion from the very beginning. Without these initial guides, it’s easy for features to become skewed, leading to an unbalanced portrait.
Understanding standard facial proportions is perhaps the most critical element when you aspire to draw realistic faces. While every face is unique, there are common proportional rules that serve as an excellent starting point for beginners. For instance, the eyes are typically located about halfway between the very top of the head and the chin. This often surprises beginners, who tend to draw eyes too high, creating an unnaturally large forehead. Another common guideline suggests dividing the face into three equal horizontal sections: from the hairline to the eyebrows, from the eyebrows to the base of the nose, and from the base of the nose to the chin. These divisions provide a framework for consistent feature placement.
Furthermore, consider the spacing of individual features. When you aim to draw realistic faces, remember that the space between the eyes is usually roughly equivalent to the width of one eye. This means you can imagine a third eye fitting perfectly between the two actual eyes. The width of the nose often aligns with the inner corners of the eyes, and the corners of the mouth typically line up with the center of the pupils when the subject is looking straight ahead. While these are generalized rules, they offer a solid blueprint. As you gain experience, you’ll learn to observe subtle variations, but for a beginner learning how to draw realistic faces, these established proportions are invaluable for creating a believable likeness.
Essential Tools for Your Artistic Journey
Having the right equipment is fundamental for anyone looking for a comprehensive guide on how to draw realistic faces. While elaborate and expensive art supplies aren’t strictly necessary, a few quality items can significantly enhance your experience and the outcome of your drawings. Choosing the correct tools for how to draw realistic faces can make a world of difference in achieving the delicate details and smooth transitions required for lifelike portraits.
Pencils are undoubtedly the cornerstone of realistic face drawing. A good set of graphite pencils is essential, offering a range of hardness and blackness. You’ll want to have pencils graded from H (hard, for lighter lines and details) to B (soft, for darker tones and shadows). A typical beginner’s set might include HB (medium), 2B (soft), 4B, and 6B, possibly extending to an 8B for the deepest blacks. Some artists also highly recommend charcoal pencils, especially for achieving very dark tones without the reflective sheen that graphite can sometimes produce. Using various pencil grades allows for a broader spectrum of values, which is crucial for adding depth and dimension to your realistic portraits.
The paper you choose also plays a significant role in how well you can draw realistic faces. For smooth, lifelike skin textures, a paper with minimal tooth (texture) is often preferred. Bristol Smooth paper is a popular choice among portrait artists because its smooth surface allows for seamless blending and fine detail work. While all drawing paper has some texture, opting for a smoother option will make it easier to achieve the soft transitions necessary for a convincing facial rendering. Some professional artists even choose archival cotton fiber paper for its longevity and acid-free properties, ensuring their portraits stand the test of time.
Erasers are not just for correcting mistakes; they are also powerful drawing tools when you learn how to draw realistic faces. A kneaded eraser is incredibly versatile, as it can be molded into various shapes to lift graphite gently, lighten areas, or create soft highlights without damaging the paper. For sharper highlights and precise adjustments, a stick eraser or a battery-operated eraser can be invaluable. These allow you to “draw” with your eraser, carving out light areas like the catchlights in eyes or fine strands of hair. Mastering the use of different erasers is key to adding those final touches that make a portrait truly come to life.
Finally, blending tools are crucial for achieving the smooth gradations of tone that are characteristic of realistic faces. Blending stumps (also known as tortillons), cotton buds, or even soft tissues can be used to smooth out pencil strokes, eliminating harsh lines and creating natural-looking transitions between values. When blending, always apply light pressure and build up layers gradually. This controlled approach prevents over-blending and maintains the integrity of your drawing. By investing in these fundamental tools and understanding how each contributes to the process, you’ll be well-equipped on your journey of how to draw realistic faces.
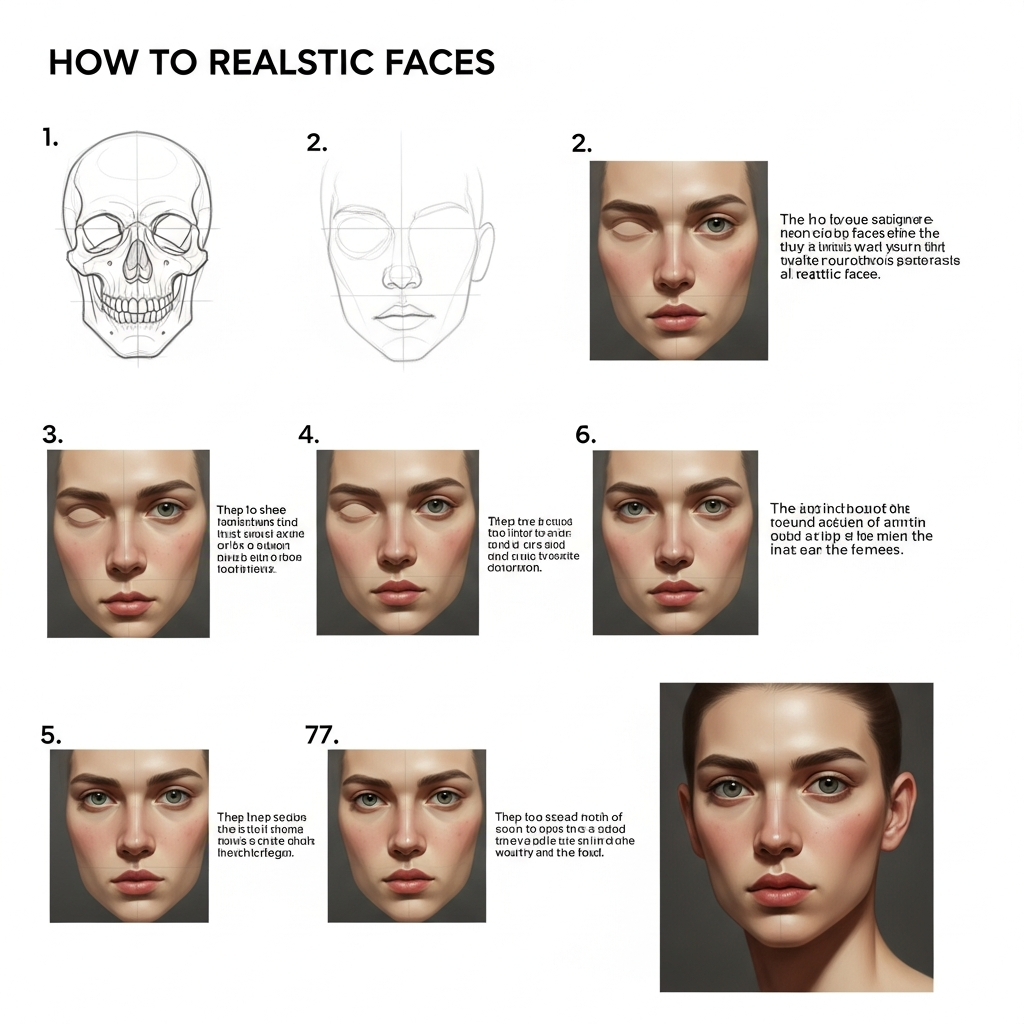
Building the Face: A Step-by-Step Approach for How To Draw Realistic Faces Guide For Beginners
Now that we’ve covered the foundational understanding and essential tools, it’s time to dive into the practical steps of how to draw realistic faces. This section will walk you through the process, feature by feature, ensuring you build a solid portrait from the ground up. Remember, the goal here is not perfection in your first attempt, but understanding the sequence and purpose of each step. This step-by-step methodology is crucial for mastering how to draw realistic faces effectively.
1. The Basic Head Shape
Every realistic face drawing begins with establishing the overall form of the head. As previously mentioned, simplifying the head into basic shapes is the most effective starting point. Begin by drawing a large circle or a slightly elongated oval, depending on the individual you are drawing. This represents the cranium. Below this circle, lightly sketch in the jawline, tapering it down to form the chin. For a front-facing view, ensure the initial circle is centered on your page. For a three-quarter view, the circle might be slightly offset, and the jawline will curve more dramatically to indicate depth and perspective. This initial structure is your scaffold, providing the necessary boundaries for the face.
This initial shape is often referred to as the “Loomis method” or a similar construction method, where the head is viewed as a sphere with planes cut out of the sides to represent the temples and cheekbones. By thinking of the head in three dimensions from the start, you avoid common mistakes beginners make, such as drawing a flat, two-dimensional face. Always remember that the skull is a complex, volumetric form, and your initial lines should reflect this understanding. Focusing on this three-dimensional construction is critical for how to draw realistic faces with depth.
2. Establishing Guidelines
With the basic head shape in place, the next crucial step in how to draw realistic faces is to lay down a series of light, intersecting guidelines. These lines are your key to accurate proportion and symmetry. Start by drawing a vertical line straight down the center of the face, from the top of the head to the chin. This line helps ensure that both sides of the face are symmetrical and acts as a central axis for placing features. Next, draw several horizontal lines across the face. The most important ones include:
- Eye Line: Typically located halfway between the top of the head and the chin. This line is where the eyes will rest.
- Nose Line: Approximately halfway between the eye line and the chin. This marks the bottom of the nose.
- Mouth Line: Generally located halfway between the nose line and the chin. This indicates the parting line of the lips.
- Hairline: The top horizontal line, marking where the hair begins on the forehead.
These guidelines are not set in stone, as individual faces vary, but they provide an excellent starting point for how to draw realistic faces. The consistent spacing between these lines helps beginners maintain overall balance. As you practice, you’ll develop an intuitive sense for these proportions, but initially, using a ruler or even your pencil to measure distances on your reference photo and transfer them to your drawing can be incredibly helpful. These precise measurements contribute significantly to learning how to draw realistic faces with accuracy.
3. Placing the Eyes
The eyes are often considered the most expressive feature of the face, and getting them right is paramount for how to draw realistic faces. Begin by sketching the basic almond shape of the eyes along your eye line. A common rule is that the space between the two eyes should be roughly the width of one eye. Also, ensure the inner corners of the eyes align with the outer edges of the nose. Once the basic shape is down, start adding details:
- Eyelids: Observe the subtle curves of the upper and lower eyelids. The upper eyelid typically covers a small part of the iris.
- Iris and Pupil: Draw the iris as a circle within the eyelid opening. The pupil, the darkest part, sits in the center of the iris.
- Catchlights: These are tiny reflections of light in the eyes that give them life and sparkle. Leave small white areas or use an eraser to create these.
- Eyelashes and Eyebrows: Eyelashes curve outwards, and are not just straight lines. Eyebrows should follow the bone structure above the eye, with hairs flowing in a specific direction, often starting darker and denser near the nose and lightening towards the outer edge.
The subtle shading around the eyes, including the shadows cast by the eyelids and the slight roundness of the eyeball, will add significant depth. Avoid harsh outlines; instead, use soft pencil strokes to suggest form. Remember, the “white” of the eye is rarely pure white; it often has subtle shading. Paying close attention to these nuances will dramatically improve your ability to draw realistic faces.
4. Sculpting the Nose
The nose can be one of the trickiest features to master when learning how to draw realistic faces due to its complex three-dimensional form and subtle transitions. Many beginners make the mistake of drawing the nose with harsh outlines, which flattens it. Instead, focus on the play of light and shadow to define its shape. Start with basic geometric shapes; for a front view, you might imagine a central sphere for the tip of the nose, with two smaller spheres on either side for the wings of the nostrils.
Align the width of the nose with the inner corners of the eyes, using your nose line as the base. Instead of drawing a solid outline, use varying pressure and soft lines to suggest the bridge, the nostrils, and the tip. Shading is key here. Observe where light hits and where shadows fall around the tip, the bridge, and underneath the nostrils. The area directly under the tip of the nose is almost always in shadow. Gradually build up your shading from light to dark, focusing on the soft curves and planes that make up this feature. The goal is to create a sense of volume and form, making the nose appear to protrude from the face, a vital step in learning how to draw realistic faces.
5. Defining the Mouth and Lips
Capturing the subtleties of the mouth and lips is essential for conveying emotion in your quest to draw realistic faces. The mouth line you established earlier will serve as the center line where the upper and lower lips meet. When drawing lips, consider their three-dimensional quality; they wrap around the cylindrical form of the jaw. For a side view, lips can be simplified into a basic triangular shape, noticing how the upper lip plane points downward and the lower lip faces upward.
- Upper Lip: The upper lip generally appears slightly darker than the lower lip because it often catches less light and has a subtle curve that creates a shadow underneath the nose (the philtrum).
- Lower Lip: The lower lip is usually fuller and reflects more light, often appearing lighter in tone, especially in the center.
- Mouth Corners: The corners of the mouth typically align with the center of the pupils, though this can vary with expression.
- Details: Add subtle vertical lines or creases on the lips to give them texture, but avoid overdoing it, which can make them look harsh. Ensure the indentation above the upper lip (the philtrum) is included, as it’s a critical anatomical landmark for realism.
Like the nose, the key to realistic lips lies in shading. Build up layers of tone, creating smooth transitions from the highlights on the fullest parts to the shadows in the corners and under the lower lip. This will give them a plump, natural appearance, making your efforts to draw realistic faces more successful.
6. Adding the Ears
Ears, though often partially obscured by hair, are an important element in understanding how to draw realistic faces. Their placement is quite consistent: the top of the ear typically aligns with the eyebrow line, and the bottom of the ear aligns with the base of the nose. This general rule provides a reliable guide for their vertical positioning.

For their shape, think of the ear as a C-shape for the outer rim, with various cartilaginous folds and curves within. Observe your reference photo closely to capture these unique inner structures. The angle and size of the ears can vary greatly between individuals, so always use your reference. Don’t simplify them into generic shapes; even subtle details in the ears contribute to the overall realism of the portrait. Properly placed and detailed ears are crucial when you strive to draw realistic faces with anatomical accuracy.
7. Drawing Hair
Hair can be one of the most challenging, yet rewarding, features to draw when learning how to draw realistic faces. The biggest mistake beginners make is trying to draw every single strand of hair. This often results in a stiff, unnatural look. Instead, focus on seeing hair as large shapes, masses, and flows.
Begin by blocking in the overall shape and volume of the hairstyle, paying attention to how it sits on the head and its general direction. Think about the big “chunks” of hair and their contours. Then, start adding layers of detail with varying pencil strokes. Use longer, confident strokes to indicate the flow and texture of the hair. Focus on creating highlights and shadows within these masses. Hair is not uniformly colored; it has areas that catch the light and areas that recede into shadow. Build up these values, using lighter pencils for highlights and softer, darker pencils for shaded areas. This layered approach, emphasizing shape and value over individual strands, will give the hair a more natural, voluminous, and realistic appearance, completing your quest to draw realistic faces.
Mastering Depth and Realism: The Power of Value and Shading
Once the fundamental structure and features are in place, the true magic of learning how to draw realistic faces emerges through the skillful application of value and shading. Value refers to the lightness or darkness of a color, and in drawing, it’s expressed through varying tones of graphite or charcoal. Shading, therefore, is the technique of applying these values to create the illusion of three-dimensional form, depth, and texture. Without effective shading, even the most accurately drawn outlines will appear flat and lifeless. This is a crucial area for anyone seeking to draw realistic faces.
Understanding Light and Shadow
To properly shade, you must first become a keen observer of light and shadow. Imagine a single light source illuminating your subject. How does that light interact with the curves and planes of the face?
- Highlights: These are the brightest areas where the light source directly hits the surface. On a face, highlights often appear on the forehead, the bridge and tip of the nose, the cheekbones, and the fullest part of the lower lip. Leave these areas as the lightest tones on your paper, or use an eraser to lift graphite.
- Mid-tones: These are the transitional values between the highlights and shadows, defining the general form of the face.
- Core Shadows: These are the darkest areas on the form itself, where light cannot reach. They help define the rounded structures of the face, such as under the chin, beneath the brow bone, and along the sides of the nose.
- Cast Shadows: These are shadows projected by one object onto another, such as the shadow the nose casts onto the upper lip, or the chin casts onto the neck. These shadows are often sharper at their edges closer to the object and softer as they extend further away.
Consistently observing these elements in your reference photos is key. Try squinting your eyes to simplify the complex light and shadow patterns into more manageable “blobs” of tone. This helps you focus on the values rather than getting caught up in specific features, making it easier to effectively draw realistic faces.
Shading Techniques
When it comes to the practical application of shade, several techniques can help you achieve smooth, realistic transitions when learning how to draw realistic faces:
- Hatching: Creating parallel lines to build up tone. The closer the lines, the darker the value.
- Cross-hatching: Layering sets of parallel lines in different directions (e.g., vertical lines over horizontal lines) to achieve darker values and richer textures.
- Circulism/Layering: Using small, overlapping circular strokes to build up tone. This technique is particularly effective for creating smooth skin textures.
- Blending: Using tools like blending stumps, tortillons, cotton buds, or even soft tissues to smooth out pencil strokes. Always blend with light pressure and build up layers gradually, rather than trying to achieve a dark tone immediately. This gives you more control and allows for subtle adjustments.
Start with your lightest pencil (e.g., HB or 2B) and apply a very light base layer across the areas that will receive mid-tones and shadows. Gradually build up darker values with softer pencils (e.g., 4B, 6B) in successive layers. This layered approach allows for greater control and prevents your drawing from becoming overworked or muddy. It’s a methodical process that, with patience, will help you master how to draw realistic faces.
Avoiding Common Shading Mistakes
Many beginners encounter similar hurdles when shading to draw realistic faces:
- Rubbing with Fingers: While tempting, rubbing graphite with your fingers can transfer oils from your skin to the paper, creating uneven, dull, or “airbrushed” looking skin tones that lack control. It can also make it difficult to add more layers of graphite later.
- Harsh Outlines: Realistic faces rarely have strong, continuous outlines. Instead, edges are suggested by the contrast between light and shadow. Relying too heavily on outlines flattens the face and makes it appear less three-dimensional. Focus on suggesting form through value changes.
- Lack of Contrast: A common issue is not pushing the darks dark enough or keeping the lights light enough. A strong range of values, from the darkest shadows to the brightest highlights, is essential for a compelling and realistic portrait. Don’t be afraid to use your 6B or 8B pencil for those deep shadows and your electric eraser for crisp highlights.
By understanding the principles of light and shadow, practicing various shading techniques, and consciously avoiding these common pitfalls, you will significantly enhance your ability to draw realistic faces, bringing an incredible sense of depth and dimension to your artwork.
The Human Element: Capturing Expressions and Emotions
Beyond accurate proportions and skillful shading, what truly brings a portrait to life and makes you feel like you truly know how to draw realistic faces is the ability to capture expression and emotion. The human face is a marvel of subtle movements, and these nuances convey an entire spectrum of feelings. For beginners, this might seem advanced, but it’s an integral part of understanding how to draw realistic faces.
The key lies in observing how the facial muscles influence the skin and features. Even slight shifts in the eyebrows, the corners of the mouth, or the tension around the eyes can dramatically alter an expression. For example, raised eyebrows can indicate surprise, while lowered brows might convey anger or concentration. The upward or downward curve of the lips, along with the tension around the mouth, communicates everything from a gentle smile to a deep frown. Understanding basic facial anatomy, including the underlying muscle groups, helps you anticipate and accurately render these changes.
Focus specifically on the eyes, often called the “windows to the soul.” The direction of the gaze, the degree to which the eyelids are open or closed, and the presence of wrinkles at the corners can all contribute significantly to the perceived emotion. A slight narrowing of the eyes can suggest skepticism, while wide-open eyes might imply shock. When you draw realistic faces, pay attention to the subtle reflections (catchlights) in the eyes, as they can also contribute to the vibrancy and “aliveness” of the expression.
To effectively capture expressions, reference photos are invaluable. Don’t just pick a neutral, flat image. Seek out references that show genuine emotions – joy, contemplation, sadness, curiosity. Study how the features distort and change in response to these feelings. You might notice that when someone smiles broadly, the corners of their eyes crinkle, their cheeks push up, and their mouth forms a distinct arc. Observing and sketching from various expressive references will train your eye to see these interconnected movements.
Remember, capturing emotion isn’t about exaggerating features; it’s about rendering the subtle, natural shifts that occur. It’s about translating the inner world of your subject onto the paper, which is a profound aspect of learning how to draw realistic faces. With practice, you’ll find that your portraits not only look like the person but also feel like them, conveying their unique personality and emotional depth.
Common Pitfalls and How to Overcome Them for Beginners
As you embark on your journey of how to draw realistic faces, it’s natural to encounter challenges and make mistakes. Recognizing these common pitfalls early on can save you frustration and accelerate your learning. Many beginners struggle with similar issues, but with awareness and targeted practice, you can overcome them and significantly improve your ability to draw realistic faces.
Starting with Details Too Soon
One of the most prevalent mistakes beginners make is jumping straight into drawing intricate details, like eyelashes or pupils, before establishing the overall head shape and proportions. This “detail-first” approach often leads to drawings where individual features might look good in isolation, but the overall face is distorted or out of proportion. Imagine trying to decorate a house before building its foundation and walls; it simply won’t work.
How to overcome: Always start with the biggest shapes and work your way down to the smaller details. Block in the entire head and jawline first. Then, use your guidelines to place the major features. Only once the overall structure and proportions feel right should you begin to refine the eyes, nose, and mouth. This ensures that every detail fits harmoniously within the larger composition, which is a fundamental rule for how to draw realistic faces.
Incorrect Proportions
Getting the proportions wrong is a common stumbling block when trying to draw realistic faces. Drawing eyes too high on the head, making the nose too long, or the mouth too wide can instantly make a portrait look “off.” Beginners often misjudge where features should be placed, leading to an unbalanced appearance.
How to overcome: Revisit and consistently apply the foundational proportional guidelines discussed earlier. Remember that eyes are typically at the halfway point of the head, and the face often divides into thirds. Use your pencil as a measuring tool to compare distances on your reference photo and transfer them accurately to your drawing. Regular measurement and comparison, even with just a simple pencil, are incredibly powerful tools for achieving accurate proportions when you set out to draw realistic faces.
Not Thinking in 3D / Flattening the Face
Many beginners tend to draw features as flat symbols rather than as three-dimensional forms. They might draw an eye as an almond shape on the surface, rather than an eyeball nestled within a socket. This leads to portraits