Shading is a transformative process that breathes life into your drawings, turning flat, two-dimensional outlines into captivating, three-dimensional forms. For anyone embarking on their artistic journey, mastering shading techniques for drawing guide for beginners is an indispensable skill. It allows you to represent light, shadow, and depth, making your artwork appear realistic and engaging. This comprehensive shading techniques for drawing guide for beginners will equip you with the fundamental knowledge and practical methods needed to elevate your drawings from simple sketches to impressive works of art.

The Magic of Shading: Breathing Life into Your Drawings
Shading, in its essence, refers to the deliberate application of varying tones and values in a drawing to create the illusion of form, space, and light. It’s the artistic language that communicates how light interacts with objects, defining their contours and textures. Without proper shading, even the most meticulously drawn lines can leave an image feeling flat and unconvincing.
Why is shading so crucial for every artist, especially when you’re just starting? It’s the key to visual storytelling. Consider a simple circle drawn on paper. It remains a flat shape. However, with the application of shading techniques for drawing guide for beginners, that circle can become a perfectly rounded sphere, a ripe apple, or even a gleaming eye. Shading adds weight, volume, and a sense of reality that lines alone cannot achieve. It helps the viewer understand the structure of an object, its position in space, and the mood of the scene. The subtle shifts from light to dark, known as tonal values, are what make objects appear to recede or protrude, giving them a tangible presence on your page. Learning proper shading techniques for drawing guide for beginners allows you to manipulate these values effectively.
I remember my own first true encounter with shading. I was a teenager, utterly frustrated with my drawings. They always looked stiff, like paper cutouts glued onto a blank background. I had drawn countless apples, yet they always appeared as if they’d been squashed by an invisible force, utterly devoid of natural curves. One afternoon, while flipping through an old art book, I saw an illustration breaking down a sphere into its light and shadow components. The artist used a simple graphite pencil, yet the sphere practically popped off the page. It was a revelation! I grabbed my own humble HB pencil and tried to replicate the soft transitions, the subtle bounce of light, and the deep core shadow. It wasn’t perfect, but for the first time, I saw my drawing begin to take on a three-dimensional quality. That moment solidified my understanding: mastering shading techniques for drawing guide for beginners wasn’t just another skill; it was the gateway to bringing my artistic visions to life. This experience underscored the power of understanding core principles and how impactful effective shading techniques for drawing guide for beginners can be.
Understanding the Fundamentals: Light, Shadow, and Value
Before diving into specific methods, it’s vital for any beginner to grasp the underlying principles of light, shadow, and value. These concepts form the bedrock of all effective shading techniques for drawing guide for beginners. Think of it as learning the alphabet before writing a novel.
The Dance of Light and Shadow: Key Elements
When light hits an object, it creates a predictable interplay of bright and dark areas. Recognizing and accurately rendering these elements is paramount for realistic shading. Understanding these components is a core aspect of any thorough shading techniques for drawing guide for beginners.
- Light Source: This is where the illumination originates. Identifying its direction, intensity, and type (e.g., direct, diffused) is the very first step in shading. A single, clear light source simplifies the process and helps define consistent shadows.
- Highlight: The brightest point on an object, where the light source directly hits and reflects most intensely. This spot is often left as the pure white of the paper or lightly touched. The position of the highlight can shift depending on the viewer’s perspective.
- Mid-tones (Halftones): These are the transitional values between the highlight and the darkest shadows. They represent surfaces that are partially illuminated and gradually turn away from the light source. Mid-tones are crucial for conveying the smooth curves and forms of an object.
- Core Shadow: This is the darkest area on the object itself, where light is completely blocked or does not reach. It usually falls on the side of the object opposite the light source and helps define its form and mass.
- Cast Shadow: The shadow an object projects onto surrounding surfaces, such as the ground or a wall. Cast shadows are typically darkest closest to the object and become softer and lighter as they extend further away. Their shape and length are directly influenced by the light source’s angle and distance.
- Reflected Light: A subtle area of lighter tone found within the core shadow, caused by light bouncing off nearby surfaces and illuminating parts of the shadowed area. Including reflected light prevents shadows from looking artificially flat and helps integrate the object into its environment.
Each of these elements plays a vital role in creating a believable illusion of depth. When you consciously identify them on your reference or from a live setup, your shading becomes less of a guessing game and more of a deliberate construction of form. This analytical approach is fundamental to mastering shading techniques for drawing guide for beginners.
The Importance of Value Scales
A value scale is a gradient chart that displays a range of tones from the lightest white to the darkest black. Creating and practicing with value scales is arguably one of the most effective exercises for improving your shading abilities. It trains your hand to control pencil pressure and your eye to distinguish subtle variations in tone. For anyone serious about learning shading techniques for drawing guide for beginners, this is a non-negotiable step.
When constructing a value scale, you typically divide a rectangle into several segments (e.g., 5 to 10). You then fill the first segment with the darkest tone you can achieve, pressing firmly. The next segment should be slightly lighter, and so on, until the last segment is pure white (or the lightest possible tone without pressure). The goal is to create smooth, gradual transitions between each step, avoiding abrupt lines or uneven patches. This exercise directly translates to achieving smooth gradients in your actual drawings.
Think of the value scale as your personal tonal roadmap. It shows you the full spectrum of darks and lights that your chosen pencil can produce. By regularly practicing this, you build muscle memory for pressure control, which is essential for rendering realistic forms. Many beginners rush past this foundational exercise, eager to draw complex subjects, but taking the time to master value scales will dramatically accelerate your progress with all shading techniques for drawing guide for beginners. It helps you understand how much pressure to apply to get a 20% gray versus an 80% gray, laying the groundwork for more nuanced work. It is an often-cited tip in any shading techniques for drawing guide for beginners.
Essential Shading Techniques For Drawing Guide For Beginners
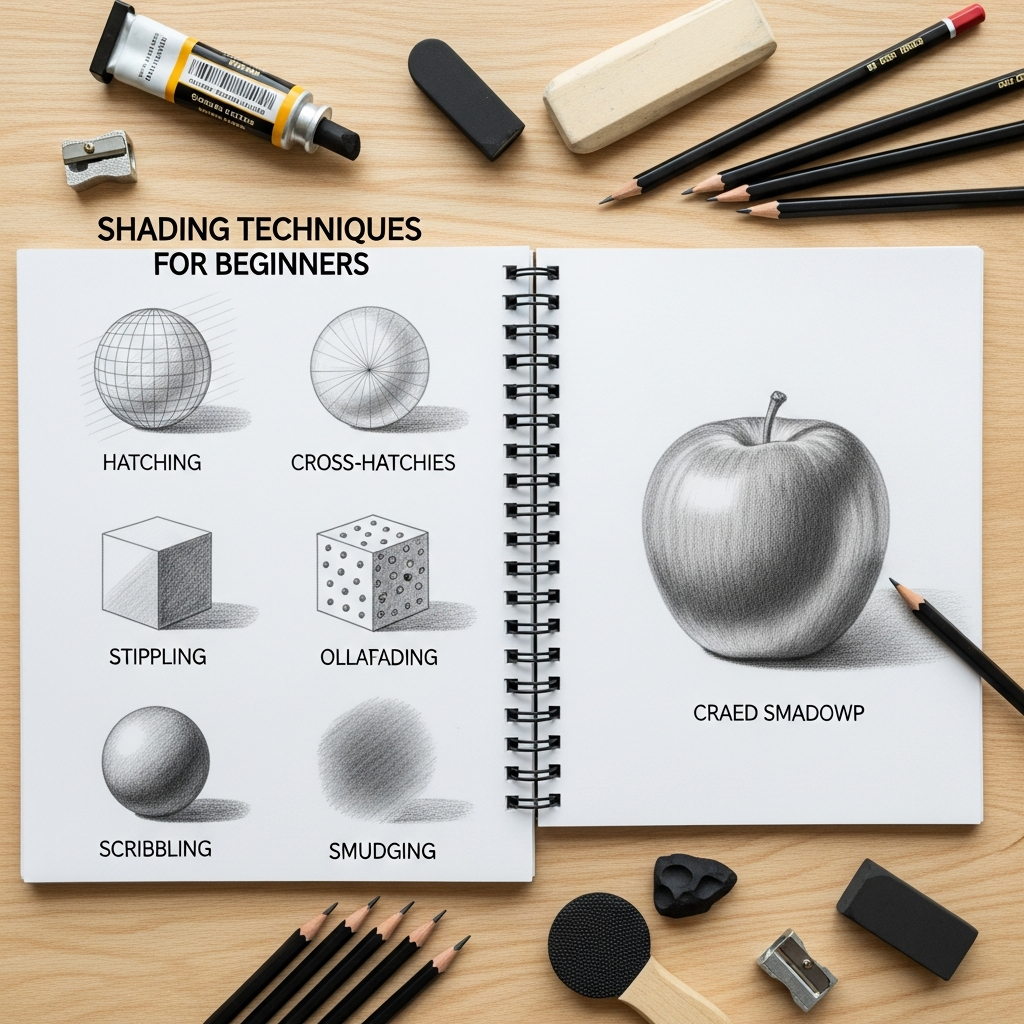
Now that we have covered the theoretical underpinnings, let’s explore the practical shading techniques for drawing guide for beginners that you can apply to your artwork. Each technique offers a unique texture and approach to building tone, providing you with a versatile toolkit.
Blending: The Smooth Operator
Blending is perhaps the most universally recognized and commonly used shading technique, especially for achieving smooth transitions and realistic textures. The goal of blending is to create a seamless gradation from one tone to another, minimizing visible pencil marks. This technique is fundamental for portraiture, still life, and any drawing aiming for a refined, polished look.
To achieve smooth blending, start by laying down light layers of graphite with consistent, light pressure. Instead of trying to get a dark tone in one go, build up your values gradually. Hold your pencil at a low angle, almost parallel to the paper, using the side of the lead rather than the tip. This allows for broader, softer strokes and helps avoid harsh lines. Work in small, controlled circular motions or consistent back-and-forth strokes, keeping your strokes close together to eliminate gaps. As you desire darker areas, increase the number of layers and slightly increase your pressure, but always maintain a light hand to avoid damaging the paper or creating irreversible dark spots. Over-blending too aggressively can result in a muddy or blurry effect, so build up tone slowly.
Various tools can assist in achieving super smooth blends.
- Blending Stumps or Tortillons: These are tightly rolled paper tools with pointed ends that are specifically designed to smudge and soften pencil marks. They offer more precision than fingers and absorb excess graphite, helping to create even tones. You can clean and sharpen them with sandpaper when they get too grubby.
- Tissues or Paper Towels: For larger areas, a soft tissue or paper towel wrapped around your finger can provide a broad, even blend. However, be cautious, as they can sometimes lift too much graphite if not used gently.
- Cotton Swabs (Q-tips): Excellent for blending small, detailed areas, offering more control than a finger but less than a blending stump.
- Soft Brushes: A soft, clean paintbrush can also be used to gently sweep and blend graphite, particularly useful for subtle effects.
It is generally recommended to avoid using your bare fingers for blending. The oils from your skin can transfer to the paper, creating uneven patches that are difficult to erase or draw over later. When practicing blending, experiment with different pressures and tools to see how they impact the final texture. This hands-on exploration is a vital part of mastering shading techniques for drawing guide for beginners.
Hatching and Cross-Hatching: Building Tone with Lines
Hatching and cross-hatching are classic linear shading techniques that build up tone and texture using parallel or intersecting lines. These methods are excellent for conveying direction, form, and a more illustrative or expressive style in your artwork. They are foundational shading techniques for drawing guide for beginners for artists interested in line work.
- Hatching Explained: Hatching involves drawing a series of closely spaced parallel lines in one direction. The density of these lines determines the darkness of the shade. Closer lines create darker tones, while lines spaced further apart result in lighter areas. The direction of the lines can also suggest the form or contour of the object. For instance, curving lines can help describe a rounded surface.
- Cross-Hatching for Darker Tones: Cross-hatching takes hatching a step further by layering a second set of parallel lines over the first, typically at an angle (often perpendicular). This criss-crossing pattern creates a denser, darker tone and can produce a mesh-like effect. You can add multiple layers of lines at varying angles to further darken the value. Just like with hatching, the spacing and angle of these lines can create a range of effects, from subtle to dramatic. When cross-hatching, it’s often best to work from light to dark, gradually adding layers.
- Contour Hatching for Form: This technique is a variation where the parallel lines follow the contours or curves of the object you are drawing. Instead of straight lines, you use curved lines that wrap around the form, enhancing the illusion of three-dimensionality. This helps to define the volume and shape of the object more effectively. For example, when shading a sphere, the contour hatched lines would be curved, mimicking the surface of the sphere.
- Woven Hatching: Less common for absolute beginners but worth noting, woven hatching involves creating patterns of lines that mimic a woven texture, adding further complexity to the tone and surface quality.
The key to successful hatching and cross-hatching is consistent line quality and controlled spacing. Practice maintaining even pressure and making deliberate strokes. These linear shading techniques for drawing guide for beginners are versatile and can be combined with other methods to create rich and varied drawings.

Stippling: Dots of Depth
Stippling is a unique and often meditative shading technique that uses small dots to create areas of light and shadow. Instead of lines, artists use the density and size of dots to build up tonal values.
To use stippling, you create darker tones by placing dots closer together and making them more concentrated. Conversely, for lighter values and highlights, the dots are spaced further apart. This technique is particularly effective for achieving delicate tonal transitions and interesting textures, such as those found in botanical illustrations, rough surfaces, or even skin tones when done subtly.
While it can be time-consuming, stippling offers a distinct visual appeal and a high degree of control over value. It’s especially useful for mediums where blending is difficult, such as ink pens. When learning stippling as part of your shading techniques for drawing guide for beginners, start with simple shapes and focus on gradually building up density to create smooth value changes. Experiment with different pen or pencil tips to see how they affect the dot size and overall texture.
Scribbling (or Circulism/Scumbling): Expressive Texture
Scribbling, also sometimes referred to as scumbling or circulism, involves using random, overlapping, and unplanned strokes to build up tone and create a textured look. While “scribbling” might sound unrefined, when executed with control and intention, it can produce wonderfully expressive and organic results. This is a creative shading techniques for drawing guide for beginners method.
- Random Strokes for Texture: This method uses a chaotic web of lines that overlap and intersect. The density of these scribbles dictates the darkness of the area. Closely packed scribbles create darker values, while looser, more spread-out marks result in lighter tones. Scribbling is particularly effective for rendering textures like foliage, hair, clouds, or rough surfaces. It allows for a sense of spontaneity and energy in the drawing.
- Circulism / Circular Shading: A specific variation of scribbling, circulism (or circular shading) uses small, overlapping circular motions to build up tone. This technique is excellent for creating soft, smooth, and even textures, making it a popular choice for shading skin in portraits. By varying the pressure and the tightness of the circles, you can achieve subtle gradations from light to dark. When using circulism, holding the pencil at a low angle and applying gentle, consistent pressure helps create a seamless, blended appearance, making it a valuable shading techniques for drawing guide for beginners for achieving realism.
The beauty of scribbling techniques lies in their ability to add character and tactile quality to a drawing. While seemingly less precise than hatching or blending, mastering controlled scribbling requires practice in managing line density and pressure. It’s about letting go a little while still maintaining artistic intention.
Choosing Your Tools: The Right Gear for Shading Techniques For Drawing Guide For Beginners
Having the right tools can make a significant difference in your shading journey, particularly for beginners. While it’s true that great art can be made with minimal supplies, understanding your tools helps unlock their full potential. This section of the shading techniques for drawing guide for beginners focuses on what you’ll need.
Pencils: Understanding the H and B Scale
Graphite pencils are the most common and versatile tools for drawing and shading. They come in a wide range of grades, indicating their hardness or softness. Understanding this scale is crucial for effective shading techniques for drawing guide for beginners.
The scale typically ranges from 9H (hardest) to 9B (softest), with HB sitting in the middle.
- Hard (H) Pencils: These pencils contain more clay and less graphite, resulting in a harder lead. They produce lighter, finer, and more precise lines. H pencils are ideal for initial sketches, intricate details, and areas requiring very light tones. However, they can be challenging for blending and may indent or scratch the paper if too much pressure is applied. Examples include 2H, 4H, and 6H.
- Soft (B) Pencils: These pencils contain more graphite and less clay, making their lead softer and darker. They lay down more graphite with ease, producing rich, dark tones and blending effortlessly. B pencils are essential for creating deep shadows, smooth gradients, and expressive marks. They are the workhorses for most shading techniques for drawing guide for beginners. Examples include 2B, 4B, 6B, and 8B.
- HB Pencil: Positioned in the middle of the scale, an HB pencil offers a good balance between hardness and softness. It’s a versatile choice for general sketching, outlines, and mid-tones, making it an excellent starting point for any shading techniques for drawing guide for beginners.
Recommended Beginner Sets: For those just starting, investing in a small set that includes a range of HB, 2B, 4B, and 6B pencils is a great way to experiment with various tones and discover your preference. You don’t need the entire 9H-9B range to begin; a few key soft grades will serve you well. Remember, you can achieve a wide range of values even with a limited selection of pencils by varying your pressure and layering.
Paper: Surface Matters
The paper you choose significantly influences the outcome of your shading. Different paper textures interact with graphite in distinct ways:
- Smooth Paper: This type of paper (e.g., Bristol board, hot-press watercolor paper) allows for very fine details and exceptionally smooth blending. Graphite glides easily, and it’s simpler to achieve seamless transitions. However, it may show more glare with heavy graphite application and can’t always take as many layers of pencil as textured paper.
- Medium or Vellum Paper: This is a good all-around choice for beginners. It has a slight “tooth” or texture that helps grip the graphite, allowing for more layers and richer darks. It also makes blending easier than very rough paper. Cartridge paper of 160-200GSM is often recommended for pencil shading.
- Rough Paper: Paper with a pronounced texture (e.g., cold-press watercolor paper) will emphasize the grain, creating a more textured, granular look in your shading. While great for certain expressive styles, it can be challenging for beginners aiming for smooth blends, as the “white” of the paper will show through more.
Experimenting with different kinds of paper is part of finding what works best for your style and the shading techniques for drawing guide for beginners you prefer.
Erasers & Blending Tools: More Than Just Corrections
These tools are not just for fixing mistakes; they are integral to the shading process itself.
- Kneaded Erasers: These pliable, putty-like erasers are fantastic for lifting graphite gently without damaging the paper. You can mold them into various shapes to create precise highlights or lighten large areas subtly. They don’t leave crumbs like plastic erasers, making them a clean option.
- Blending Stumps and Tortillons: As discussed earlier, these paper tools are indispensable for achieving smooth, blended effects by gently smudging and evening out pencil marks. They are key components in any comprehensive shading techniques for drawing guide for beginners.
- Other Blending Alternatives: If you don’t have specialized blending tools, you can carefully use cotton swabs, soft brushes, or even a clean piece of tissue or paper towel. Again, avoid using your fingers to prevent oil transfer.
- Vinyl/Plastic Erasers: These are firmer erasers good for complete removal of lines or for creating sharp highlights by erasing through layers of graphite.
- Electric Erasers: For very precise, bright highlights or textured effects, especially in detailed work, an electric eraser with a fine tip can be very effective.
Knowing how to use these tools effectively is an important aspect of mastering shading techniques for drawing guide for beginners.
Common Pitfalls and How to Avoid Them: A Shading Techniques For Drawing Guide For Beginners Troubleshooting Section
Many beginners encounter similar hurdles when learning to shade. Recognizing these common mistakes is the first step towards correcting them and improving your shading techniques for drawing guide for beginners.
Avoiding Muddy or Flat Shading
One of the most frustrating issues for beginners is when shading makes a drawing look muddy, dull, or simply flat instead of three-dimensional. This often stems from a few related problems:
- Over-blending: While blending aims for smoothness, excessive rubbing can destroy the vibrancy of your tones and blend them into a uniform, lifeless gray. The fix is to build up layers gradually and use blending tools sparingly, just enough to soften transitions.
- Not differentiating values: If all your shadows are the same darkness, or if your mid-tones are too close in value to your shadows, the drawing will lack contrast and depth. Review your value scale and ensure you’re utilizing a full range of tones from light to dark.
- Using pure black for shadows: In reality, shadows are rarely pure black. They have cooler, richer undertones and are still connected to the object’s local color. Using only black can make shadows appear disconnected and heavy, flattening the form. Instead, build up deep shadows using layers of dark B-grade pencils, allowing for some subtle variation and reflected light within them. This advice is critical for anyone following a shading techniques for drawing guide for beginners.
The “Afraid of the Dark” Mistake
Many new artists are hesitant to push their darks far enough, resulting in drawings that look timid or “washed out”. This is often due to a fear of ruining the drawing or making it too dark to erase.
- Solution: Embrace the dark! Strong contrast between light and shadow is what creates true depth and drama. If your shadows are not dark enough, your forms will appear flat and lack volume. Practice going really dark on your value scales to build confidence. Remember the rule: “the lightest dark is darker than the darkest light”. This means even the lightest part of a shadowed area should be darker than the darkest part of a lit area. Don’t be afraid to press down with your softer B-grade pencils to achieve those rich, velvety darks. This boldness is key to advancing your shading techniques for drawing guide for beginners.
Over-reliance on Outlines
While outlines are essential for defining shapes in the initial stages, relying on them too heavily in the final shaded drawing can make it look cartoony and two-dimensional. Realistic drawings use values to define edges, not stark lines.
- Solution: Aim to integrate your outlines into your shading. Make your initial sketches as light as possible so they don’t show through. As you add shading, let the contrast between light and dark values define the edges of forms. For instance, where a dark shadow meets a lighter background, the edge of the shadow itself creates the “outline.” If an outline is still needed for clarity, make it very light and subtle, blending it with the surrounding tones. Thinking in terms of 3D planes rather than 2D shapes helps immensely. This transition from line-focused to value-focused thinking is a crucial step in a shading techniques for drawing guide for beginners.
Messy and Inconsistent Strokes
Haphazard pencil marks or inconsistent directions can make your shading look uneven and detract from the illusion of form. Visible gaps between strokes can also make shading appear “scratchy”.
- Solution: Practice pencil control. When using techniques like blending, hatching, or circulism, strive for consistency in your strokes. Keep them close together to avoid gaps. If using hatching, try to maintain a uniform direction or curve the lines to follow the object’s form. If you need to change directions, do so gradually and subtly, overlapping your marks to ensure a smooth transition. Using the side of your pencil lead more often, especially for larger areas, can also help achieve smoother coverage. Consistency in these basic actions improves any shading techniques for drawing guide for beginners.
Ignoring Light Logic
One of the biggest mistakes is shading without understanding how light actually behaves, leading to illogical highlights and shadows. This can make an object appear to float, lack proper form, or be illuminated by multiple, conflicting light sources.
- Solution: Always identify your light source first and visualize how it interacts with the object and its surroundings. Mark the direction of the light source on your paper if it helps. Observe real-life objects under a single light source to understand how highlights, mid-tones, core shadows, cast shadows, and reflected light naturally occur. This observational practice is invaluable for developing an intuitive understanding of light logic, which is critical for all shading techniques for drawing guide for beginners. Squinting at your reference image can also simplify details and reveal the underlying value shapes. The shadows should always follow the shape of the object, curving and wrapping with its surface, not sitting flat.
Practical Exercises to Master Shading Techniques For Drawing Guide For Beginners
Consistent practice is the most effective way to improve your shading skills. Here are some structured exercises that will solidify your understanding of shading techniques for drawing guide for beginners.
Value Scales: Your Foundation Training
We’ve discussed the importance of value scales, but regular practice is key.
- Exercise: Draw several rectangles or strips on a piece of paper. For each strip, create a smooth gradient from your darkest possible tone to your lightest. Experiment with different pencils (e.g., a 2B, 4B, and 6B) to see how their range differs. Try to make the transitions as seamless as possible, without visible lines or sudden jumps in tone.
- Advanced Variation: Divide a rectangle into 7-10 distinct blocks and try to create seven distinct, evenly spaced values, from pure white to solid black. This challenges your control and ability to distinguish subtle tonal differences. This repeated effort is fundamental to any shading techniques for drawing guide for beginners.
Shading Basic Forms: Spheres, Cubes, and Cylinders
Mastering simple geometric forms is the stepping stone to shading more complex objects, as most complex objects can be broken down into these basic shapes.
- Sphere Exercise: Draw a simple circle. Imagine a single light source (e.g., coming from the top left). Now, apply shading to transform that circle into a three-dimensional sphere. Identify the highlight, mid-tones, core shadow, cast shadow, and reflected light. Focus on smooth transitions and making the forms appear rounded. Practice using different shading techniques for drawing guide for beginners, like blending, hatching, and circulism, on the sphere.
- Cube Exercise: Cubes are excellent for practicing abrupt value changes and understanding how shadows fall on flat planes. Draw a cube and imagine a light source. Each face of the cube will have a distinct value based on its angle to the light. The face most directly facing the light will be lightest, the face turning away will be darker, and the cast shadow will be darkest.
- Cylinder Exercise: Cylinders combine flat and curved surfaces, offering a good challenge. Practice shading the curved surface with a smooth gradient and the flat top with a consistent, lighter value. Observe how the cast shadow forms.
- Practice with Multiple Objects: Place a few simple objects on a table under a single light source. Observe the interplay of light and shadow, then draw and shade them. This helps make shading more intuitive. This real-world application is an invaluable part of learning shading techniques for drawing guide for beginners.
Observational Practice: Learning from Life
Drawing from observation is paramount for internalizing light logic and applying your shading techniques for drawing guide for beginners effectively.
- Still Life with Simple Objects: Set up a small still life with everyday objects like an apple, a cup, or a crumpled piece of cloth. Use a single lamp as your light source to create clear light and shadow patterns. Draw and shade these objects, focusing on accurately capturing the values and transitions you observe.
- Move the Light Source: Experiment by moving your light source around (e.g., from top, side, low). Observe how the highlights, core shadows, and cast shadows change dramatically with each shift. This deepens your understanding of how light behaves.
- Grayscale Conversion: If using reference photos, try converting them to grayscale. This removes the distraction of color and allows you to focus purely on tonal values, helping you identify distinct light and shadow areas more easily