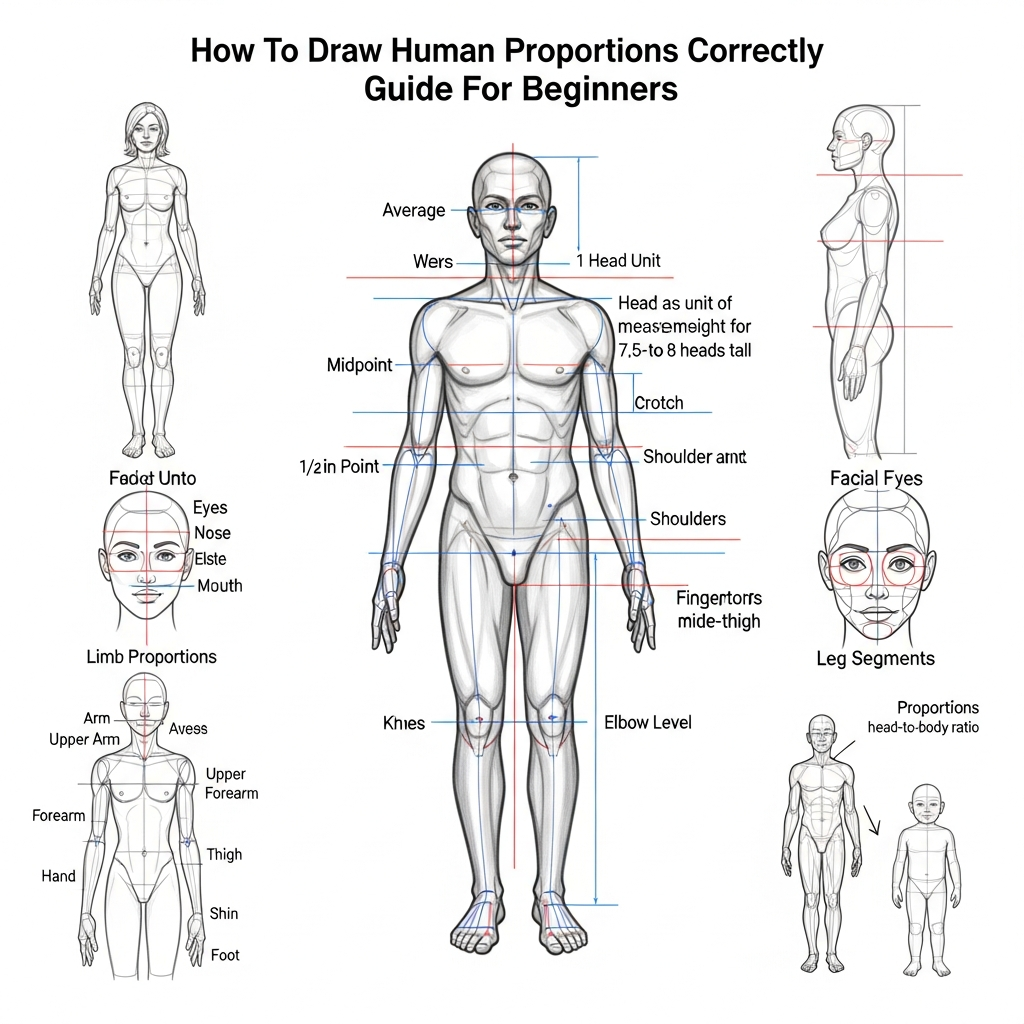
Learning How To Draw Human Proportions Correctly Guide For Beginners is the single most important step in developing your figure drawing skills. This essential knowledge acts as the blueprint for all compelling and realistic character artwork, giving your figures an immediate sense of weight, balance, and believability. Many artists struggle with figures that look stiff or unbalanced, but mastering a simple proportional system provides a reliable, repeatable framework to prevent these common issues. By treating the head as a foundational unit of measurement, you can easily map out the entire body, ensuring the torso, limbs, and joints fall exactly where they should.
The Head: Your Universal Measuring Stick
The most effective and time-tested approach to understanding How To Draw Human Proportions Correctly Guide For Beginners is by using the subject’s own head height as a standard unit of measurement. This method simplifies the complex anatomy into manageable, equal segments.
Why The Head Unit Is So Powerful
For thousands of years, artists have sought an ideal, harmonious relationship between the parts of the human body. The concept of dividing the body into “heads” emerged as the most practical and flexible system for achieving this harmony. It’s a tool for relative measurement, meaning it works whether you are drawing a tiny figure in the corner of a landscape or a massive close-up figure on a canvas.
Imagine your drawing surface as a vertical ruler. Instead of using inches or centimeters, your ruler is marked in “Head Units.” This simple mental switch allows you to bypass complex mathematical ratios and focus purely on placement. For instance, you don’t need to worry if the torso is ‘X’ inches long; you only need to know it should be ‘Y’ head units long. This technique is indispensable for anyone who needs a solid How To Draw Human Proportions Correctly Guide For Beginners.
The power of this system lies in its scalability. A head unit is just a concept, a placeholder for the distance from the chin to the top of the skull. Once you establish the size of the head you wish to draw, every other major landmark on the body is determined, creating a figure that is instantly proportionate.
Establishing Your First Unit
The very first step in applying this guide on How To Draw Human Proportions Correctly Guide For Beginners is drawing the head itself. For beginners, it’s best to start with a simple oval or egg shape to define this first unit.
Key Steps for Unit Establishment:
- Draw the Head: Sketch a simple egg shape for the skull. This is Head Unit 1.
- Measure and Mark: Using the height of that head shape, mark off equal segments straight down the page. If you are aiming for a heroic figure, you might mark eight segments. For an average, naturalistic figure, mark seven and a half segments.
- The Center Line: Always ensure you draw a light vertical line down the center. This centerline will help you check for symmetry and balance, which is crucial for getting the proportions right.
This preliminary work is not about detail; it’s about laying a stable foundation. You are setting up the grid that will ensure your final figure is not only anatomically correct but also naturally balanced. Learning How To Draw Human Proportions Correctly Guide For Beginners is, at its core, learning how to build this internal framework correctly.
The Classical Proportional Systems: 7.5 vs. 8 Heads
When learning How To Draw Human Proportions Correctly Guide For Beginners, you will encounter two primary classical systems: the 7.5-Head system and the 8-Head system. Both are valid, but they serve different artistic goals.
| System | Total Heads | Artistic Purpose | Description |
| :— | :— | :— | :— |
| 7.5 Heads | 7.5 | Naturalism/Realism | Represents the average adult figure, slightly shorter and more grounded. |
| 8 Heads | 8 | Idealism/Heroism | Often used for fashion, comics, or classical sculpture to create a long, graceful, and “heroic” look. |
The 7.5-Head System: A Guide for Natural Figures
The 7.5-Head system is widely considered the standard for life drawing, as it reflects the proportions of the average, non-idealized adult. It offers the most accurate and practical framework for anyone looking for a direct How To Draw Human Proportions Correctly Guide For Beginners.
The Breakdown of the 7.5-Head System (from the top down):
- Head 1: Head and Neck (Bottom edge is at the chin).
- Head 2: The bottom of this unit usually falls at the Nipple Line or the middle of the chest.
- Head 3: The bottom of this unit falls near the Navel or just below the rib cage.
- Head 4: The bottom of this unit falls at the Crotch Line (the division between the legs). This is the halfway point of the entire figure!
- Head 5: The bottom of this unit hits the mid-thigh, usually just above the Knee.
- Head 6: The bottom of this unit falls at the Bottom of the Knee or the top of the calf muscle.
- Head 7: The bottom of this unit falls just above the Ankle.
- Head 7.5: The remaining half-unit marks the Soles of the Feet.
The significance of the 7.5 system is the placement of the halfway point. In a human figure, the exact middle of the body (Head Unit 4) is not the waist, as many beginners assume, but the crotch. This one realization is a game-changer when learning How To Draw Human Proportions Correctly Guide For Beginners. When you consistently misplace the center point, every subsequent part—from the legs to the feet—will be disproportionately short.
The 8-Head System: Heroic and Idealized Figures
For those interested in illustrations, comics, or high fashion, the 8-Head system provides a figure that appears taller, more graceful, and often more muscular. The extra half a head of height is added entirely to the leg and torso length, giving the figure an undeniably heroic stance.
Key Differences in the 8-Head System:
- Torso is Longer: The upper body is often elongated slightly, placing the waist further down from the chest.
- Legs are Longer: The extra length primarily goes into the legs, making them a full four heads long, which is a key element in creating the ‘idealized’ look.
- Visual Impact: Figures drawn using this method look ‘larger than life,’ perfect for dynamic action poses or stylized character design.
Understanding the subtle but powerful difference between these two systems is a hallmark of a skilled How To Draw Human Proportions Correctly Guide For Beginners user. Choose your system based on the mood and context of your art. If you are drawing an everyday person, stick to 7.5. If you are drawing a superhero, embrace the 8-Head system.
Mastering the Landmarks: Segmenting The Torso and Limbs
Once your grid is set, the next critical phase in mastering How To Draw Human Proportions Correctly Guide For Beginners involves mapping the major anatomical landmarks onto your head units. This ensures the complex structure of the human body is correctly simplified.
The Torso: The Core of the Figure
The torso is one of the most error-prone areas for beginners because they often misunderstand its shape. Instead of a simple cylinder, think of the torso as two masses—the Rib Cage (Egg/Sphere) and the Pelvis (Bucket/Bowl)—connected by the spine.
- Shoulders (Unit 2): The width of the shoulders is approximately 2 to 3 Head Units wide. This is where male and female proportions start to diverge, with male shoulders often being closer to 3 heads wide, and female shoulders tending to be 2 to 2.5 heads wide.
- Rib Cage/Nipples (Unit 2): The bottom of the chest area rests near the bottom of Head Unit 2.
- Pelvis/Hips (Unit 4): The bony ridge of the pelvis starts in Head Unit 3 and extends to the dividing line of Head Unit 4 (the crotch). The width of the hips is roughly 1.5 to 2 Head Units wide.
A helpful analogy for the torso is a twisting, three-dimensional beanbag. It’s flexible and capable of bending and twisting. A beginner learning How To Draw Human Proportions Correctly Guide For Beginners often draws a stiff, rectangular torso. However, the rib cage and pelvis can rotate independently, which is what gives life and dynamism to a figure. Block these two shapes in first, focusing on their proportional size before adding any detail.
The Limbs: Arms and Legs
The proper placement and length of the limbs are essential components of any good How To Draw Human Proportions Correctly Guide For Beginners.
Arms and Hands
- Elbow: The elbow falls roughly at the Waistline (which is slightly above the crotch line).
- Forearm: The forearm is approximately the same length as the upper arm.
- Wrist: The wrist typically aligns with the Crotch Line (the bottom of Head Unit 4).
- Fingertips: The fingertips usually fall to about the Mid-Thigh (the middle of Head Unit 5). This is a common point of error where beginners draw arms too short.
- Hands: The length of the hand, from the wrist to the tip of the middle finger, is often equivalent to the length of the face (from the hairline to the chin). Do not fall into the mistake of drawing small, ‘cutesy’ hands; they should be proportionally large.
Legs and Feet
The legs make up the entire lower half of the proportional structure. Since the body’s halfway point is the crotch (Unit 4), the legs must cover the remaining 3.5 to 4 head units.
- Knee Cap: The knee falls at the dividing line of Head Unit 6. It’s crucial to know that the knee joint is relatively small.
- Lower Leg: The shin (tibia and fibula) extends down from the knee.
- Feet: The feet are often one of the most neglected areas when learning How To Draw Human Proportions Correctly Guide For Beginners. A foot is often the length of the forearm (from the elbow to the wrist) and is essential for grounding the figure. They should not be stubby triangles; they are complex structures that provide balance.
Addressing Proportional Differences: Male vs. Female Figures
While the fundamental How To Draw Human Proportions Correctly Guide For Beginners grid remains the same (7.5 or 8 heads), key gender-based proportional differences need to be considered to give your figure a natural, accurate appearance. This is not about stereotypes, but about fundamental skeletal and fat distribution differences.
Male Proportions: The Wedge Shape
The male figure is typically characterized by a wedge or ‘V’ shape, defined by a broader shoulder mass relative to the hips.
- Shoulder-to-Hip Ratio: Male shoulders are generally broader, often reaching 3 head units wide. The hips, however, are narrower, generally around 1.5 head units wide.
- Torso Shape: The chest is often blockier and the waistline is higher and less pronounced than in a female figure.
- Muscle Mass: Male figures tend to have more pronounced muscle mass, especially in the upper body and limbs, which can visually alter the perceived proportions.
Female Proportions: The Hourglass or Pear Shape
The female figure, on average, exhibits a wider pelvis and hips relative to the shoulders, giving a different overall silhouette.
- Shoulder-to-Hip Ratio: Female shoulders are typically narrower (2 to 2.5 head units wide), while the hips are wider, often 2 head units wide, or slightly more. This creates a subtle but important shift in the center of gravity and overall balance.
- Center of Gravity: The widest point of the female form is the pelvis, which sits at the bottom of Head Unit 4. This lower center of gravity is an important detail for realistic figure drawing.
- Limb Shape: Female limbs, while following the same proportional length rules, often have more tapering and subtle curves due to different fat distribution patterns.
A sophisticated How To Draw Human Proportions Correctly Guide For Beginners acknowledges these differences not as hard and fast rules, but as general averages that guide your eye. Always remember that real-life figures are incredibly varied, but these proportional guidelines serve as your starting point before adding individual characteristics.
Essential Proportional Checks and Common Mistakes
Even with a perfect proportional grid, beginners still make a few recurring errors that throw off the drawing. Being aware of these pitfalls is a crucial part of applying your knowledge of How To Draw Human Proportions Correctly Guide For Beginners.
The Five Most Common Proportion Mistakes
Avoid these frequent mistakes to instantly elevate the quality of your figure drawing:
- Starting with Detail and Shrinking: Many new artists start with the head and focus on details like the eyes or hair, then attempt to draw the rest of the body around this finished head. As they move down, they run out of space or subconsciously shrink the proportions, resulting in a tiny, stumpy body attached to a relatively large head. The solution is to block out the full height of the body and all major landmarks (Head Units 1-8/7.5) before drawing any details.
- Too Short Legs (High Crotch): This is perhaps the number one mistake. For an average adult, the crotch must fall exactly at the halfway mark (the bottom of Head Unit 4). When the crotch is drawn too high, the figure appears juvenile or unbalanced.
- Small Hands and Feet: Beginners often feel intimidated by drawing hands and feet and therefore make them too small and insignificant. Remember the rule: the hand is about the length of the face, and the foot is often the length of the forearm. Do not underestimate the proportional size of the extremities.
- Misplaced Joints: Elbows that are too low, knees that are too high, or wrists that fall above the crotch line will instantly break the illusion of a proportionate figure. You must rely on your proportional grid to check and recheck these joint placements.
- Lack of Symmetry and Balance: Without a solid central line and block-out shapes, torsos can appear twisted or leaning awkwardly. A key technique for anyone mastering How To Draw Human Proportions Correctly Guide For Beginners is to use ‘plumb lines’—imaginary vertical lines dropped from key points (shoulders, hips) to check alignment.
A Practical Step-by-Step Guide for Beginners
This section synthesizes the knowledge into a practical, repeatable workflow. Following this process will provide a systematic way of applying the How To Draw Human Proportions Correctly Guide For Beginners.
Step 1: Establish The Total Height and Head Unit
Begin by lightly marking the top of the head and the bottom of the feet. This defines the overall size and prevents the ‘shrinking’ error. Next, draw a single egg or oval for the head. This height is your Head Unit. Use this unit to mark off 7.5 or 8 equal segments down the page.
Step 2: Draw the Line of Action and The Central Axis
Draw a gentle curve from the head to the feet. This is the Line of Action, which captures the figure’s movement or ‘gesture’ and prevents a stiff, straight pose. Overlay this with a light, straight Central Axis line to help maintain symmetry. Focusing on the Line of Action is a contemporary technique that adds life to your figures immediately.
Step 3: Block In the Major Masses (Simplification)
Do not draw the details of the torso. Instead, block it out using simple geometric shapes (sometimes called the “Loomis Method” of simplification). This is a crucial step in any How To Draw Human Proportions Correctly Guide For Beginners.
- Rib Cage: Draw a rounded box or a flattened egg shape spanning from the top of Unit 2 to the top of Unit 3.
- Pelvis: Draw a bowl or a simple shield shape centered around the line of Unit 4.
- Shoulder Mass: Indicate the width of the shoulders (2 to 3 head units wide) across the top of the figure.
Step 4: Map the Landmarks and Joints
Now, use your proportional grid to place the joints correctly:
- Crotch: Must be at the dividing line of Unit 4.
- Knees: Must be near the dividing line of Unit 6.
- Elbows/Wrists: Elbows near the waist, wrists near the crotch line.
- Ankles: Near the dividing line of Unit 7.
Step 5: Connect the Masses (Volume and Form)
With the masses and joints correctly placed, connect them with simple, cylinder-like shapes for the arms and legs. These cylinders should conform to the proportional lengths you’ve established. This is where you transition from a ‘stick figure’ to a figure that has volume. Focus on smooth, natural curves that adhere to the established proportional lengths. The emphasis at this stage, for any serious artist mastering How To Draw Human Proportions Correctly Guide For Beginners, remains on the overall shape, not the muscle definition.
Step 6: Refinement and Detail
Only once you are confident that the entire figure has the correct proportional layout should you move on to adding details, shading, and anatomical features like muscles, clothing, or facial features. This patient, staged approach is the guaranteed path to success in applying the principles of How To Draw Human Proportions Correctly Guide For Beginners.
The Importance of Repetition and Observation
Proportion is not an intellectual puzzle; it’s a visual skill. You don’t just read this How To Draw Human Proportions Correctly Guide For Beginners once and succeed. You must internalize the principles until they become second nature.
The Practice of Measuring in Real Life
Take the principles of the Head Unit system and apply them to the real world. When you see a person, practice measuring their parts mentally. How many ‘heads’ long are their legs? Does their wrist line up with their crotch? This active observation, or ‘life drawing’ exercise, is vital.
Analogies for Understanding Proportion:
- The Carpenter’s Rule: Think of your proportional system as a measuring tape. A carpenter doesn’t guess the length of a plank; they use a tool. You must use the head unit as your tool to measure the human form.
- The Musician’s Scale: A musician practices scales constantly to build muscle memory. Proportional grids and figure block-outs are your scales. Repetition builds the visual memory needed to draw figures correctly, even without a grid.
Continuous, deliberate practice, where you check your work against the established rules in this How To Draw Human Proportions Correctly Guide For Beginners, is the only way to move from simply ‘knowing’ the rules to instinctively ‘drawing’ them correctly. The goal is to reach a point where your hand automatically places the knee at Unit 6 and the wrist at Unit 4 without having to draw the entire grid.
Beyond the Ideal: Proportions for All Ages and Figures
This How To Draw Human Proportions Correctly Guide For Beginners focuses on the average adult. However, for a complete understanding, you must know that proportions change drastically with age.
- Infants: An infant is roughly 4 to 5 heads tall. Their head is proportionally enormous compared to their body. The halfway point of a baby is the navel, not the crotch.
- Children (Age 6-8): They grow to about 6 heads tall. The legs start to lengthen, and the proportions begin to approach the adult form.
- Teens: They will typically be 7 heads tall, with the last half-head of height being added during the final growth spurt into adulthood (7.5 heads).
Understanding these shifts is crucial for character design, ensuring that a child figure doesn’t simply look like a small adult but has its own unique, large-headed, short-limbed proportional structure. Every artist needs this deeper knowledge to fully apply a comprehensive How To Draw Human Proportions Correctly Guide For Beginners.
Integrating Gesture Drawing with Proportions
While proportion deals with ‘how big’ a part is, gesture drawing deals with ‘how’ the whole body is moving. To create dynamic, non-stiff figures, you must combine the structural rigidity of proportions with the fluid energy of gesture. This is a progressive step for anyone who has mastered the basics of How To Draw Human Proportions Correctly Guide For Beginners.
The Power of the Expressive Line
Gesture drawing requires you to capture the entire pose in just a few lines and seconds. This forces you to focus on the essential flow and curve of the body, rather than getting bogged down in proportional measurements right away.
The Workflow Integration:
- Gesture First (1-2 minutes): Start by capturing the line of action and the general flow of the limbs. This is all about energy and movement.
- Proportion Check: Immediately overlay this fluid gesture with the proportional masses (Rib Cage, Pelvis, Head Unit) to ensure the structure is correct. This is where your foundational knowledge from this How To Draw Human Proportions Correctly Guide For Beginners comes in. If the gesture feels right, but the head unit forces the knee to be too high, you adjust the entire gesture to fit the proper length.
- Volume and Form: Proceed with the cylinder-like connections and refinements.
By combining the life and energy of gesture with the accuracy of a proportional system, you are no longer drawing stiff, standing figures, but dynamic figures that feel alive. This blended approach is the signature of a skilled How To Draw Human Proportions Correctly Guide For Beginners user transitioning into intermediate figure drawing.
Final Summary and Commitment
Mastering How To Draw Human Proportions Correctly Guide For Beginners is not a destination but a journey of continuous practice and measurement. The head unit system provides the scaffolding you need to build any figure with confidence, preventing the common mistakes of short limbs and misplaced joints. By consistently applying the 7.5 or 8-head grid, blocking out the figure with simple shapes, and verifying the key anatomical landmarks, you will establish a rock-solid foundation for all your figure work. Commit to drawing figures, not details, and your skills will improve dramatically. Use this How To Draw Human Proportions Correctly Guide For Beginners as your permanent reference, and never stop observing the human form around you. The key to success is patience and repetition, ensuring every new drawing is an exercise in correct measurement and natural balance.
—
FAQ (Pertanyaan yang Sering Diajukan)
# Kenapa sebagian panduan bilang 7 kepala, 7.5 kepala, dan 8 kepala? Mana yang benar untuk menggambar proporsi manusia? (Why do some guides say 7 heads, 7.5 heads, and 8 heads? Which one is correct for drawing human proportions?)
Untuk panduan How To Draw Human Proportions Correctly Guide For Beginners, 7.5 kepala dianggap sebagai standar paling akurat untuk menggambar sosok dewasa rata-rata yang natural dan realistis. Sistem 8 kepala digunakan untuk sosok yang diidealkan, heroik, atau untuk fashion, memberikan kesan lebih tinggi dan ramping. Sistem 7 kepala sering kali merepresentasikan sosok yang lebih pendek atau berusia lanjut. Semua sistem benar, tetapi Anda harus memilih berdasarkan hasil akhir yang Anda inginkan (natural vs. ideal).
# Apa kesalahan terbesar yang sering dilakukan pemula saat mencoba menggambar proporsi? (What is the biggest mistake beginners often make when trying to draw proportions?)
Kesalahan terbesar, yang seringkali menghancurkan seluruh proporsi, adalah menempatkan garis selangkangan (crotch line) terlalu tinggi. Garis selangkangan harus berada tepat di tengah-tengah sosok (di batas unit kepala ke-4) untuk dewasa. Kesalahan umum lainnya yang sering ditemui dalam panduan How To Draw Human Proportions Correctly Guide For Beginners adalah menggambar tangan dan kaki terlalu kecil, atau memulai detail wajah sebelum keseluruhan kerangka tubuh selesai diblokir.
# Apakah proporsi tubuh wanita dan pria berbeda secara signifikan? (Do male and female body proportions differ significantly?)
Ya, ada perbedaan proporsional yang signifikan yang perlu diperhatikan dalam panduan How To Draw Human Proportions Correctly Guide For Beginners. Pria umumnya memiliki rasio bahu yang lebih lebar (seringkali 3 kepala lebar) dibandingkan dengan pinggul yang lebih sempit, menghasilkan bentuk ‘V’ atau baji. Wanita umumnya memiliki bahu yang sedikit lebih sempit (2 hingga 2.5 kepala lebar) dengan pinggul yang lebih lebar (seringkali 2 kepala lebar), menghasilkan pusat gravitasi yang sedikit lebih rendah dan bentuk ‘jam pasir’ atau buah pir.