Welcome to the captivating world of self-expression where you are both the artist and the muse. Self Portrait Photography With Light is more than just taking a picture of yourself; it’s a deep dive into using the most fundamental element of the craft—illumination—to convey mood, tell a story, and reveal a carefully curated version of yourself. Mastering this specialized genre requires patience and an intimate understanding of how shadows and highlights sculpt the human form.

The foundation of compelling Self Portrait Photography With Light is a strategic use of illumination to define contours and establish the emotional tone of the final image. A soft, diffused light source will create a dreamy, gentle look, while a harsh, direct light will introduce drama and deep shadows. Successfully executing a piece of Self Portrait Photography With Light hinges on the photographer’s ability to precisely control the light’s:
- Quality: Is the light hard (creating sharp shadows) or soft (creating gradual transitions)?
- Direction: Where is the light coming from in relation to the subject’s face?
- Color: Is the light warm, cool, or tinted with a specific hue?
These elements work together to transform a simple snapshot into a profound work of art.
The Fundamental Role of Light in Self Portrait Photography With Light
In every genre of image creation, illumination acts as the primary sculpting tool, and this is magnified when discussing Self Portrait Photography With Light. When you step in front of the lens, you lose the ability to continuously observe how the illumination falls on your face, making pre-visualization and technical knowledge absolutely critical. It is a dialogue between the light source and the self, a silent conversation where the resulting image is the final statement.
The brilliance of Self Portrait Photography With Light lies in its challenge: you must be the director, the lighting technician, and the model all at once. If the light source is poorly positioned, it can completely flatten your features, making the image look dull and uninteresting. Conversely, a masterful placement can emphasize bone structure, add depth to the eyes, and convey a specific, powerful emotion that immediately connects with the viewer. This is why a meticulous approach to the lighting setup is the single most important step in crafting an effective Self Portrait Photography With Light image.
To truly excel at Self Portrait Photography With Light, one must move beyond merely having ‘enough’ light and begin thinking about the kind of light. This distinction separates beginners from seasoned artists. It is not about simply avoiding darkness; it is about painting with light and shadow to create an illusion of three-dimensional space on a two-dimensional plane. The way a shadow falls can imply secrecy, vulnerability, or defiance, making light management the core narrative component of any successful Self Portrait Photography With Light project.
Understanding the Quality of Light (Hard vs. Soft)
The “quality” of light refers to how crisp or diffused the shadows are. This is controlled by the size of the light source relative to the subject. This is perhaps the most immediate variable that impacts the mood of any endeavor in Self Portrait Photography With Light.
A Soft Light Source is typically large and/or close to the subject. Think of a massive studio softbox, a large window on an overcast day, or the popular ring light. Because the light wraps around the subject from many angles, it produces soft, gradual shadows that hide imperfections and create a very flattering, gentle appearance. The transition from light to dark is smooth and delicate. This quality is often preferred for beauty shots or serene examples of Self Portrait Photography With Light where the aim is to create a sense of calm and accessibility.
Conversely, Hard Light comes from a small, often distant source, such as the midday sun, a bare lightbulb, or an uncovered flash head. This kind of illumination creates sharp, distinct shadows with a clearly defined edge. It is dramatic, stark, and often used to emphasize texture, shape, or to create a high-contrast, edgy aesthetic. Many creative examples of Self Portrait Photography With Light employ hard light to give the image a sense of grit, intensity, or high-fashion drama. Learning to harness both qualities is essential for a versatile Self Portrait Photography With Light portfolio.
Mastering the Direction of Light (Front, Side, Back)
Once the quality is determined, the direction of the light becomes the sculptor. The same soft or hard light source, when moved just a few degrees, can completely change the entire feeling of your Self Portrait Photography With Light. This control over direction is what allows you to manipulate features and mood without relying on extensive post-processing.
Frontal Lighting is the simplest and often the least dramatic. When the light source is directly in front of you (like the camera’s axis), it illuminates the entire face evenly. While it’s great for removing shadows and showing detail, it tends to flatten the face, removing the sense of depth needed for compelling Self Portrait Photography With Light. This is the look you often get with a standard phone camera flash or a ring light positioned directly in front of you.
Side Lighting (Directional Light) involves placing the light source to the left or right of you, typically at a 45-to-90-degree angle. This is the cornerstone of classical Self Portrait Photography With Light. It creates contrast, throws one side of the face into shadow, and immediately gives the image a three-dimensional quality. Techniques like split lighting (90-degree angle, dividing the face into half light, half shadow) or Rembrandt lighting (a triangle of light on the shadowed cheek) are achieved using carefully managed side light.
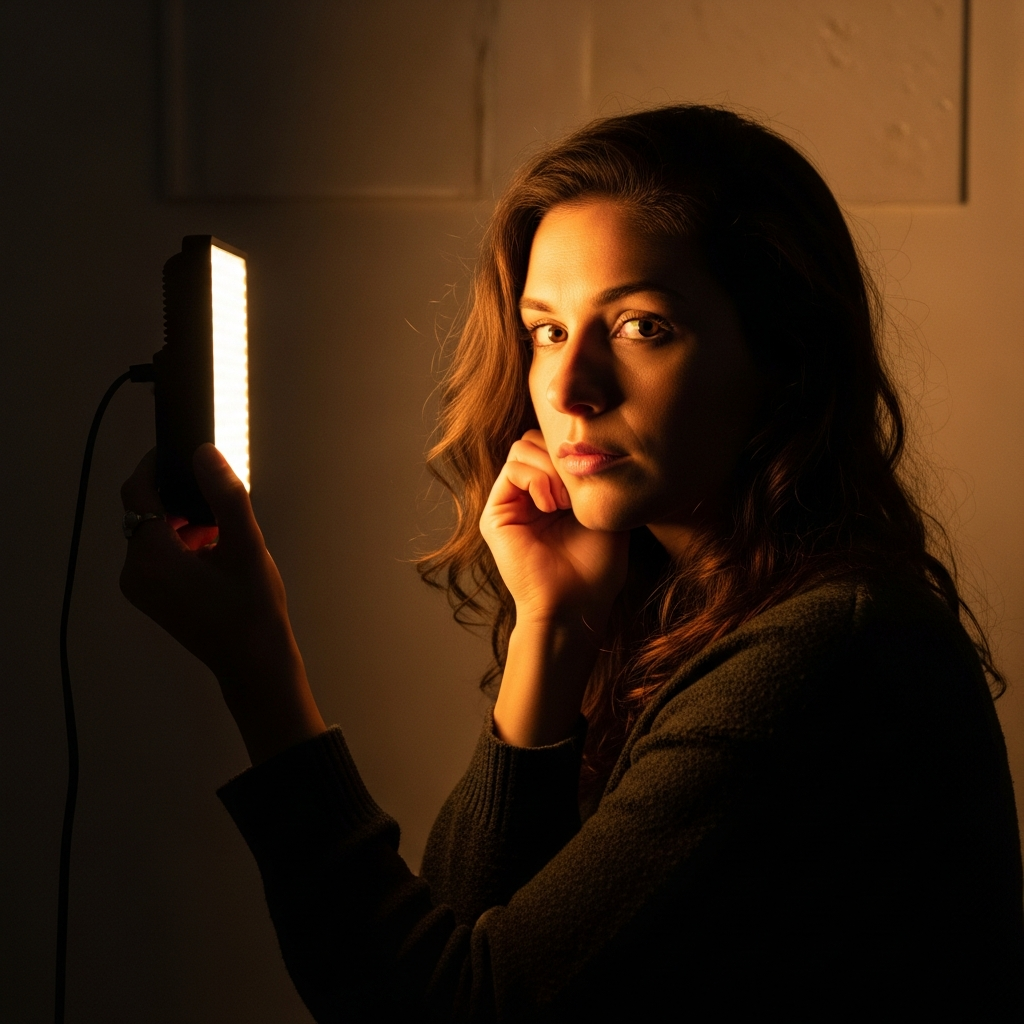
Back Lighting places the light source behind the subject. This creates a powerful, ethereal rim or outline of light, separating the subject from the background and adding incredible depth. The face itself is often in shadow (silhouette), which can add a layer of mystery and intrigue to your Self Portrait Photography With Light. A skilled approach here will use a second, much weaker light (or a reflector) in front of the face to add just a touch of detail, preventing the face from becoming a featureless black shape.
Essential Lighting Gear for Self Portrait Photography With Light
You do not need an entire studio to create professional-level Self Portrait Photography With Light. The beauty of this genre is that incredible results can be achieved with surprisingly accessible equipment. The right tools, however, certainly make the process more controlled, repeatable, and versatile.
The selection of gear directly impacts the creative possibilities available for your Self Portrait Photography With Light. While expensive professional strobes offer unparalleled power and speed, a budget-conscious photographer can achieve similar results in a small home setting using continuous LED lights. The key is understanding the purpose of each piece of equipment and how it contributes to the final illumination of your Self Portrait Photography With Light.
The technical advancement in continuous light sources, such as LED panels, has made high-quality lighting much more affordable and easier to use, which is a major benefit for Self Portrait Photography With Light. Unlike flash, LED lighting allows you to see exactly how the light falls and what the final shadow pattern will look like before you even press the shutter, making the process of self-modeling significantly simpler. This ‘what you see is what you get’ advantage saves enormous amounts of time and frustration when you are working alone on your Self Portrait Photography With Light.
Natural Light: The Most Accessible Tool
The sun is the original and most powerful light source, and it is completely free. Learning to harness natural light is the first step toward mastering Self Portrait Photography With Light. This involves understanding the best times of day and the best locations relative to the sun.
The “Golden Hour,” shortly after sunrise or before sunset, provides incredibly soft, warm, and flattering light. It has a beautiful, rich quality that immediately elevates any attempt at Self Portrait Photography With Light. Another excellent source is a large window. A window acts as a gigantic natural softbox, providing exceptionally soft, directional light that is perfect for gentle, emotional Self Portrait Photography With Light indoors.
However, controlling natural light is the challenge. If you are shooting mid-day, the light will be hard and harsh, creating deep, unflattering shadows. In these cases, you must use light modifiers. A simple sheer white curtain can turn harsh midday sun into lovely soft light. You can also use a large white piece of foam board or a professional reflector to Bounce the natural light back onto the shadowed side of your face, filling in the dark areas and dramatically improving the overall appearance of your Self Portrait Photography With Light.
Studio and Continuous Lights (LED, Ring Lights)
For those who want total control over the light’s position, intensity, and color—regardless of the time of day—studio or continuous lights are indispensable. Modern Self Portrait Photography With Light heavily relies on these tools for consistency.
LED Panels are highly popular because they are cool to the touch, energy-efficient, and often offer adjustable color temperature (from cool blue to warm orange) and dimming capabilities. Their ‘what you see is what you get’ nature makes setting up complex lighting for Self Portrait Photography With Light much more intuitive than using flash. You can immediately see the effect of moving the light 10 inches or changing its power level.
The Ring Light has gained enormous popularity, especially for close-up Self Portrait Photography With Light. It creates a distinctive, flattering, and almost shadowless illumination by shining light directly onto the face from the camera’s perspective. Its unique feature is the circular catchlight it creates in the subject’s eyes, which is immediately recognizable. While excellent for beauty and direct address portraits, remember that the flatness of the light can sometimes limit the dramatic potential of your Self Portrait Photography With Light.
Speedlights and Strobe Systems
For the ultimate power and versatility in Self Portrait Photography With Light, flash-based systems—speedlights (hotshoe flash) and studio strobes—are the professional standard. They offer significantly more power than continuous lights, allowing the photographer to use smaller apertures (for greater depth of field) and overpower ambient light (for dramatic effects).
The key to using flash for Self Portrait Photography With Light is to always get the flash Off-Camera. A flash on the camera’s hotshoe creates direct, harsh frontal light that almost always looks amateurish. By getting the speedlight onto a stand and triggering it wirelessly (via a radio trigger), you regain control over the light’s direction and quality. This ability to place a strong burst of light exactly where you need it fundamentally changes what is possible in Self Portrait Photography With Light.
When working with speedlights for Self Portrait Photography With Light, you will always need a modifier. The small size of the flash head inherently creates hard light. The solution is to use:
- Umbrellas: Cheap, portable, and great for creating broad, soft light.
- Softboxes: More directional than umbrellas, offering a very controlled, professional quality of light for your Self Portrait Photography With Light.
- Beauty Dishes: Provide a unique, soft, yet slightly punchy light that is excellent for fashion-forward Self Portrait Photography With Light.
Advanced Techniques for Self Portrait Photography With Light
Once you are comfortable with your gear and the basics of light quality and direction, the next step in your creative journey is to employ classic, multi-faceted lighting setups. This is where the true artistry of Self Portrait Photography With Light begins to shine through, moving from simple illumination to intentional, emotive lighting design. These setups are the same foundations used by portrait masters for decades, and they are fully adaptable to a solo practice of Self Portrait Photography With Light.
The application of these advanced lighting patterns is less about the equipment and more about geometrical precision. A light source placed too high can result in distracting ‘raccoon eyes’; too low, and you create an unnatural, spooky effect. This focus on precision is crucial for nuanced Self Portrait Photography With Light.
It takes practice to achieve these setups when you are simultaneously the subject and the technician. Many photographers use a stand-in (a mannequin, a stuffed animal, or a simple chair) to precisely measure and adjust the illumination before they step into the frame. This technique is indispensable for achieving repeatable, high-quality results in Self Portrait Photography With Light. Once the stand-in is perfectly illuminated, you step into their place, focus, and capture the carefully constructed scene.
Single-Light Setup: The Classic Look
The beauty of a single-light setup is its simplicity and dramatic potential. A well-placed single light is far superior to multiple poorly placed lights. Many of the most iconic pieces of Self Portrait Photography With Light rely on this minimal approach, focusing the viewer’s attention solely on the contrast between light and shadow.
Rembrandt Lighting is achieved with a single directional light source positioned at about 45 degrees to the subject and slightly above eye level. The defining characteristic is the small, inverted triangle of light that appears on the cheek opposite the light source. This setup adds depth, dimension, and a sense of gravity, making it a powerful choice for serious, evocative Self Portrait Photography With Light. It is a testament to the power of deliberate shadow.
Split Lighting is even more stark, created by positioning the light source 90 degrees to the side of the subject. This setup literally splits the face into two halves: one brightly lit and one entirely in shadow. It is incredibly dramatic and often used to convey mystery, inner conflict, or a high-contrast cinematic feel in Self Portrait Photography With Light. This technique requires a very dark room or studio environment to ensure the shadow side remains truly dark and free from light spill.
Two-Light System: Adding Dimension and Separation
While a single light creates drama, a two-light system allows for greater control, providing the ability to shape the shadows, separate the subject from the background, and add complex layering to your Self Portrait Photography With Light. The interaction between the Key Light and the Fill Light is what makes this setup so versatile.
The Key Light is the primary source of illumination. It is the brightest light and determines the overall look and mood—it might be set up in a Rembrandt pattern, for instance. The Fill Light, which is typically much weaker (often 1/2 or 1/4 the power of the key light), is used to soften or ‘fill in’ the shadows created by the key light. In sophisticated Self Portrait Photography With Light, the fill light prevents the shadows from becoming too deep or distracting.

The fill light does not even need to be another light source; it can be a simple Reflector (a white or silver card). The reflector bounces the light from the key source back onto the shadow side. This is often the easiest and most affordable two-light setup for Self Portrait Photography With Light. A second key use for a second light is as a Hair Light or Rim Light, positioned behind the subject to create that bright outline and make the subject visually pop against a dark background, adding a final, professional polish to the Self Portrait Photography With Light.
High Key and Low Key Portraits: Creating a Mood
These two techniques represent extremes on the tonal scale and are foundational concepts for expressive Self Portrait Photography With Light. They are not merely brightness levels; they are aesthetic choices designed to communicate a specific feeling.
High Key Self Portrait Photography With Light is characterized by an overall bright, airy, and low-contrast look. The majority of the image is made up of mid-tones and highlights, with very few true blacks or dark shadows. This setup often requires multiple light sources to evenly illuminate both the subject and the background. The mood is typically optimistic, clean, innocent, or joyful. It is excellent for a serene, ethereal, or minimalist approach to Self Portrait Photography With Light. The goal is a light-infused image where the illumination is deliberately overdone to wash out deep shadows.
Low Key Self Portrait Photography With Light is the opposite: it is moody, dramatic, and dominated by deep shadows and dark tones. Only a small, critical area—such as the eyes or a portion of the face—is lit, usually with a hard, focused light source. The background is typically rendered completely black. This style is powerful for conveying intensity, melancholy, secrecy, or dramatic tension. In low-key Self Portrait Photography With Light, the shadows become as important as the light itself, defining the subject through the negative space and emphasizing the carefully controlled highlights.
Creative Trends in Self Portrait Photography With Light
The beauty of Self Portrait Photography With Light is its constantly evolving nature. While the foundational principles of illumination remain, new tools and cultural influences drive fresh, exciting trends. Modern practitioners often push the boundaries of color and unconventional light sources to create visually striking and unique compositions. Being aware of these trends allows you to inject a contemporary feel into your own practice of Self Portrait Photography With Light.
One of the most significant shifts in modern Self Portrait Photography With Light is the move away from ‘natural’ or ‘realistic’ lighting towards highly stylized and artificial color palettes. This reflects a broader trend in visual media where dramatic, manufactured light serves as a direct extension of the subject’s narrative or emotional state. The availability of inexpensive, high-powered colored LED lights has democratized this kind of visual experimentation in Self Portrait Photography With Light.
When incorporating trends, the fundamental goal remains the same: use light to tell a story. Whether you are using a subtle color gel or a flashing projector, the light should serve a purpose beyond mere decoration. It should align with the character or narrative you are trying to capture in your Self Portrait Photography With Light.
Neon and Color Gels: Dramatic and Thematic Lighting
The trend of Neon-Themed Portraits has been highly popular. This style uses vibrant, saturated colors to create a striking, sometimes retro-futuristic aesthetic. This is a deliberate, highly stylized form of Self Portrait Photography With Light.
This look is easily achieved using Color Gels (thin, translucent filters) placed over your light sources (speedlights, strobes, or LEDs). By using two different color gels—perhaps blue from one side and magenta from the other—you can create an immediate, eye-catching visual separation. This is known as Bi-Color Lighting or complementary lighting, and it is a defining characteristic of contemporary Self Portrait Photography With Light.
For example, a strong teal light used as a rim light combined with a soft orange key light creates a beautiful, cinematic contrast, often referred to as the “Orange and Teal” look. Experimenting with different color combinations can fundamentally change the emotion of your Self Portrait Photography With Light. The color itself becomes a major character in the story you are telling through your Self Portrait Photography With Light.
Projection Mapping and Unique Light Sources
Moving beyond traditional modifiers, many artists are now incorporating everyday items and technology to create truly unique lighting effects for their Self Portrait Photography With Light. This approach is about seeking out sources of illumination that are not traditionally photographic equipment.
One fascinating technique involves using a simple Projector (either a slide projector or a digital one) to project patterns, textures, or even entire scenes onto the subject and background. This technique, often called Projection Mapping, allows you to instantly change the environment and context of your Self Portrait Photography With Light without physically moving. You can project the image of a forest, a busy city street, or a graphic pattern, making the light itself the central artistic element of your Self Portrait Photography With Light.
Other unique sources include fairy lights (string lights), phone screens, or even car headlights, which can all be used as unique accent or rim lights. The key is to treat every light source, no matter how small, as a deliberate element that contributes to the overall composition of your Self Portrait Photography With Light.
Shadows as Storytellers: Using Negative Space
While we often focus on the light, a powerful trend in Self Portrait Photography With Light is the conscious use of Negative Space and deep shadows. The shadow is not merely the absence of light; it is a creative tool that adds mystery, depth, and compositional balance.
This technique is often achieved through a method called Gobo (Goes Before Optics) or Cucoloris. A Gobo is essentially a stencil or cutout placed between the light source and the subject. This creates distinct, hard shadows in a specific shape, such as window blinds, leaves, or geometric patterns. These shadow patterns can be used to dramatically obscure parts of the face, hinting at a hidden narrative or emphasizing a sense of confinement or thought in your Self Portrait Photography With Light.
The power of shadows lies in what they do not reveal. By strategically shrouding most of the face in darkness, you force the viewer’s eye to focus intensely on the one small area of light, such as a single eye. This is a sophisticated way to manage viewer engagement and add a layer of complex visual information to your Self Portrait Photography With Light. A master of Self Portrait Photography With Light understands that their most important tool is the shadow, not the light itself.
Practical Workflow and Camera Settings for Self Portrait Photography With Light
The logistical challenge of Self Portrait Photography With Light—being behind the camera and in front of it simultaneously—requires a methodical and efficient workflow. Excellent lighting means nothing if the image is out of focus or improperly exposed. A solid, repeatable process is what allows the photographer to focus on the performance and expression rather than the technical details of the camera operation.
The process often involves a dance between the light meter, the camera settings, and the final look. Because you are the subject, you must lock in your camera settings completely before you step into the frame. Once the lights are set, the exposure should ideally be set to Manual Mode (M) to prevent the camera from changing the brightness when you move. This consistency is paramount for high-quality Self Portrait Photography With Light.
Remember the importance of shooting in a RAW format. RAW files contain significantly more data than JPEGs, particularly in the highlights and shadows. This extra information is invaluable when working with high-contrast lighting setups, as it gives you the maximum flexibility to recover details in post-processing that might have been lost in a complex Self Portrait Photography With Light scenario.
Achieving Focus and Exposure (Tripod, Timer, Remote)
The trio of a tripod, a remote shutter, and a focus method are the non-negotiable tools for successful Self Portrait Photography With Light. Without them, consistent results are nearly impossible to achieve.
- Tripod: A stable base is absolutely essential. Any movement of the camera, even slight, will ruin the focus and composition you have so carefully arranged for your Self Portrait Photography With Light. The tripod locks down the entire setup.
- Focus: Since you cannot be behind the camera to focus, you must pre-focus. The most common and reliable method is to place a stand-in object (a bottle, a chair, or a teddy bear) where you plan to stand. Manually Focus on that object’s ‘eye,’ then take the camera off Autofocus (AF) and switch it to Manual Focus (MF). When you step in and replace the object, you know the focus is correct for your Self Portrait Photography With Light.
- Shutter Release: A Wireless Remote Control is the most convenient tool. It allows you to trigger the camera without touching it, preventing camera shake and allowing you to shoot multiple frames quickly. If you don’t have a remote, a 10-Second Timer is the reliable fallback, though it requires constant rushing back and forth, making the process of creating Self Portrait Photography With Light more tedious.
Post-Processing Considerations for Self Portrait Photography With Light
Post-processing is the final step where the vision of your Self Portrait Photography With Light is fully realized. Even the most perfect lighting setup often requires a final polish to truly make the image pop. The adjustments made here are crucial for establishing the final tone and atmosphere.
The most critical adjustments in post-processing for Self Portrait Photography With Light are related to Tonal Contrast. You can use the adjustments (specifically Shadows, Highlights, Blacks, and Whites) to subtly enhance the three-dimensional effect created by your carefully positioned light. For instance, you might slightly darken the blacks to deepen the shadows on the unlit side of your face, further enhancing the drama of the Self Portrait Photography With Light.
Furthermore, color grading—adjusting the color hues and saturation—plays a huge role, especially in images using color gels. You can fine-tune the blue of a rim light or the warmth of a key light to match your exact creative vision for your Self Portrait Photography With Light. Even in black and white images, the application of subtle color tints (such as sepia or selenium tones) can add a layer of artistic depth to the final piece of Self Portrait Photography With Light.
The mastery of Self Portrait Photography With Light is a journey, not a destination. It is a continuous loop of learning, setting up, shooting, and refining. By understanding that light is your most important expressive medium, you unlock limitless creative potential. Every decision—from the type of light modifier you use to the placement of your key light—is a deliberate step toward crafting a personal and visually powerful statement through Self Portrait Photography With Light.
*
FAQ (Frequently Asked Questions)
Q: What is the most effective and affordable light source for a beginner in Self Portrait Photography With Light?
A: The most effective and affordable starting point is a large window during the day. It provides a massive, soft light source, which is naturally flattering. To maximize this, place yourself close to the window at a 45-degree angle to create soft, directional lighting. For artificial light, a simple, large LED ring light or a single, small continuous LED panel is the best investment for excellent Self Portrait Photography With Light, as it is easy to see and control before shooting.
Q: How can I create a dramatic, moody self-portrait using only one light?
A: To achieve a dramatic, moody image, you should employ a Low Key technique using the single light as a Key Light with no fill. Place the light close to your face, high up, and at a 90-degree angle (Split Lighting) or 45-degree angle (Rembrandt Lighting). Ensure your shooting location is very dark, preventing light from bouncing back. Use a hard light source (a bare speedlight or a small, focused LED) to create deep, defined shadows, which is the key to compelling Self Portrait Photography With Light in a low-key style.
Q: What is the “Orange and Teal” effect, and how do I apply it to my Self Portrait Photography With Light?
A: The Orange and Teal effect is a popular cinematic color grading technique that emphasizes the complementary contrast between the warm tones (orange/skin) and cool tones (teal/blue). To apply this in your Self Portrait Photography With Light, use a warm-colored light source (an orange gel on an LED or flash) as your Key Light on your face, and place a separate, cool-colored light source (a blue or teal gel) behind you as a Hair/Rim Light. This two-color contrast creates immediate, dynamic visual separation in your Self Portrait Photography With Light.
Q: Why do my self-portraits look flat, even when I use a softbox?
A: Your self-portraits likely look flat because the light, even though soft, is positioned too close to the camera, resulting in Frontal Lighting. Frontal light minimizes shadows, which are essential for defining three-dimensional form. To fix this, move the softbox to the side—ideally at a 45-degree angle to your face. This will create dimension by introducing shadows under your chin and on the far side of your face, instantly adding depth and visual interest to your Self Portrait Photography With Light.
Q: What is the most important camera setting when trying to achieve a High Key look in Self Portrait Photography With Light?
A: The most important consideration is your Aperture (f-stop), followed by your Shutter Speed. For a High Key image, you want a bright, shallow depth of field, so set your aperture to a wide value (e.g., f/2.8 or f/4). Then, use a slow-enough shutter speed (if using continuous lights) or a fast shutter speed (if using flash) to correctly expose the brightly lit scene. The overall goal for High Key Self Portrait Photography With Light is to overexpose the background and ensure the brightest areas of your face are very close to pure white.